Related Plugins and Tags

QGIS Planet

A First Glimpse at the QGIS Processing Framework

The aim of QGIS Processing Framework developed by Polymeris is to provide a generic framework for accessing existing geo-processing functionality of e.g. SAGA, GRASS, Orfeo Toolbox, etc. This should enable users to script their geo-processing work in python console and allow development of a tool to graphically build workflows using VisTrails an “open-source scientific workflow and provenance management system”.

For a first impression, Polymeris has published some screenshots of QGIS with SAGA modules loaded: [1],[2]

This project is big and if it turns out well, QGIS will profit enormously from it. Both scriptable geoprocessing functionality and a graphic workflow builder can improve user experience a lot if they are implemented well. You can follow further development on the project homepage on GitHub.


Converting MXD to QGIS Project File

On Wednesday, Allan Maungu – geoscripting.blogspot.com announced MXD2QGS, a converter that exports layers from an Arcmap 10 document into a Quantum GIS project file. The tool is built as an ArcToolbox and can be downloaded from the blog.

I’d be very interested to hear whether this tool works for you.


Fast SQL Layer for QGIS

For everyone working with spatial databases in QGIS there comes a time when “Add PostGIS/SpatiaLite Layer” and “RT Sql Layer” start to be annoying. You always have to retype or copy-paste your SQL queries into the user interface if you need to change the tiniest thing in the layer’s definition.

This is where “Fast SQL Layer” can be a real time saver. Fast SQL Layer is a new plugin for QGIS by Pablo T. Carreira. It basically adds an SQL console for loading layers from PostGIS/SpatiaLite into QGIS. And it even comes with syntax highlighting!

Installation

Fast SQL Layer comes with one dependency: Pygments, which is used for syntax highlighting.

On Ubuntu, all you have to do is install it with apt-get:

sudo apt-get install python-pygments

For Windows with OSGeo4W, @Mike_Toews posted this on gis.stackexchange:

I downloaded and extracted Pygments-1.4.tar.gz, then in an OSGeo4W shell within the Pygments-1.4 directory, type python setup.py build then python setup.py install

Usage

When you activate the plugin in plugin manager, a dock widget will appear which contains the console and some fields for specifying the database connection that should be used. Then, you can simply write your SQL query and load the results with one click.

Fast SQL plugin

In this example, I renamed “gid” to “id”, but you can actually edit the values in the drop down boxes to adjust the column names for id and geometry:

A second layer loaded using Fast SQL plugin

It certainly needs some polishing on the user interface side but I really like it.


WMS & WFS for Vienna Open Data

The city of Vienna has started their open data initiative. They’re offering data on a variety of topics, including: infrastructure, population, education, environment and traffic.

For use in GIS, they serve the data through WMS and WFS:

Both WMS and WFS work well with the developer version of QGIS.

Looking forward to new datasets. Announcements should be published via RSS feed.


The things I would like to see in QGIS. What are yours?

So if you have not already guessed from my increasing post about QGIS. I really like it as a GIS system but with all systems it comes with its shortcomings. (Nothing that can’t be fixed of course)

Here is my little wishlist of a few things I would love to see in QGIS.

Multipule map canvases. (ArcGIS, MapInfo)

I was thinking more like ArcGIS data frames vs something like what MapInfo has (multiple windows).  I think the multi window system can add confusion for people new to GIS, plus I hate having to window manage.

SQL like interface. (MapInfo)

This is something that I really like from MapInfo.  It adds a lot of power to the application being able to spatially join two tables that don’t share a command link column and get back a new layer.  Adding this to QGIS could be a pretty big task, although a very rewarding one IMO.  

Now there is some credit in saying “well you can just import your data into PostGIS and use that”, however that is not always a option and I think having a layer above that can query any open layer would be very very powerful.

These are just two of the main things that I would like to see, I’ll update the post if I can think of anymore.

Of course being open source I can write the features myself but C++ is still a bit over my head at the moment.

I would love to see what other peoples thoughts, or mini wishlists, are.  So if you are willing, drop a comment and let me know.


Filed under: MapInfo, Open Source, qgis Tagged: Feature Requests, gis, mapinfo, Open Source, OSS, qgis, Quantum GIS

Catchment Areas with pgRouting driving_distance()

In a previous post, I’ve described how to create catchment areas with pgRouting shortest_path() function. The solution described there calculates costs from the starting node (aka vertex) to all other nodes in the network. Depending on the network size, this can take a long time. Especially, if you are only interested in relatively small catchment areas (e.g. 50 km around a node in a network covering 10,000 km) there is a lot of unnecessary calculation going on. This is where you might want to use driving_distance() instead.

Driving_distance() offers a parameter for maximum distance/cost and will stop calculations when the costs exceed this limit. But let’s start at the beginning: installing the necessary functions.

Installation

If you have followed my guide to installing pgRouting, you already have some routing functions installed – but not driving_distance(). Weirdly, the necessary SQL scripts are not shipped with the .zip file available on pgRouting’s download page. You need:

routing_dd.sql
routing_dd_wrappers.sql

Both are available through the project repository at Github. Get them and execute them in your pgRouting-enabled database. Now, you should be ready.

Calculating driving distances

To calculate driving distances, we need a query very similar to shortest_path():

CREATE OR REPLACE FUNCTION driving_distance(
sql text,
source_id integer,
distance float8,
directed boolean,
has_reverse_cost boolean)
RETURNS SETOF path_result

The only new value is “distance”. That’s the maximum distance/cost you want to be contained in the result set. “distance” has to be specified in the same units as the cost attribute (which is specified in the “sql” text parameter).

Note: In my opinion, the name “(driving) distance” is misleading. While you can use distance as a cost attribute, you’re not limited to distances. You can use any cost attribute you like, e.g. travel time, fuel consumption, co2 emissions, …

The actual query for a catchment area of 100 km around node # 2000 looks like this:

SELECT * FROM driving_distance('
      SELECT gid AS id,
          start_id::int4 AS source,
          end_id::int4 AS target,
          shape_leng::float8 AS cost
      FROM network',
      2000,
      100000,
      false,
      false)

Interpreting the result

These are the first lines of the result set:

vertex_id;edge_id;cost
294;7262;97400.433506144
297;7236;98012.620979231
335;1095;96849.456306244
347;7263;93617.693852324
364;7098;93573.849081386
366;2551;92702.443434779
378;7263;91994.328368081

The cost attribute contains the total cost of travel from the starting node to the vertex_id node.
We will only be using vertex_id and cost. The use of edge_id is a mystery to me.

Visualizing the result

The easiest way to visualize driving_distance() results is using RT Sql Layer plugin. We need to join the results of driving_distance() with the table containing node geometries:

SELECT *
   FROM node
   JOIN
   (SELECT * FROM driving_distance('
      SELECT gid AS id,
          start_id::int4 AS source,
          end_id::int4 AS target,
          shape_leng::float8 AS cost
      FROM network',
      2000,
      100000,
      false,
      false)) AS route
   ON
   node.id = route.vertex_id

If you color the nodes based on the cost attribute, it will look something like this:
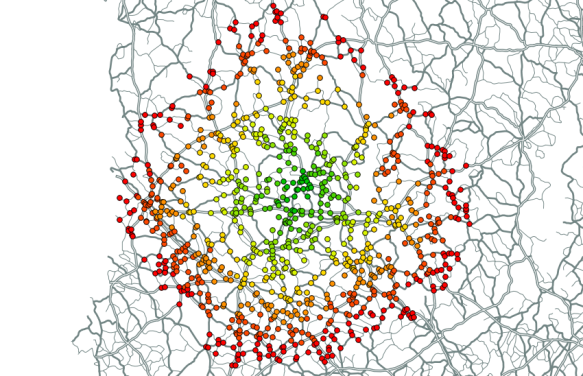
result of pgRouting driving_distance() visualized in QGIS


3D DXF from MapInfo Tab or ESRI Shape (or anything) using OGR

Note:The following post requires gdal 1.8

A lot of times we need to send/use 3D dxf files, we used to use FME however FME is not free or cheap. So I went looking for a free solution.

If you have gdal 1.8 it’s just one simple command line run using, what is becoming my favorite GIS tool, ogr2ogr.

All you have to do is run:

ogr2ogr -f "DXF" {outFile} {inFile} -zfield {ColumnWithZValue}

So in my case I ran:

ogr2ogr -f "DXF" C:\Temp\contourswarwick.dxf C:\Temp\Contours.TAB -zfield Height

I haven’t fully tested it but {outfile} can be any file ogr supports.

and the output:

Top view of contours

Top view of contour layer

Contours side view

The side view of the above image.

In the words of, the not so great, Charlie Sheen. WINNING!

Happy mapping :D


Filed under: MapInfo, Open Source Tagged: 3D, ESRI, gdal, gis, mapinfo, mapping, ogr, Open Source, OSS

FOSSGIS2011 – After Action Report

FOSSGIS2011 in Heidelberg was a great success for the QGIS project and for me personally. The audience was really impressed by Marco’s and Andreas’ presentation on QGIS Mapserver and GeoExt Web Client. My presentation on Time Manager for QGIS was followed by a series of interesting questions and comments concerning use cases in e.g. land use mapping. Requested features include support for raster layers and support for timestamps before year 19xx.
I’ll be posting an English version of the Time Manager presentation including some additional comments here soon.


FOSSGIS 2011: Vergleich von Open Source Virtual Globes

Mittlerweile gibt es mehrere Open Source Alternativen zu Google Earth, wie z.B. Nasa World Wind Java SDK, ossimPlanet oder osgEarth. Dieser Vortrag soll eine Übersicht aktueller Open Source Virtual Globes bieten und einige Vorschläge zu erwünschten Funktionen liefern.

Präsentation

Demos:

NASA World Wind Java SDK

ossimPlanet

gvSIG 3D

osgEarth

osgEarth QGIS plugin

OSM-3D

Using Python and MapInfo with Callbacks

The other day I posted an entry about using MapInfo with Python and Qt (see http://woostuff.wordpress.com/2011/03/05/mapinfo-map-control-into-qt-python-form/), one big thing that I missed was support for callbacks, which if you want to do anything related to integrated mapping is a must for map tool support.

Turns out it is pretty easy, and today I worked out how.

You will need to create a class in python that looks something like this:

class Callback():
    _public_methods_ = ['SetStatusText']
    _reg_progid_ = "MapInfo.PythonCallback"
    _reg_clsid_ = "{14EF8D30-8B00-4B14-8891-36B8EF6D51FD}"
    def SetStatusText(self,status):
        print status

This will be our callback object that we will need to create for MapInfo.

First I will explain what some of the funny stuff is:

  • _public_methods_ is a Python array of all the methods that you would like to expose to COM eg MapInfo in this case. This attribute is a must for creating a COM object.
  • _reg_progid_ is the name of your COM application or object.  This can be anything you would like.
  • _reg_clsid_ is the GUID, or unique id, for the object or app.  Do not use the one I have, call the following in a Python shell to create your own.
             import pythoncom
             pythoncom.CreateGuid()
             
  • SetStatusText is the MapInfo callback method that is called when the status bar changes in MapInfo.

In order to use the class as a COM object we have two more steps to complete, one is registering the COM object and the other is creating it.

First, in oder to register the object we call the following code from our main Python method:

if __name__ == "__main__":
    print "Registering COM server..."
    import win32com.server.register
    win32com.server.register.UseCommandLine(Callback)
    main()

This will register the COM object which will mean it can then be creating for use by MapInfo.

In order to create our callback in Python we call:

callback = win32com.client.Dispatch("MapInfo.PythonCallback")

and set it as our callback object for MapInfo:

mapinfo.SetCallback(callback)

So after all that the final code looks like this:

def main():
    from PyQt4.QtCore import *
    from PyQt4.QtGui import *
    from win32com.client import Dispatch
    import sys

    app = QApplication(sys.argv)
    app.setAttribute(Qt.AA_NativeWindows,True)
    wnd = QMainWindow()
    wnd.resize(400, 400)
    widget = QWidget()
    wnd.setCentralWidget(widget)
    wnd.show()

    handle = int(widget.winId())
    mapinfo = Dispatch("MapInfo.Application")
    callback = win32com.client.Dispatch("MapInfo.PythonCallback")
    mapinfo.SetCallback(callback)
    mapinfo.do('Set Next Document Parent %s Style 1' % handle)
    mapinfo.do('Open Table "D:\GIS\MAPS\Property.TAB"')
    mapinfo.do('Map from Property')

    app.exec_()

class Callback():
    """ Callback class for MapInfo """
    _public_methods_ = ['SetStatusText']
    _reg_progid_ = "MapInfo.PythonCallback"
    _reg_clsid_ = "{14EF8D30-8B00-4B14-8891-36B8EF6D51FD}"
    def SetStatusText(self,status):
        print status

if __name__ == "__main__":
    print "Registering COM server..."
    import win32com.server.register
    win32com.server.register.UseCommandLine(Callback)
    main()

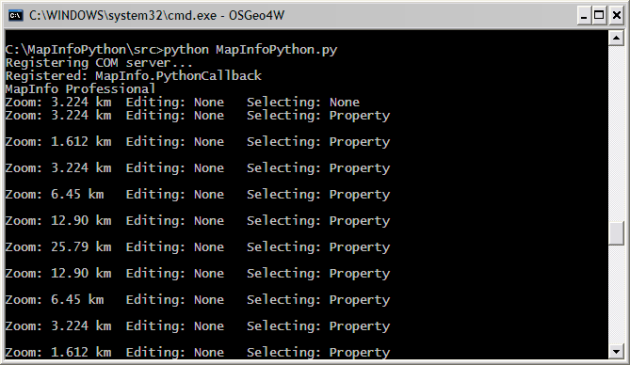
and the result is a map window and information printed to the console.

Information from MapInfo callback

I think Python could be a good language to prototype MapInfo based app, or even build a whole app itself. If you do end up making something of it let me know I am quite interested with what people could come up with.


Filed under: MapInfo, Mapinfo Programming, Open Source Tagged: gis, Mapbasic, mapinfo, mapinfo interop, mapinfo ole, MapInfo Professional, mapping, Open Source, python

FOSSGIS 2011: Neue Entwicklungen und Features vom Quantum GIS Projekt

Das QGIS Projekt hat zum Ziel, ein plattformunabhängiges, einfach zu bedienendes und offenes Desktop GIS zu entwickeln. Im vergangenen Jahr hat die Aktivität in der QGIS-Community erneut zugenommen. Seit der letzten FOSSGIS Konferenz in Osnabrück hat sich QGIS wieder enorm weiterentwickelt. Sucht man sich (aus der Liste der svn commits) alle Neuerungen des letzten Jahres heraus, so kommt man auf eine Liste, die den Rahmen dieses Artikels bei weitem sprengen würde. Daher stellen wir im Rahmen des Vortrags lediglich eine kleine Auswahl der Entwicklungen der aktuellen und der kommenden Versionen vor.

Präsentation

FOSSGIS 2011: SDI-Architektur mit verteilter Datenhaltung

Aggregation von OGC Diensten

Um OGC-Dienste verschiedener Anbieter (z.B. Bundesländer) zu einem zentralen Dienst zusammenzufassen, müssen neben der Kaskadierung noch einige weitere Operationen ausgeführt werden. Eine hohe Performance und Ausfallsicherheit kann mit einem Tile-Cache auf Basis der aggregierten Dienste gewährleistet werden. Dieser Vortrag zeigt die Problempunkte, die es bei bei einer solchen SDI-Architektur zu berücksichtigen gilt und stellt entsprechende Lösungen vor.

Präsentation

Ubuntu PostGIS package for PostgreSQL 9.0

A while ago I’ve compiled PostGIS 1.5.2 for PostgreSQL 9.0.

To install it on Ubuntu the following steps are required:

apt-get install python-software-properties

add-apt-repository ppa:ubuntugis/ubuntugis-unstable
add-apt-repository ppa:pitti/postgresql
add-apt-repository ppa:pi-deb/gis

apt-get update

apt-get install postgresql-9.0-postgis

A basic template database can be created with the following commands:

sudo su - postgres

createdb template_postgis
psql -q -d template_postgis -f /usr/share/postgresql/9.0/contrib/postgis-1.5/postgis.sql
psql -q -d template_postgis -f /usr/share/postgresql/9.0/contrib/postgis-1.5/spatial_ref_sys.sql
psql -q -d template_postgis -f /usr/share/postgresql/9.0/contrib/postgis_comments.sql
cat <<EOS | psql -d template_postgis
UPDATE pg_database SET datistemplate = TRUE WHERE datname = 'template_postgis';
REVOKE ALL ON SCHEMA public FROM public;
GRANT USAGE ON SCHEMA public TO public;
GRANT ALL ON SCHEMA public TO postgres;
GRANT SELECT, UPDATE, INSERT, DELETE
  ON TABLE public.geometry_columns TO PUBLIC;
GRANT SELECT, UPDATE, INSERT, DELETE
  ON TABLE public.spatial_ref_sys TO PUBLIC;
EOS

To test database creation you can do the following:

createdb --template template_postgis test_gis
psql -d test_gis -c "select postgis_lib_version();"

Ubuntu supports parallel installations of different PostgreSQL versions. So if you have already PostgreSQL 8.x installed, PostgreSQL 9.0 will probably be configured to listen on port 5433. So you have to add the option -p 5433 to each command and to specify the full path for the executables. For example:

/usr/lib/postgresql/9.0/bin/psql -p 5433 -d test_gis -c "select postgis_lib_version();"

  • <<
  • Page 13 of 15 ( 292 posts )
  • >>
  • gis

Back to Top

Sustaining Members