Related Plugins and Tags

QGIS Planet

The PostgreSQL Connection Service File and Why We Love It

The PostgreSQL Connection Service File pg_service.conf is nothing new. It has existed for quite some time and maybe you have already used it sometimes too. But not only the new QGIS plugin PG service parser is a reason to write about our love for this file, as well we generally think it’s time to show you how it can be used for really cool things.

What is the Connection Service File?

The Connection Service File allows you to save connection settings for each so-called “service” locally.

So when you have a database called gis on a local PostgreSQL with port 5432 and username/password is docker/docker you can store this as a service called my-local-gis.

# Local GIS Database for Testing purposes
[my-local-gis]

host=localhost port=5432 dbname=gis user=docker password=docker

This Connection Service File is called pg_service.conf and is by client applications (such as psql or QGIS) generally found directly in the user directory. In Windows it is then found in the user’s application directory postgresql.pg_service.conf. And in Linux it is by default located directly in the user’s directory ~/.pg_service.conf

But it doesn’t necessarily have to be there. The file can be anywhere on the system (or on a network drive) as long as you set the environment variable PGSERVICEFILE accordingly:

export PGSERVICEFILE=/home/dave/connectionfiles/pg_service.conf 

Once you have done this, the client applications will search there first – and find it.

If the above are not set, there is also another environment variable PGSYSCONFDIR which is a folder which is searched for the file pg_service.conf.

Once you have this, the service name can be used in the client application. That means in psql it would look like this:

~$ psql service=my-local-gis
psql (14.11 (Ubuntu 14.11-0ubuntu0.22.04.1), server 14.5 (Debian 14.5-1.pgdg110+1))
SSL connection (protocol: TLSv1.3, cipher: TLS_AES_256_GCM_SHA384, bits: 256, compression: off)
Type "help" for help.

gis=#

And in QGIS like this:

If you then add a layer in QGIS, only the name of the service is written in the project file. Neither the connection parameters nor username/password are saved. In addition to the security aspect, this has various advantages, more on this below.

But you don’t have to pass all of these parameters to a service. If you only pass parts of them (e.g. without the database), then you have to pass them when the connection is called:

$psql "service=my-local-gis dbname=gis"
psql (14.11 (Ubuntu 14.11-0ubuntu0.22.04.1), server 14.5 (Debian 14.5-1.pgdg110+1))
SSL connection (protocol: TLSv1.3, cipher: TLS_AES_256_GCM_SHA384, bits: 256, compression: off)
Type "help" for help.

gis=#

You can also override parameters. If you have a database gis configured in the service, but you want to connect the database web, you can specify the service and explicit the database:

$psql "service=my-local-gis dbname=web"
psql (14.11 (Ubuntu 14.11-0ubuntu0.22.04.1), server 14.5 (Debian 14.5-1.pgdg110+1))
SSL connection (protocol: TLSv1.3, cipher: TLS_AES_256_GCM_SHA384, bits: 256, compression: off)
Type "help" for help.

web=#

Of course the same applies to QGIS.

And regarding the environment variables mentioned, you can also set a standard service.

export PGSERVICE=my-local-gis

Particularly pleasant in daily work with always the same database.

$ psql
psql (14.11 (Ubuntu 14.11-0ubuntu0.22.04.1), server 14.5 (Debian 14.5-1.pgdg110+1))
SSL connection (protocol: TLSv1.3, cipher: TLS_AES_256_GCM_SHA384, bits: 256, compression: off)
Type "help" for help.

gis=#

And why is it particularly cool?

There are several reasons why such a file is useful:

  • Security: You don’t have to save the connection parameters anywhere in the client files (e.g. QGIS project files). Keep in mind that they are still plain text in the service file.
  • Decoupling: You can change the connection parameters without having to change the settings in client files (e.g. QGIS project files).
  • Multi-User: You can save the file on a network drive. As long as the environment variable of the local systems points to this file, all users can access the database with the same parameters.
  • Diversity: You can use the same project file to access different databases with the same structure if only the name of the service remains the same.

For the last reason, here are three use cases.

Support-Case

Someone reports a problem in QGIS on a specific case with their database. Since the problem cannot be reproduced, they send us a DB dump of a schema and a QGIS project file. The layers in the QGIS project file are linked to a service. Now we can restore the dump on our local database and access it with our own, but same named, service. The problem can be reproduced.

INTERLIS

With INTERLIS the structure of a database schema is precisely specified. If e.g. the canton has built the physical database for it and configured a supernice QGIS project, they can provide the project file to a company without also providing the database structure. The company can build the schema based on the INTERLIS model on its own PostgreSQL database and access it using its own service with the same name.

Test/Prod Switching

You can access a test and a production database with the same QGIS project if you have set the environment variable for the connection service file accordingly per QGIS profile.

You create two connection service files.

The one to the test database /home/dave/connectionfiles/test/pg_service.conf:

[my-local-gis]
host=localhost
port=54322
dbname=gis-test

And the one for the production database /home/dave/connectionfiles/prod/pg_service.conf:

[my-local-gis]
host=localhost
port=54322
dbname=gis-productive

In QGIS you create two profiles “Test” and “Prod”:

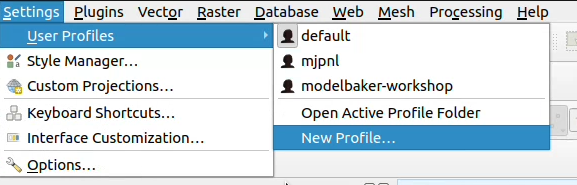
And you set the environment variable for each profile PGSERVICEFILE which should be used (in the menu Settings > Options… and there under System scroll down to Environment

image

or

image

If you now use the service my-local-gis in a QGIS layer, it connects the database prod in the “Prod” profile and the database test in the “Test” profile.

The authentication configuration

Let’s have a look at the authentication. If you have the connection service file on a network drive and make it available to several users, you may not want everyone to access it with the same login. Or you generally don’t want any user information in this file. This can be elegantly combined with the authentication configuration in QGIS.

If you want to make a QGIS project file available to multiple users, you create the layers with a service. This service contains all connection parameters except the login information.

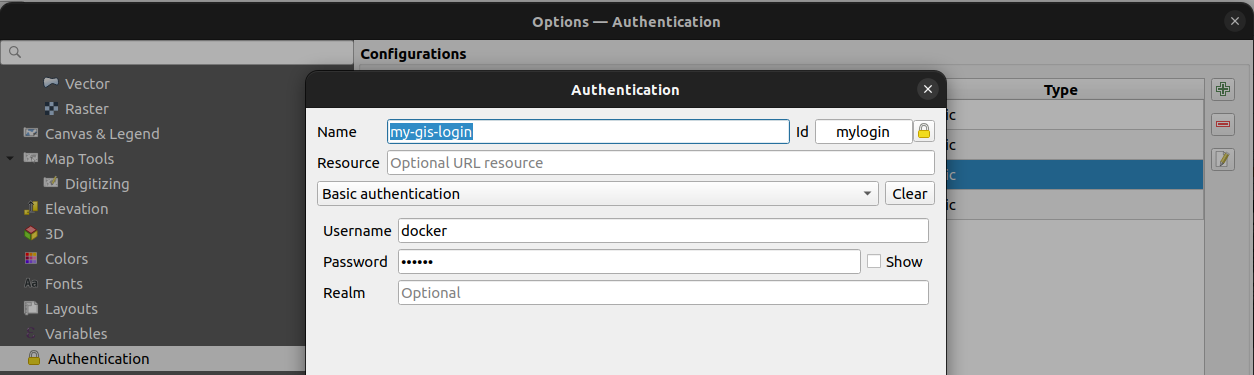
This login information is transferred using QGIS authentication.

image

You also configure this authentication per QGIS profile we mentioned above. This is done via Menu Settings > Options… and there under Authentication:

image

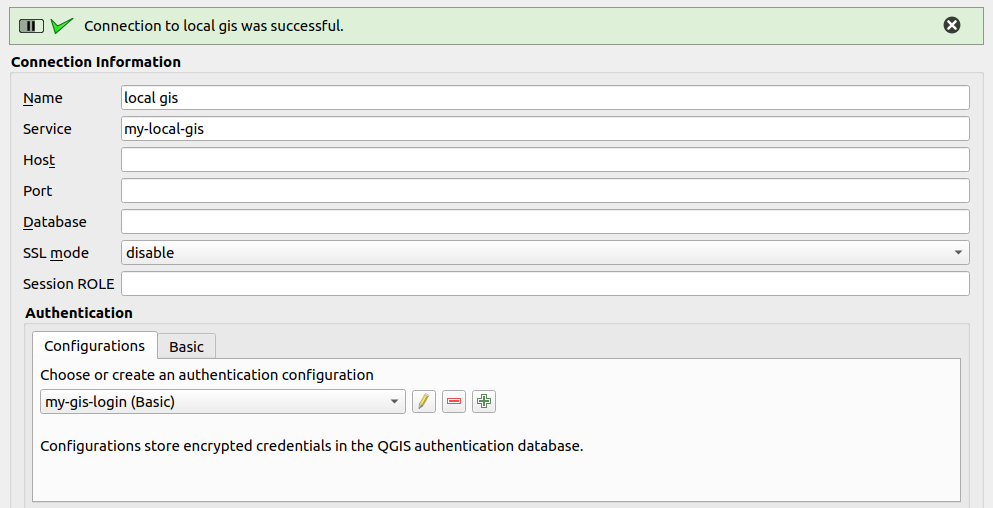
(or directly where you create the PostgreSQL connection)

If you add such a layer, the service and the ID of the authentication configuration are saved in the QGIS project file. This is in this case mylogin. Of course this name must be communicated to the other users so that they can also set  the ID for their login to mylogin.

Of course, you can use multiple authentication configurations per profile.

QGIS Plugin

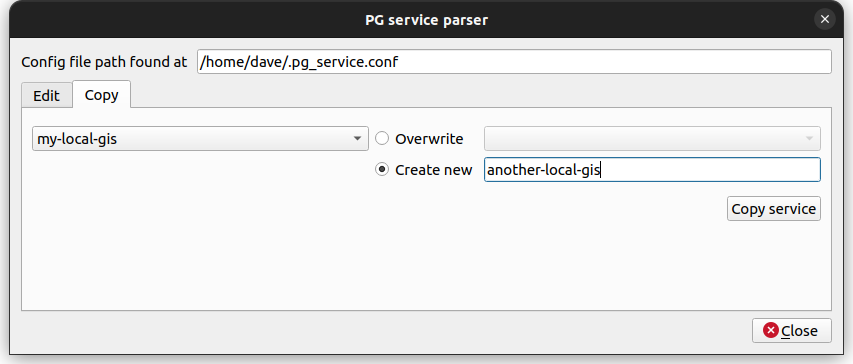
And yes, there is now a great plugin to configure these services directly in QGIS. This means you no longer have to deal with text-based INI files. It’s called PG service parser:

image

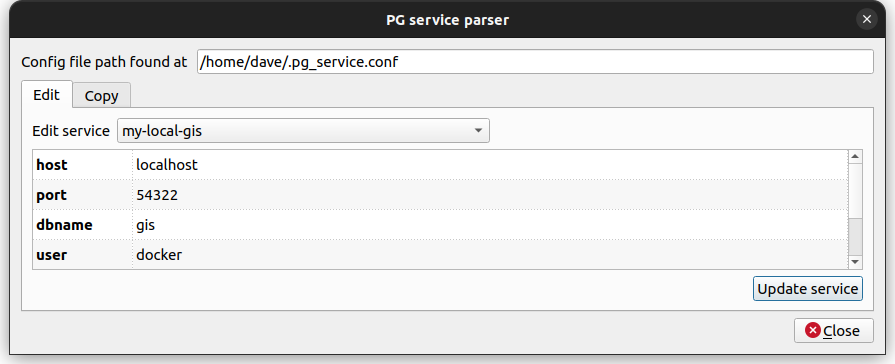
It finds the connection service file according to the mentioned environment variables PGSERVICEFILE or PGSYSCONFDIR or at its default location.

As well it’s super easy to create new services by duplicating existing ones.

And for the Devs

And what would a blog post be without some geek food? The back end of this plugin is published on PYPI and can be easily installed with pip install pgserviceparser and then be used in Python.

For example to list all the service names. 

>>> import pgserviceparser
>>> pgserviceparser.service_names()
['my-local-gis', 'another-local-gis', 'opengisch-demo-pg']

Optionally you can pass a config file path. Otherwise it gets it by the mentioned mechanism.

Or to receive the configuration from the given service name as a dict.

>>> pgserviceparser.service_config('my-local-gis')
{'host': 'localhost', 'port': '54322', 'dbname': 'gis', 'user': 'docker', 'password': 'docker'}

There are some more functions. Check them out here on GitHub or in the documentation.

Well then

We hope you share our enthusiasm for this beautiful file – at least after reading this blog post. And if not – feel free to tell us why you don’t in the comments 🙂

Unterstützung für WMTS im QGIS Swiss Locator

Das QGIS swiss locator Plugin erleichtert in der Schweiz vielen Anwendern das Leben dadurch, dass es die umfangreichen Geodaten von swisstopo und opendata.swiss zugänglich macht. Darunter ein breites Angebot an GIS Layern, aber auch Objektinformationen und eine Ortsnamensuche.

Dank eines Förderprojektes der Anwendergruppe Schweiz durfte OPENGIS.ch ihr Plugin um eine zusätzliche Funktionalität erweitern. Dieses Mal mit der Integration von WMTS als Datenquelle, eine ziemlich coole Sache. Doch was ist eigentlich der Unterschied zwischen WMS und WMTS?

WMS vs. WMTS

Zuerst zu den Gemeinsamkeiten: Beide Protokolle – WMS und WMTS – sind dazu geeignet, Kartenbilder von einem Server zu einem Client zu übertragen. Dabei werden Rasterdaten, also Pixel, übertragen. Ausserdem werden dabei gerenderte Bilder übertragen, also keine Rohdaten. Diese sind dadurch für die Präsentation geeignet, im Browser, im Desktop GIS oder für einen PDF Export.

Der Unterschied liegt im T. Das T steht für “Tiled”, oder auf Deutsch “gekachelt”. Bei einem WMS (ohne Kachelung) können beliebige Bildausschnitte angefragt werden. Bei einem WMTS werden die Daten in einem genau vordefinierten Gitternetz — als Kacheln — ausgeliefert. 

Der Hauptvorteil von WMTS liegt in dieser Standardisierung auf einem Gitternetz. Dadurch können diese Kacheln zwischengespeichert (also gecached) werden. Dies kann auf dem Server geschehen, der bereits alle Kacheln vorberechnen kann und bei einer Anfrage direkt eine Datei zurückschicken kann, ohne ein Bild neu berechnen zu müssen. Es erlaubt aber auch ein clientseitiges Caching, das heisst der Browser – oder im Fall von Swiss Locator QGIS – kann jede Kachel einfach wiederverwenden, ganz ohne den Server nochmals zu kontaktieren. Dadurch kann die Reaktionszeit enorm gesteigert werden und flott mit Applikationen gearbeitet werden.

Warum also noch WMS verwenden?

Auch das hat natürlich seine Vorteile. Der WMS kann optimierte Bilder ausliefern für genau eine Abfrage. Er kann Beispielsweise alle Beschriftungen optimal platzieren, so dass diese nicht am Kartenrand abgeschnitten sind, bei Kacheln mit den vielen Rändern ist das schwieriger. Ein WMS kann auch verschiedene abgefragte Layer mit Effekten kombinieren, Blending-Modi sind eine mächtige Möglichkeit, um visuell ansprechende Karten zu erzeugen. Weiter kann ein WMS auch in beliebigen Auflösungen arbeiten (DPI), was dazu führt, dass Schriften und Symbole auf jedem Display in einer angenehmen Grösse angezeigt werden, währenddem das Kartenbild selber scharf bleibt. Dasselbe gilt natürlich auch für einen PDF Export.

Ein WMS hat zudem auch die Eigenschaft, dass im Normalfall kein Caching geschieht. Bei einer dahinterliegenden Datenbank wird immer der aktuelle Datenstand ausgeliefert. Das kann auch gewünscht sein, zum Beispiel soll nicht zufälligerweise noch der AV-Datensatz von gestern ausgeliefert werden.

Dies bedingt jedoch immer, dass der Server das auch entsprechend umsetzt. Bei den von swisstopo via map.geo.admin.ch publizierten Karten ist die Schriftgrösse auch bei WMS fix ins Kartenbild integriert und kann nicht vom Server noch angepasst werden.

Im Falle von QGIS Swiss Locator geht es oft darum, Hintergrundkarten zu laden, z.B. Orthofotos oder Landeskarten zur Orientierung. Daneben natürlich oft auch auch weitere Daten, von eher statischer Natur. In diesem Szenario kommen die Vorteile von WMTS bestmöglich zum tragen. Und deshalb möchten wir der QGIS Anwendergruppe Schweiz im Namen von allen Schweizer QGIS Anwender dafür danken, diese Umsetzung ermöglicht zu haben!

Der QGIS Swiss Locator ist das schweizer Taschenmesser von QGIS. Fehlt dir ein Werkzeug, das du gerne integrieren würdest? Schreib uns einen Kommentar!

QGIS Relations, their Widgets and the Plugins of them

This blog post is about QGIS relations and how they are edited in the attribute form with widgets in general, as well as some plugins that override the relations editor widget to improve usability and solve specific use cases. The start is quite basic. If you are already a relation hero, then jump directly to the plugins.

QGIS Relations in General

Let’s have a look at a simple example data model. We have four entities: Building, Apartment, Address and Owner. In UML it looks like this:

  • A building can have none or multiple apartments, but an apartment must to be related to a building. This black box on the left describes the relation strength as a composition. An apartment cannot exist without a building. When a building is demolished, all apartments of it are demolished as well.
  • An apartment needs to be owned by at least one owner. An owner can own none or more apartments. This is a many-to-many relation and this means, it will be normalized by adding a linking (join) table in between.
  • A building can have an address (only one – no multiple entrances in this example). An address can refer to one building.
    Why not making one single table on a one-to-one relation? To ensure their existence independently: When a building is demolished, the address should persist until the new building is constructed.

Creating Relations in QGIS

In QGIS we have now five layers. The four entities and the linking table called “Apartment_Owner”.

Open Project > Properties… > Relations

With Discover Relations the possible relations are detected from the existing layers according to their foreign keys in the database. In this example no CASCADE is defined in the database what means that the relations strength is always “Association”.

Where would “Composition” make sense?

Of course in the relation “Apartment” to “Building”, to ensure that when a feature of “Building” is deleted, the children (“Apartment”) are deleted as well, because they cannot exist without a building. Also a duplication of a feature of “Building” would duplicate the children (“Apartment”) as well.

But as well on the linking (join) table “Apartment_Owner” and its relation to “Apartment” and “Owner” a composition would make sense. Because when a feature of “Apartment” or “Owner” is deleted, the entry in the linking table should be deleted as well. Because this connection does not exist anymore and otherwise this would lead to orphan entries in the linking table.

Walk through the widgets

To demonstrate the relation widgets Relation EditorRelation Reference and Value Relation we make a walk through the digitizing process.

Relation Editor

First we create a “Building” and call it “Garden Tower”. Then we add some “Apartments”.

The “Apartments” are created in the widget called Relation Editor. This shows us a list (similar to the QGIS Attribute Table) of all children (“Apartment”) referencing to this “Building”. We have here activated the possibilities to adddelete and duplicate child-features.

In the widget settings (Right-click on the layer > Properties… > Attribute Form) we see that there are other possibilities to link and unlink child-features as well as zoom to the current child-feature (what only would make sense when they have a geometry).

As well we can set here the cardinality. This will become interesting when we go to the “Owner” to “Apartment” relation. But let’s first have a look at the opposite of what we just did.

Relation Reference

When we open now a feature of “Apartment”, we see that we have a drop down to select the “Building” to reference to.

On the right of this drop down we can see some buttons. Those are for the following functionalities (from left to right):

  • Open the form of the current parent feature (in our case the “Building” feature called “Garden Tower”)
  • Add a new feature on the parent layer (in our case “Building”)
  • Highlight the parent layer (in our case “Building”) on the map
  • Select the parent feature (in our case “Building”) on the map to reference it

In the settings (Right-click on the layer > Properties… > Attribute Form) we see that we choose the configured relation to connect the child (“Apartment”) to the parent (“Building”). This won’t be needed with the widget Value Relation.

Value Relation

The Value Relation does not require a relation at all. We simply choose the “parent” layer (“Building”) its primary key as the key (“t_id”) and a descriptive field as the value (“Description”).

The result shows us a drop down as well to select the parent.

It is much easier to configure, but you can see the limitations. There are no such functionalities to control the parent feature like addidentify on map etc. As well you need to be careful to fulfill the foreign key constraint (you have to choose the correct field to link with). All this is given, when you build a Relation Reference on an existing relation.

Many-to-Many Relations

Now we link some “Owner” to our “Apartment”. We could create new ones like we did it for the “Apartment” in “Building” or we can link existing ones. For linking we choose the yellow link-button on the top of the Relation Editor.

This dialog looks similar to the Relation Editor widget. You have just to select the “Owner” you want to link to the “Apartment” by checking the yellow box. It’s a very powerful tool, but people are often confused about the load of functionality here and the selection that can be difficult to get used to (yellow boxes vs. blue index selection). For this case we extended the Relation Editor widget with a plugin.

Anyway after that we linked our features of the layer “Owner”.

Have you seen the linking table in between? Well, me neither. It’s completely invisible for the end user. This because of the cardinality setting I mentioned already. When we choose the linked table “Owner” instead of “Many to one relation”, then we can create and link the other parent (“Owner”) directly.

One-to-One Relation

A one-to-one relation like we have here between “Building” and “Address” is created in the database more or less like a normal one-to-many relation. This means one of the tables (in our case “Address”) has a foreign key pointing to the parent table (“Building”). There are tricks to fulfill the one-to-one maximum cardinality (like e.g. by setting a UNIQUE constraint on this foreign key column) but still in the QGIS user interface it looks like a one-to-many relation. It’s displayed in a normal Relation Editor widget.

Solutions could be so called “Joins”. Go to the settings (Right-click on the layer > Properties… > Joins)

Here you can join a layer of your choice and add the fields of this other layer (in our case “Address”) to your current feature form (of “Building”). So it appears to the user that it’s the same table containing fields of “Building” and “Address”.

Negative point about those joins are, that they are fault prone. You have to be careful with default values (e.g. on primary keys) of the joined layer. You cannot expect a fully reliable feature form like you have it in the Relation Editor. Here as well, we extended the Relation Editor widget with a plugin.

Plugins for Relation Editor Widgets

Since QGIS 3.18 the base class of the Relation Editor Widgets became abstract, what opened the possibility to use it in PyQGIS and derive it to super nice widgets handling specific use cases and improving the usability.

Linking Relation Editor Widget

As mentioned before, the QGIS stock dialog to link children is full of features but it can be overwhelming and difficult to use. Mostly because of the two selection possibilities in the list. A blue selection is for the currently displayed feature, and a yellow checkbox selection is for the features to be actually linked.

In collaboration with the Model Baker Group we wanted to improve the situation. But as we where unsure how the end solution should look like, so we decided to experiment in a plugin. The result is a link manger dialog, in which features can be linked and unlinked by moving them left and right. The effective link is created or destroyed when the dialog is accepted.

Find more information on the repository https://github.com/opengisch/qgis-linking-relation-editor

Ordered Relation Editor Widget

Sometimes the order of the children play a role on the project, and you want to have them displayed following that. For that there is the Ordered Relation Editor Widget. You can configure a field in the children to be used to order them. In the given example the field Floor was used to order Apartments. Reordering the fields by Drag&Drop would change the value of the configured field. Display name and optionally a path to an icon to be shown on the list can be configured by expression in the Attribute Form tab in the layer properties (Right-click on the layer > Properties… > Attribute Form).

Find more information on the repository https://github.com/opengisch/qgis-ordered-relation-editor

Document Management System Widgets

Often in QGIS projects there is the need to deal with external documents. This could be for example pictures, documentations or reports about some features. To support that we added two new tables in the project:

  • Documents each document is represented by a row in this table. The table has following fields:
    • id
    • path is the filename of the document.
  • DocumentsFeatures this is a linking (join) table and permits to link a document with one or more features in more layers. The table has following fields:
    • id
    • document_id id of the document.
    • feature_id id of the feature.
    • feature_layer layer of the feature.

Thanks to a QGIS feature named Polymorphic Relations we can link a document with features of multiple layers. The polymorphic relation can evaluate an expression to decide in which table will be the feature to link. Here a screenshot of the relation configuration:

After this configuration in the layers “Apartment” and “Building” it will be possible to link children from the “Documents” table. The document management plugin provides two widgets to simplify the handling of the relation. In the feature side widget the documents are displayed as a grid or list. If possible a preview of the contend is shown and you can add new documents via Drag&Drop from the system file manager. Double-click on a document will open it in the default system viewer.

The second widget is meant to be used in the Feature Form of the “Documents” table, and it permits to handy see, for each document, with which feature from which layer it is linked.

Find more information on the repository https://github.com/opengisch/qgis-document-management-system-plugin

That’s it

Well then. We hope that all the beginners reading this article received some light on QGIS Relations and all the advanced user some inspiration on the immense possibilities you have with QGIS ?

  • Page 1 of 1 ( 3 posts )
  • qgis plugins

Back to Top

Sustaining Members