Related Plugins and Tags

QGIS Planet

QGIS WHY U NO PRINT DEBUG INFO

One of those days today where I burnt more time then I should on something that I din’t know about and spent way to much time searching for the wrong thing.

On a new install of Fedora I couldn’t get my QGIS to output any debug messages, even on my dev build running in the terminal, Qt Creator, or VS Code. Super frustraining to say the least.

Turns out the logging, at least on Fedora for Qt5, is disabled by default. You need to enable it by editing ~/.config/QtProject/qtlogging.ini and adding the following:

[Rules]
default.debug=true

The more you know!

QGIS style dock – Part 2 – Plugin panels

In part 1 I talked about the new style dock and the in built functions it has in this post I would like to cover how you can extend that dock using plugin panels.

While building the dock it became evident that being able to add your own panels with be super neat, why lock the user to what styling controls we have built into core.

After one, or two, API iterations it is now possible to add your own panels to the style dock.

First we need to make a new widget using QgsLayerStylingPanel

class CustomPanel(QgsLayerStylingPanel):
    def __init__(self, layer, canvas, parent):
        super(CustomPanel, self).__init__(layer, canvas, parent)
        self.layer = layer

    def apply(self):
        pass

then we need to create a factory object (QgsLayerStylingPanelFactory) which will hold the metadata for the panel widget, things like icon, title, and the widget it self as required. The factory object looks like this:

class PanelFactory(QgsLayerStylingPanelFactory):
    def icon(self):
        return QIcon(r"F:\icons\SVG\book.svg")

    def title(self):
        return ""

    def supportsLayer( self, layer):
        return layer.type() == QgsMapLayer.VectorLayer

    def createPanel(self, layer, canvas, parent):
        return CustomPanel(layer, canvas, parent)

# Also make a instance and tell the style dock about it
# make sure you keep a instance of the the factory around
factory = PanelFactory()
iface.registerMapStylePanelFactory(factory)

You can also see we have a supportsLayer() method. This must return True if the layer can be supported for the widget, if the layer isn’t support it’s not shown in the layer style dock. We also have the createPanel method which just returns the widget, you could also use this method to return different widgets based on layer type if you needed. This createPanel method will be called any time the item is selected in the left panel of the style dock. Using the above code we will see a new icon on the side panel

style

Remember, the create method is called any time this new item is selected.    If your widget is expensive to create you can create a cache here.

Now lets add some logic.  As an example I’m going to load the style xml and show it in the panel. Adding some logic to the __init__ method of the CustomPanel class

class CustomPanel(QgsLayerStylingPanel):
    def __init__(self, layer, canvas, parent):
        super(CustomPanel, self).__init__(layer, canvas, parent)
        self.layer = layer
        self.setLayout(QVBoxLayout())

        # Create the editor and set the xml from the layer.
        self.editor = QgsCodeEditorHTML()
        self.editor.setLexer(QsciLexerXML())
        doc = QDomDocument( "style" ) 
        rootNode = doc.createElement( "qgis" )
        doc.appendChild( rootNode )
        iface.activeLayer().writeStyle( rootNode, doc, "")
        xml = doc.toString()
        self.editor.setText(xml)
        self.layout().addWidget(self.editor)

xml

Nifty.  Now can we 1 UP it and make it live edit?  Sure can!  The style dock will call apply() whenever we raise the widgetChanged signal.  We can just connect this to the text changed event and add some logic to the apply method.

class CustomPanel(QgsLayerStylingPanel):
    def __init__(self, layer, canvas, parent):
        super(CustomPanel, self).__init__(layer, canvas, parent)
        .....
        self.editor.textChanged.connect(self.widgetChanged.emit)

    def apply(self):
        # Read the xml and set it back to the style.
        doc = QDomDocument( "style" ) 
        doc.setContent(self.editor.text())
        node = doc.documentElement()
        self.layer.readStyle(node, "")
        self.layer.triggerRepaint()

live

WINNING!

Pro Tip: Raise widgetChanged whenever you need to tell the style dock to trigger the apply method. The style state of the layer will also be saved to the undo stack so you don’t have to worry about that.

This is just an example, hand editing xml is well gross, but I’m sure you can see great uses for being able to expand the style dock.

QGIS style dock – Part 1 – Live Styles!

This post is part of a series exploring the new style dock.

  • Part 1 – Styles
  • Part 2 – Plugin pages
  • Part 3 – New panel API

A while ago did a post about the new style dock in QGIS. The first stage was getting labels working and then moving on to styles. After many iterations of the UIs and the APIs I’m pretty happy with the release state of the dock. We now have styles (vector and raster), labels, saved styles, undo redo, and plugin support (yep!)

Of all the features I have added to QGIS this is my favorite. Nothing has made me feel more productive then working on this feature and seeing the gains it allows in day to day work.

If you haven’t used the style dock yet I would strongly encourage you to grab the nightly QGIS builds and give it a crack, F7 to open anytime, or use the paint brush icon on the layers panel.   I’m not bragging when I say that it will change your life in QGIS for the better, it has become a part of my daily workflow. No going back!

Dock break down

breakdown

As you can see in the image there is a few main things in the dock, the layer selection, style options selector (come back to this later), undo/redo, live update and apply.

Live Updates

One of the key things for me when doing this dock was instant feedback. I really hated the open close, change, apply, repeat workflow of the old dialogs.  Every widget in the dock can request a redraw on change so you can see feedback instantly in the canvas.  This might not always be what you want so you can disable it for those cases and use manual apply.

Undo Stack

Live updates come with a risk. What happens if you apply something you didn’t mean. There is no cancel button. Well not to fear we now have a undo/redo stack.  Any style change will now add an entry to the style undo stack so you can rollback and forward any changes. Undo/Redo now allows for fearless style changes, so style away to your hearts content and rollback anything you don’t like.

I will also add that the undo stack is stored on the layer object itself, so closing the dock doesn’t clear the stack nor does changing the active layer. You can also access the stack via the Python bindings if needed.

Style Options

On the side of the dock we have the different style options.  These buttons change the style options in the main panel.

options
Vector Style Options
  • Style
  • Label
  • Saved styles
  • Undo/Redo
optionsraster
Raster Style Options
  • Style
  • Transparency
  • Histogram
  • Saved styles
  • Undo/Redo

The Saved Styles and Undo/Redo will always be the last in the stack regardless of the active layer type.

Style UIs (Note: GIF heavy section)

Almost all the widgets have been tweaked to allow for better dock layout. Widgets are now in a more uniform layout which flows better when moving around in the dock and just generally look better.

layout

When I talked about live updates before this applies to everything, even the data defined buttons.  Any changes in those will be reflected into the canvas without any extra clicks.

dd

Changing renderers is now simple and quick. You go from nothing to seeing instant results in seconds.

change

A excellent side effect of the live updates is workflows that were never exposed before and now possible. Using the graduated renderer histogram for example. As the histogram allows for live edits we can now update the map on the fly from adjusting the histogram.

hiso.gif

Style UIs (Raster)

As soon as I finished vectors it became pretty evident that raster layers were going to be the next main thing to move.   So the style dock fully supports raster styling.

raster

Undo/Redo

For the final trick. Here we have the undo/redo stack in action. Unlimited undo/redo  on all layers when changing styles. Fearless change he we come

undo

Trying to find a picture to sum up my feelings about the style dock and I think this fits

but of course I’m super bias.

Stay tuned for Part 2 where I talk about adding your own style panels to the style dock.

Speeding up QGIS build times with Ninja

As a developer, feedback is important when you are working.  The quicker you have the feedback the quicker you can fix the issues.  This doesn’t just apply to feedback from users/clients but also from your tooling.

Finding a new tool that increases my productivity is one of the best feelings, and this is one of those cases.   I was told about using Ninja for building instead Make, Visual Studio, Jom (Qt Build Tool).

If you are not a developer and don’t know what those tools are, they are what we use to build and compile all the code in QGIS.  If this step is slow the feedback loop is slow and it becomes annoying.  Improving this feedback loop greatly increases your workflow and happiness, and by happiness I really do mean that.

Ninja is one of these tools that did this. It’s optimized to be fast.  It does very little work in order to be faster any time it can.  Ninja was built by a developer on the Google Chrome team in order to improve their build times (read the history here)

Building QGIS with Ninja is super easy:

Install Ninja from package manager or using the ninja.exe (the whole tool is a single exe) if you are on windows

cd qgis-src
mkdir ninja-build
cd ninja-build
ccmake -GNinja ..
ninja

Done

You can build just the targets you need using

ninja qgis
ninja pycore

etc

The ccmake setup generates the ninja.build file that ninja uses. Myself and Matthias Kuhn have already patched our QGIS cmake files to handle any odd things that got generated – only a handful of things which was nice

The best thing I find about Ninja is how smart it is on knowing if it needs to build something or not, and this is the point that I find other tools fail on. They spend ages wasting time looking for what to do. Ninja knows it in a instant.

When running Ninja with no code changes I get this (on Windows):

21:18:54: Running steps for project qgis2.15.0...
21:18:54: Starting: "C:\QtCreator\bin\ninja.exe" qgis
ninja: no work to do.
21:18:54: The process "C:\QtCreator\bin\ninja.exe" exited normally.
21:18:54: Elapsed time: 00:00. 

Not even a second. If I did the same with VS or JOM I could have written this post before it finished working out what to do.

Here is what happens changing a single file:

21:19:48: Running steps for project qgis2.15.0...
21:19:48: Starting: "C:\QtCreator\bin\ninja.exe" qgis
[1/6] Building CXX object src\core\CMakeFiles\qgis_core.dir\raster\qgshillshaderenderer.cpp.obj
[2/6] Linking CXX shared library output\bin\qgis_core.dll
21:19:51: The process "C:\QtCreator\bin\ninja.exe" exited normally.
21:19:51: Elapsed time: 00:03.

It’s super impressive. Even a cold build on Windows is shorter now. On Linux it’s even faster due to faster disk access in Linux vs Windows

If you build QGIS form source I would highly recommend giving it a crack because I know you will love it.

Styling maps in QGIS is better when it’s interactive

I’m sure you are all well aware of my hate of blocking dialogs, and when it comes to styling QGIS has a few and they annoy me to no end. With new fancy map making tools like MapBox and CartoDB all having nice non blocking styling options it’s about time QGIS followed suit to bring better control and faster workflows to users.

The first stage of the dock is complete, pending feedback of course, and merged into master.

Introducing the map styling dock:

2016-04-19 20_27_00-Action center

Having the style (label only at the moment) options in a dock widget opens up some really nice workflows to map styling.

Firstly, now you don’t have to do the Open -> Change Setting -> Apply -> Close -> Open dance each time you want to change a layer style.  The dock is linked to the active layer in the legend so you can move around freely, update settings, and move on.

Second, we can now have a great workflow and allow for live updating. Yes you did read that right, it will live update the map as you change values. How bloody great is that!  Reducing the feedback loop is always the best.  If it can be done live, do it live.  There is a Reset button if you make a mistake.

Third, all styling options will now live in a single location going forward. Once we have moved style, diagrams, blend modes, it will be a one stop shop for styles with no annoying dialogs getting in the way.

In QGIS 2.14 we also have this awesome feature for rule based labels, however that added another dialog, and I wasn’t going move to a dock just to have another dialog block me two steps down the road. So now all the rules based labels dialogs are panels inside the main dock. When adding a new rule it will show the rule editor, and the list when not.  Remember how I said the dock updates the map live, well that also applies when you add/update rules.  The dock will update the canvas as the rule changes even before you hit save on the rule

2016-04-19 20_48_36-Action center

2016-04-19 20_48_28-Action center

The new styling dock is in master now, although might not be in the nightly build for a day or so.

You can check out some videos of the dock in action here:

Super keen on any feedback and ideas anyone might have.  Give it a try and let me know what you think.

EDIT: I would also like to add that what I have started/done is only possible because of the great work that has been done before me. Big thanks to all the people that have done work to enable me to make this feature,  label settings, threaded rendering, data defined buttons, etc.

UIs are for the weak. Welcome to ASCII QGIS land

Have you ever thought “gee I wish I could have a ASCII  QGIS map viewer for console use.  I’m so over these fancy UIs with their fancy graphics, fonts, and icons”.

No?

Anybody?

You are still reading? OK good I thought I lost you.

Anyway. Here is a fun idea. A ASCII QGIS map viewer that renders your project files in a console window (with colour possible).  Still with me?

This project was mainly just a bit of fun to play with the curses Python library and QGIS. What started off as a random idea on the train seems to have turned into full “usable” thing, if viewing a project and the legend is considered usable.

If you are still with me and itching to see it in action here it is.  In all the ASCII glory

Nifty!

What can it do so far?

  • Load project
  • Pan
  • Zoom
  • Set colour mode on/off

QGIS

The code is up at https://github.com/NathanW2/ascii_qgis (or http://nathanw2.github.io/ascii_qgis/)

It’s a bit of a fun side project at the moment so you might find bugs as I have only tested it on my machine.

Follow the README on github for notes on running.

Have fun.


Good news for QGIS MapInfo users

So some good news for QGIS users who also need/want to use MapInfo.  QGIS via GDAL 2.0 can support MapInfo TAB file editing. In all older versions of GDAL there was only support for read and/or write but not both.

MapInfo TAB editing has been supported in GDAL 2 but up until this point QGIS has only be built against GDAL 1.xx.  GDAL 2.x is now the default GDAL release in OSGeo4w.

From Jurgen:

2.0.2 is now the default GDAL in OSGeo4W and the nightlies (qgis-ltr-dev,
qgis-rel-dev and qgis-dev) already picked it up.

With the next release the regular packages (2.14 and 2.8) will also be updated
to use it

Even if you don’t want to make the switch to full QGIS you can now use both bits of software and edit in both.

QGIS will still only support a single geometry type per layer so if you open a mixed tab file you will get the geometry type selector.  You can load the layer 3 times if you need the 3 different geometry types.


Rendering web images as markers in QGIS

So here is an idea.  Say you have a point layer that has a link to a static image from a web cam. Lets say it is a traffic camera for this use case.

Selection_0272016-02-04 21_30_36-QGIS 0a64c16

We can use that feed to see the image in a browser. Cool. But what would be even cooler is if we could get the images into QGIS as markers without having to download each image each time for a update ourselves.

Turns out it’s pretty easy – could be easier no doubt but lets just go with this route for now.  For this you will need: a custom expression function, and data defined SVG path locations. (We have to use SVG markers because QGIS doesn’t have image markers just yet)

Lets write that custom expression function.  We need a SVG marker so lets set that for the layer and also edit the data defined path

svg.png

Hit the New file button and define a new function called show_camera. 

import requests
import base64

@qgsfunction(args='auto', group='Custom')
def show_camera(feed, feature, parent):
    svg = """
<?xml version="1.0" encoding="UTF-8" standalone="no"?>
<svg>
  <g>
    <image xlink:href="data:image/jpeg;base64,{0}" height="256" width="320" />
  </g>
</svg>
"""
    data = requests.get(feed, stream=True).content
    name = feed[-16:]
    b64response = base64.b64encode(data)
    newsvg = svg.format(b64response).replace('\n','')
    path = r"C:\temp\camera\{0}.svg".format(name)
    with open(path, 'w') as f:
        f.write(newsvg)
    return path.replace("\\", "/")

This will take the image feed, load it with the Python request library, base64 the image, stick the data in to a SVG, save the SVG to disk, and return the path to the new SVG.

We have to save to disk because QGIS can’t load SVGS from strings, although that would be a cool feature. I am also using base64 because a linked file SVG didn’t render in QGIS.

Once we have defined that we can use the function like so

show_camera( "url" )

looking at the output preview we have

'C:/temp/camera/MRMETRO-1216.jpg.svg'

Which looks right. Hit OK on the expression.

Before hitting Apply just make the size of the marker a little bigger as it will make the image to small to see, I used 35 for the demo. You should also pick a SVG marker from the list that is used as the default one if there is no valid path returned.

Hit Apply. Magic :)

qgis

The images are getting download and saved into C:\temp\camera for this demo but you could add some more magic around that.

Something to note is that each time you refresh the map you are making a bunch of web requests to get the new images. You could avoid this by tracking the image times and only grabbing new ones if a set time has elapsed.  I will leave that up the reader, however here is a link to a Gist with the code if you wish to fork it

Big hat tip to QGIS and its multi threaded rendering that still allows you to continue to work while it renders and downloads the images in the background.

Not always about new features

I love a good feature just as much as the next person but sometimes it’s great to fix a small workflow issue that has bugged you for the longest time.

If you have ever seen this kind of dialog you will know what I mean

error

The good old Python error dialog in QGIS.  The dialog is there to tell you that an exception was raised in Python somewhere and would dump out the error for you to debug it.   One big issue with this dialog though.  It’s blocking.  Blocking dialogs are really bad.   As a user, the blocking dialog means a broken workflow. Worst of all, there really is nothing you can do about it because the only thing you can do is close.

This dialog has now been replaced with a message bar if something goes wrong in Python code.  The message bar is non blocking and lets you continue working even if something didn’t work correctly.

message

The message bar has two buttons.  One will open the stack trace dialog to see the error in more detail. The other button opens the log window.

dialog

The message bar will only show a single error message for each type of error even if there are multiple exceptions in a row. A good example of this is an error in a mouse move event handler causing a error on each mouse move.

UI theme support now core in QGIS

I enjoy using the dark UI theme for QGIS so much I figured why not make it a core feature. In the next version of QGIS if you head to the options screen you can now find a UI Theme option.

Options | General_037

The default dark theme is called Night Mapping for all those late night mapping jobs that you do, or if you just like dark UI themes.

QGIS b789fab_029

Selection_031

Selection_034

Something you will notice with this theme is the custom icons for the layer visibility. Pretty nifty! Here is how it is done

Creating new themes

To create a new theme simply make a new folder in .qgis2\themes\ with the name of the theme you want and create a style.qss file inside there. Check out the default themes for an example

Follow the Qt style sheet guides to see what can be styled.

Something I have added on top of the normal style sheets is variable support. Variables can be declared in a variables.qss file in the theme folder.

Here is an example of some variables:

@background: #323232
@text: #aaa
@selection: #507098
@menuback: #444
@highlight: #ffaa00

Now in style.qss we can do this:

QWidget
{
color: @text;
background-color: @background;
}

Great for not having to repeat your self or quick updating in a single place. When the theme is applied via the Options dialog or via the API it will replace the variables in style.qss using variables.qss. The result file is called style.qss.auto

Needs some tweaks

The default dark theme is a collection of stuff I have found around the net and stuff I have added myself. It’s far from prefect and I would love help to make it the best dark theme for QGIS. If you have another theme you think would make a good default one open a pull request on GitHub

Enjoy

Mixing a bit of Excel into QGIS – conditional formatted table cells

I was using Excel the other day and used the conditional formatting rules to style some cells based on a condition. If you have never seen or used them they look like this:

They are pretty handy for a quick idea on the state of your data.  Looking at QGIS I thought to myself “Wait!? Why not do that in QGIS too. That would be pretty neat”.  And with that here it is, finally!. Conditional formatting rules for QGIS attribute table.

cells

icons

You can control the font style, color, background color, even custom icons based on QGIS symbols. The buttons at the top give you access to quick styles which you can tweak more with the other options.

The conditions are just normal QGIS expressions. Use the special variable @value to refer to the current cell value. As they are normal QGIS expressions you can reference the other fields in the expressions.

(Click the GIF for a better view)

table

So go nuts. I would love to hear any feedback if you use it. Try it out in the next nightly dev build.


Filed under: Open Source

QGIS UI themes plugin

Scrap that idea. Seems there is already a  plugin to do this called Load QSS.  I’m not going to duplicate effort. Use that one and we can all make it better.

Want to have a dark theme, or even your own custom theme, for QGIS?  No worries. The UI Theme plugin has your back. Grab it from the plugin installer.  

Change the theme using Plugins -> UI Themes -> Theme It!

theme

Just select a theme and the interface will change styles.  Here is the dark theme called “Much Dark. Such Goth” :)

dark

I will let you try the “Oh my eyes” theme.

Themes can be added by creating a {name}.css file in plugin folder themes folder and edited __init__.pyfile to list the theme.  I’m working on this to make it better but I wrote this in about half an hour so it’s not all there yet.

The active themes is saved in the settings and restored on QGIS load.

If you make a cool theme feel free to make a pull request or ticket so it can be added to the plugin for others to use.  There is heaps that can be done with the Qt stylesheets so go nuts and make something cool.

Note: It’s a work in progress and things might not always look right.


Filed under: Open Source

Hat racks; or appreciating people for what they do.

The biggest thing with open source work is that it can be pretty thankless. There is a lot more that goes into a open source project then just some lines of code, there is events, documentation, API documentation, PR material, more documentation, websites, build setups, etc. It’s quite easy to just look at a project on GitHub, check out the graphs and see the top contributors and never think about it again. Because the code is all that matters right?

githubn

All hail Jürgen and Nyall!

Getting back to the point.  There is a lot of stuff that goes into an open source project that can go unnoticed and under appreciated.  Stuff that isn’t code is hard to track.  Do you know who maintains the QGIS website? What about who translates the UI? What about who ran the last dev meetings? These projects are non code related but are normally things that go unnoticed or under appreciated simply because it’s not a fancy chart in GitHub.  Making people feel welcome and appreciated in a project normally leads to a higher retention rate and a better overall feel for the project.  I remember when I was first thanked for the work I added to QGIS and how it made me feel, still here doing the same thing so it must have worked pretty well.

At PyCon AU 2015  Katie McLaughlin gave a talk about welcoming contributions to a project and being generally being nice to people. Not just being nice but actively thanking people for what they do and how it makes you feel. People generally put a lot of time into the projects they involve themselves in knowing you are appreciated makes you feel good.

Katie got the idea for the project from the talk and post titled A Place to Hang Your Hat by Leslie Hawthorn.  It seems like a silly title but read it and it will all make sense.

Her sub text makes the perfect summary:

On getting many good things done. And no one knows you’re doing any of it.

I’m not going to copy the post here but I will steal her tl;dr part:

  • If someone has volunteered to help your project, take the time to write a 2-3 sentence summary of what they did to help.
  • You can send it to them, along with a thank you note, or offer to post it on their LinkedIn profile. (Remember, users can approve recommendations before they’re added to their profile.)
  • Let’s spend some time celebrating our successes and all of our contributions! Let folks know you’re celebrating that success using #LABHR as a hashtag.
  • #LABHR stands for Let’s All Build a Hat Rack. For why its an awesome acronym, you have to read the post.

And here is the example post she makes:

Sample Recommendation

Deb Nicholson, Board Member, Open Hatch
While not strictly related to her work as an OpenHatch board members, Deb has given me invaluable counsel on fundraising for various non-profits I’ve been affiliated with. She’s also trained numerous community members on how to perform in-person advocacy for free and open source software projects, and software patent reform. As part of that training, she’s also convened numerous meetings and round tables to help people get things done in the open source world. She performs all this work with grace and patience for our sometimes difficult personalities. She’s brilliant and utterly unflappable. Cannot recommend her work highly enough.

So go ahead. Write something nice about someone and what they have done. Send it to them, blog about it, put it in Twitter, LinkedIn, etc.


Filed under: Open Source

Accessing composer item properties via custom expressions in QGIS

So here is a neat trick. Lets say you wanted to access the scale of a composer map to make it part of a label. The scale bar can already be set to numeric to show the number value but what if it needs to be part of an existing label with other text. Not to fear, expression functions are here.

  • Create a new composer. Add the map frame and a label.
  • Set the item ID of the map frame to something you can remember, lets just use themap
  • Select the label and add some text
  • Click Insert Expression

Now for the cool part

  • Select Function Editor
  • Click New File. Give the file a new name and hit save. I called it composer functions.

In the code editor paste this code:

from qgis.utils import iface
from qgis.core import *
from qgis.gui import *

@qgsfunction(args="auto", group='Composer')
def composeritemattr(composername, mapname, attrname, feature, parent):
    composers = iface.activeComposers()
    # Find the composer with the given name
    comp = [composer.composition() for composer in composers 
                if composer.composerWindow().windowTitle() == composername][0]
    # Find the item
    item = comp.getComposerItemById(mapname)
    # Get the attr by name and call 
    return getattr(item, attrname)()
  • Click Run Script

run

Now in your label use this text:

Scale: [% composeritemattr('Composer 1', 'themap', 'scale')%]

Update the Composer 1 to match your composer name, and the themap to match your item ID.

and like magic here is the scale from the map item in a label:

2015-05-21 22_00_09-Composer 1

Check the expression error section if the label doesn’t render

error


Filed under: Open Source, qgis Tagged: composer, python, qgis

PSA: Please use new style Qt signals and slots not the old style

Don’t do this:

self.connect(self.widget, 
             SIGNAL("valueChanged(int)"), 
             self.valuechanged)

It’s the old way, the crappy way. It’s prone to error and typing mistakes. And who really wants to be typing strings as functions and arg names in it. Gross.

Do this:

self.widget.valueChanged.connect(self.valuechanged)
self.widget.valueChanged[str].connect(self.valuechanged)

Much nicer. Cleaner. Looks and feels like Python not some mash up between C++ and Python. The int argument is the default so it will use that. If you to pick the signal type you can use [type].

Don’t do this:

self.emit(SIGNAL("changed()", value1, value2))

Do this

class MyType(QObject):
   changed = pyqtSignal(str, int)

   def stuff(self):
       self.changed.emit(value1, value2)

pyqtSignal is a type you can use to define you signal. It will come with type checking, if you don’t want type checking just do pyqtSignal(object).

Please think of the poor kittens before using the old style in your code.


Filed under: pyqt, python, qgis Tagged: pyqt, qgis, qt

A interactive command bar for QGIS

Something that has been on my mind for a long time is a interactive command interface for QGIS.  Something that you can easily open, run simple commands, and is interactive to ask for arguments when they are needed.

After using the command interface in Emacs for a little bit over the weekend – you can almost hear the Boos! from heavy Vim users :) – I thought this is something I must have in QGIS as well.  I’m sure it can’t be that hard to add.

So here it is.  A interactive command interface for QGIS.

commandbar

commandbar2

The command bar plugin (find it in the plugin installer) adds a simple interactive command bar to QGIS. Commands are defined as Python code and may take arguments.

Here is an example function:

@command.command("Name")
def load_project(name):
    """
    Load a project from the set project paths
    """
    _name = name
    name += ".qgs"
    for path in project_paths:
        for root, dirs, files in os.walk(path):
            if name in files:
                path = os.path.join(root, name)
                iface.addProject(path)
                return
    iface.addProject(_name)

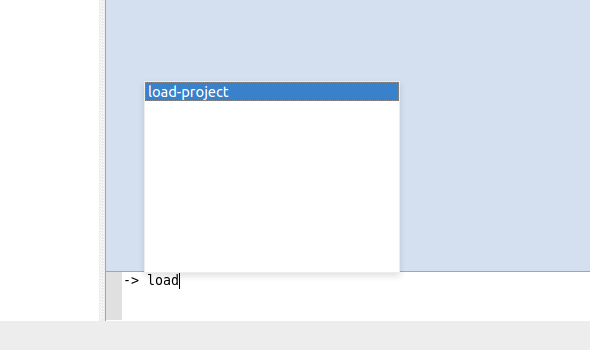
All functions are interactive and if not all arguments are given when called it will prompt for each one.

Here is an example of calling the point-at function with no args. It will ask for the x and then the y

pointat

Here is calling point-at with all the args

pointatfunc

Functions can be called in the command bar like so:

my-function arg1 arg2 arg2

The command bar will split the line based on space and the first argument is always the function name, the rest are arguments passed to the function. You will also note that it will convert _ to - which is easier to type and looks nicer.

The command bar also has auto complete for defined functions – and tooltips once I get that to work correctly.

You can use CTRL + ; (CTRL + Semicolon), or CTRL + ,, to open and close the command bar.

What is a command interface without auto complete

autocomplete

Use Enter to select the item in the list.

How about a function to hide all the dock panels. Sure why not.

@command.command()
def hide_docks():
    docks = iface.mainWindow().findChildren(QDockWidget)
    for dock in docks:
        dock.setVisible(False)

alias command

You can also alias a function by calling the alias function in the command bar.

The alias command format is alias {name} {function} {args}

Here is an example of predefining the x for point-at as mypoint

-> alias mypoint point-at 100

point-at is a built in function that creates a point at x y however we can alias it so that it will be pre-called with the x argument set. Now when we call mypoint we only have to pass the y each time.

-> mypoint
(point-at) What is the Y?: 200

You can even alias the alias command – because why the heck not :)

-> alias a alias
a mypoint 100

a is now the shortcut hand for alias

WHY U NO USE PYTHON CONSOLE

The Python console is fine and dandy but we are not going for a full programming language here, that isn’t the point. The point is easy to use commands.

You could have a function called point_at in Python that would be

point_at(123,1331)

Handling incomplete functions is a lot harder because of the Python parser. In the end it’s easier and better IMO to just make a simple DSL for this and get all the power of a DSL then try and fit into Python.

It should also be noted that the commands defined in the plugin can still be called like normal Python functions because there is no magic there. The command bar is just a DSL wrapper around them.

Notes

This is still a bit of an experiment for me so things might change or things might not work as full expected just yet.

Check out the projects readme for more info on things that need to be done, open to suggestions and pull requests.

Also see the docs page for more in depth information


Filed under: Open Source, python, qgis Tagged: plugin, pyqgis, qgis

In memory of Tim York

The other weekend the world lost a great guy, someone so nice that you struggle to find anything bad to say about him at all. Tim was only 27 but died tragically on the weekend, to the complete shock of everyone that knew him. I don’t think anyone really knew what to feel at that point, and even now it is still really hard to take it.

Tim was very well known in the GIS space here in Australia, and extremely well respected by everyone that knew him. I attended Locate15, where I was going catch up for a beer and chat with him, and almost everyone I talked to knew who he was and how great he really was. I would not doubt at all he could have become CEO or leader at a large company, no doubt at all.

It was mentioned at the funeral that we should try to think of how Tim made our lives better. For that I can fully thank Tim for my job at DMS. It was at a SSSI event after talking with my now manager about if they would like me at DMS that I had caught up with Tim and he encouraged me to move into the private sector. For that I thank him a lot.

I have started to read “How To Win Friends & Influence People” by Dale Carnegie, because one can always do with more skills in life, and some important points from the book:

  • Become genuinely interested in other people.
  • Smile.
  • Remember a person’s name.
  • Be a good listener. Encourage others to talk about themselves.
  • Talk in terms of the other person’s interests

This. All of this is what Tim did. This is the reason it always felt great to talk to him and be around him, even when I only saw him a few times.

I don’t know if Tim’s life was better for knowing me, given his large group of friends and great partner I suspect not, but I know sure as shit that mine was better for having known him.

319187_10150351976087518_3388507_n


Filed under: personal

New addition

Stace and I would like to welcome Matilda Anne Woodrow, born 5/1/15 at 10:36am.

Matilda

She is a nice way to start 2015.

After the pretty crappy year that was 2014 it was finally nice to see Matilda in the flesh. The relief of seeing her alive and well is hard to put in words after losing Ellie in 2013.

People always ask about the lack of sleep, but it feels like we have more energy now then we did before. The emotional and physical toll that the pregancy took on our family had pretty much run us into the ground and it felt like it was never ending.

The toll of the pregancy had lead me to massive lack of motivation towards QGIS and pretty much everything else in life, which isn't healthy when you have a family to look after. Pro Tip: Get help if you find yourself in this spot, it be hard to recover if you go over the edge.

Anyway. Here is to a new year. A better year.

Function editor for QGIS expressions

A new feature for QGIS 2.8 is a function editor for expressions. Being able to define your own custom functions has be possible for a while now, over a year, I even have a plugin (Expressions+) that adds some extra ones, however it wasn’t easy for new users and required you to create files that lived on python path while also editing the startup.py file for QGIS so that functions got registed at start up. Way too much effort for my liking.

This feature is now exposed via the expression builder on the Function Editor tab. The function editor will create new Python files in qgis2\python\expressions and will auto load all functions defined when starting QGIS. I remember Sean Gillies saying that Python support in a field calculator should be a gateway to full Python programming, can’t get any more Python then full Python modules.

The best way to show this feature is a quick video so here it is

The play button in the editor will run the current editor file in the QGIS session and register any functions it finds, it will also save the file in the expressions folder.

You can make a new file by pressing the new file button which will add the basic function template, changing the name in the combobox and hitting save will save the file.

The function editor allows you have to define reuseable functions for your QGIS. If you want to share a function you simply share the .py file from the expressions folder and give it to another user. In future versions of QGIS we might have a way to download other users functions.

Auto expanding values

You can also use the args="auto" keyword in place of the number of args which will let QGIS work it out and expand the arguments for you.

Here is an example

@qgsfunction(args="auto", group='Custom')
def myfunc(value1, value2 feature, parent):
    pass

and can be used like this:

myfunc('test1', 'test2')

QGIS will workout how many arguments your function takes based on what you have defined. Note: The last arguments should always be feature, parent, these are not included in the count.

Raising errors

If you need to report a error from a function simply use the raise method like normal in QGIS and raise an exception.

@qgsfunction(args="auto", group='Custom')
def myfunc(value1, value2 feature, parent):
    raise Expection("Hahah Nope!")

The function wrapper will catch the exception and raise it though the expression engine.

A couple of things to note

  • New functions are only saved in the expressions folder and not in the project file. If you have a project that uses one of your custom functions you will need to also share the .py file in the expressions folder.
  • The editor doesn’t unregister any functions. If you define a function called test, hit play, change the name to test_2, hit play, both functions will exist until you reload QGIS.

Filed under: Open Source

Function editor for QGIS expressions

A new feature for QGIS 2.8 is a function editor for expressions. Being able to define your own custom functions has be possible for a while now, over a year, I even have a plugin (Expressions+) that adds some extra ones, however it wasn't easy for new users and required you to create files that lived on python path while also editing the startup.py file for QGIS so that functions got registed at start up. Way too much effort for my liking.

This feature is now exposed via the expression builder on the Function Editor tab. The function editor will create new Python files in qgis2\python\expressions and will auto load all functions defined when starting QGIS. I remember Sean Gillies saying that Python support in a field calculator should be a gateway to full Python programming, can't get any more Python then full Python modules.

The best way to show this feature is a quick video so here it is

The play button in the editor will run the current editor file in the QGIS session and register any functions it finds, it will also save the file in the expressions folder.

You can make a new file by pressing the new file button which will add the basic function template, changing the name in the combobox and hitting save will save the file.

The function editor allows you have to define reuseable functions for your QGIS. If you want to share a function you simply share the .py file from the expressions folder and give it to another user. In future versions of QGIS we might have a way to download other users functions.

Auto expanding values

You can also use the args="auto" keyword in place of the number of args which will let QGIS work it out and expand the arguments for you.

Here is an example

@qgsfunction(args="auto", group='Custom')
def myfunc(value1, value2 feature, parent):
    pass

and can be used like this:

myfunc('test1', 'test2')

QGIS will workout how many arguments your function takes based on what you have defined. Note: The last arguments should always be feature, parent, these are not included in the count.

Raising errors

If you need to report a error from a function simply use the raise method like normal in QGIS and raise an exception.

@qgsfunction(args="auto", group='Custom')
def myfunc(value1, value2 feature, parent):
    raise Expection("Hahah Nope!")

The function wrapper will catch the exception and raise it though the expression engine.

A couple of things to note

  • New functions are only saved in the expressions folder and not in the project file. If you have a project that uses one of your custom functions you will need to also share the .py file in the expressions folder.
  • The editor doesn't unregister any functions. If you define a function called test, hit play, change the name to test_2, hit play, both functions will exist until you reload QGIS.

Back to Top

Sustaining Members