Related Plugins and Tags

QGIS Planet

Store and visualize your raster in the Cloud with COG and QGIS

We have recently been working for the French Space Agency ( CNES ) who needed to store and visualize satellite rasters in a cloud platform. They want to access the image raw data, with no transformation, in order to fullfill deep analysis like instrument calibration. Using classic cartographic server standard like WMS or TMS is not an option because those services transform datasets in already rendered tiles.

We chose to use a quite recent format managed by GDAL, the COG (Cloud Optimize Geotiff) and target OVH cloud platform for it provides OpenStack, a open source cloud computing platform.

How it works

A COG file is a GEOTiff file which inner structure is tiled, meaning that the whole picture is divided in fixed size tile (256 x 256 pixels for instance) so you can efficiently retrieve parts of the raster. In addition to the HTTP/1.1 standard feature range request, it is possible to get specific tiles of an image through the network without downloading the entire raster.

We used a service provided by OpenStack, called Object Storage to serve the COG imagery. Object storage allows to store and retrieve file as objects using HTTP GET/POST requests.

Why not WCS ?

Web Coverage Service standard could have been an option. A WCS server can serve raw data according to a given geographic extent. It’s completely possible to deploy a container or a VPS (Virtual Private Server) running a WCS Server in a cloud plateform. The main advantages of the COG solution over WCS Server is that you don’t have to deal with the burden of deploying a server, like giving it ressources, configuring load balancing, handle updates, etc…

The beauty of COG solution is its simplicity. It is only HTTP requests, and everything else (rendering for instance) is done on the client side.

Step by step

Here are the different steps you’d have to go through if you’re willing to navigate in a big raster image directly from the cloud.

First, let’s generate a COG file

gdal_translate inputfile.tif cogfile.tif -co TILED=YES -co COPY_SRC_OVERVIEWS=YES -co COMPRESS=DEFLATE

Install your openstack-client, it can be achieved easily with Python pip install command line

$ pip install python-openstackclient

Next, configure your openstack client in order to generate an athentification token. To do so you need to download your project specific openrc file to setup your environment)

$ source myproject-openrc.sh
Please enter your OpenStack Password for project myproject as user myuser:
**********
$ openstack token issue                                 
+------------+-----------------------------------------------------------------------------------------------------------------------------------------------------------------------------------------+
| Field      | Value                                                                                                                                                                                   |
+------------+-----------------------------------------------------------------------------------------------------------------------------------------------------------------------------------------+
| expires    | 2020-07-21T08:15:12+0000                                                                                                                                                                |
| id         | xxxx_my_token_xxxx
| project_id | 97e2e750f1904b41b76f80a50dabde0a                                                                                                                                                        |
| user_id    | 18f7ccaf1a2d4344a4e35f0d84eb065e                                                                                                                                                        |
+------------+-----------------------------------------------------------------------------------------------------------------------------------------------------------------------------------------+

You are now good to push you COG file to the cloud instance

openstack object create MyContainer cogfile.tif --name cogfile.tif

Before starting QGIS, 2 environment variables need to be set.  (replace xxxx_my_token_xxxx with the token you’d just come to generate)

$ export SWIFT_AUTH_TOKEN=xxxx_my_token_xxxx
$ export SWIFT_STORAGE_URL=https://storage.sbg.cloud.ovh.net/v1/AUTH_$OS_PROJECT_ID

It can also be done directly from the QGIS Python console by setting those variable using the os.environ.

Finally, add a cloud raster data source in in QGIS

You can now navigating into your image directly reading it from the cloud

© CNES 2018, Distribution Airbus DS

Performances

While panning in the map, QGIS will download only few tiles from the image in order to cover the view extent. The display latency that you could see in the video depends essentially on:

  • The number of band of your image
  • The pixel size
  • Your internet connection (mine, the one use for the video, is not an awesome one)

Note that the white flickering that you could see when you move in the map and the raster is refreshed should be removed in next version of QGIS according to this QEP.

What’s next ?

Thanks so much to the GDAL and QGIS contributors for adding such a nice feature ! It brings lots of possibilities for organizations that have to deal with great number of big raster and just want to explore part of it.

We are already thinking about further improvments (ease authentification, better integration with processing…), so if you’re willing to fund them or just want to know more about QGIS, feel free to contact us at [email protected]. And please have a look at our support offering for QGIS.

GRASS GIS 7.8.2 released

GRASS GIS 7.8.2 released with updated PROJ 6 and GDAL 3 support

What’s new in a nutshell

As a follow-up to the recent GRASS GIS 7.8.1 we have pusblished the new stable release GRASS GIS 7.8.2.
Besides other improvements, the release contains important PROJ 4/5/6 related datum handling fixes, wxGUI fixes and a fix for the vector import from PostGIS databases.

An overview of the new features in the 7.8 release series is available at new features in GRASS GIS 7.8.

Binaries/Installer download:

Source code download:

See also our detailed announcement:

First time users may explore the first steps tutorial after installation.

About GRASS GIS

The Geographic Resources Analysis Support System (https://grass.osgeo.org/), commonly referred to as GRASS GIS, is an Open Source Geographic Information System providing powerful raster, vector and geospatial processing capabilities in a single integrated software suite. GRASS GIS includes tools for spatial modeling, visualization of raster and vector data, management and analysis of geospatial data, and the processing of satellite and aerial imagery. It also provides the capability to produce sophisticated presentation graphics and hardcopy maps. GRASS GIS has been translated into about twenty languages and supports a huge array of data formats. It can be used either as a stand-alone application or as backend for other software packages such as QGIS and R geostatistics. It is distributed freely under the terms of the GNU General Public License (GPL). GRASS GIS is a founding member of the Open Source Geospatial Foundation (OSGeo).

The GRASS Development Team, December 2019

The post GRASS GIS 7.8.2 released appeared first on GFOSS Blog | GRASS GIS and OSGeo News.

Remarks on SVN-trac to GitHub migration

GRASS GIS is an open source geoinformation system which is developed by a globally distributed team of developers. Besides the source code developers also message translators, people who write documentation, those who report bugs and wishes and more are involved.

1. Early days… from pre-Internet to CVS and SVN

While GRASS GIS is under development since 1982 (no typo!) it has been put into a centralized source code management system in December 1999. Why so late? Because the World Wide Web (WWW) became available in the 1990s along with tools like browsers and such, followed by the development of distributed source code management tools. We moved on 29th Dec 1999 (think Y2K bug) the entire code into our instance of CVS (Concurrent Versioning System). With OSGeo being founded in 2006, we migrated the CVS repository to SVN (Subversion for the source code management) and trac (bug and wish tracker) on 8 Dec 2007. See here for historic details on our various bug trackers.

2. Time to move on: git

Now, after more than 10 years using SVN/trac time had come to move on and join the large group of projects managing their source code in git (see also our related Wiki page on migration). Git comes with numerous advantages, yet we needed to decide which hosting platform to use. Options where github.com, gitlab.com, gitlab or gitea on OSGeo infrastructure, or other platforms. Through a survey we found out that the preference among contributors is GitHub. While not being open source itself it offers several advantages: it is widely known (good to get new developers interested and involved), numerous OSGeo projects are hosted there under the GitHub “OSGeo organization“.

If all fails (say, one day GitHub no longer being a reasonable choice) the import of our project from GitHub to GitLab is always possible. Indeed, we meanwhile mirror our code on OSGeo’s gitea server.

Relevant script code and migration ticket:

Relevant steps:

  • migrated SVN trunk -> git master
  • migrated and tagged release branches (milestones)
  • deleted “develbranch6” (we compared it to “releasebranch_6_4” and didn’t discover relevant differences)
  • Fix commit messages (yes, we really wanted to be brave, updating decades of commit messages!):
    • references to old RT tracker tickets (used Dec 2000 – Dec 2006)
    • references to old GForge tracker tickets (used Jan 2007 – Dec 2008)
    • references to other trac tickets (#x -> https://trac.osgeo.org/…)

3. Source code migration: the new git repositories

  • github repository “grass” (repo)

    • Source code from 1999 to present day (SVN-trunk -> git-master)
    • all 7.x release branches
  • github repository “grass-legacy” (repo)

    • separate repository for older GRASS GIS releases (3.2, 4.x, 5.x, 6.x), hence source code now available in git since 1987!
  • github repository “grass-addons” (repo)

    • repository for addons
  • github repository “grass-promo” (repo)
    • repository for promotional material
  • github repository “grass-website” (repo)
    • repository for upcoming new Website

4. Remarks on the “grass-legacy” repository

What special about it:

  • the source code goes back to 1987!
  • file timestamps (which I tried to preserve for decades :-) have been used to reconstruct the source code history (e.g., releasebranch_3_2)
  • junk files removed (plenty of leftover old binary files, files consisting of a special char only etc)
  • having this grass-legacy repo available in parallel to the main grass repo which contains the  recent source code we have a continuous source code coverage from 1987 to today in git.
  • size is about 250MB

What’s missing

  • the 4.3 source code doesn’t have distinct timestamps. Someone must have once packaged without mtime preservation… a pity. Perhaps a volunteer may fix that by carrying over the timestamps from GRASS GIS 4.2 in case the md5sum of a file is identical (or so).

5. Trac issue migration

A series of links had to be updated. Martin Landa invested days and days on that (thanks!!). He used the related GDAL efforts as a basis (Even Rouault: thanks!). As the date for the trac migration we selected 2007-12-09 (r25479) as it was the first SVN commit (after the years in CVS). The migration of trac bugs to github (i.e. transfer of trac ticket content) required several steps:

Link updates in the ticket texts:

  • links to other tickets (now to be pointed to full trac URL). Note that there were many styles of referring in the commit log message which had to be parsed accordingly
  • links to trac wiki (now to be pointed to full trac URL)
  • links source code in SVN (now to be pointed to full trac URL)
  • images and attachments (now to be pointed to full trac URL)

Transferring:

  • “operating system” trac label into the github issue text itself (following the new issue reporting template)
  • converting milestones/tickets/comments/labels
  • converting trac usernames to Github usernames
  • setting assignees if possible, set new “grass-svn2git” an assignee otherwise
  • slowing down transfer to match the 60 requests per second API limit rate at github

6. Fun with user name mapping

Given GRASS GIS’ history of 35+ years we had to invest major effort in identifying and mapping user names throughout the decades (see also bug tracker history). The following circumstances could be identified:

  • user present in CVS but not in SVN
  • user present in SVN but not in CVS
  • user present in both with identical name
  • user present in both with different name (well, in our initial CVS days in 1999 we often naivly picked our surnames like “martin”, “helena”, “markus”, “michael” … cute yet no scaling very much over the years!) as some were changed in the CVS to SVN migration in 2007, leading to
    • colliding user names
  • some users already having a github account (with mostly different name again)

We came up with several lookup tables, aiming at catching all variants. Just a “few” hours to dig in old source code files and in emails for finding all the missing email addresses…

7. Labels for issues

We cleaned up the trac component of the bug reports, coming up with the following categories which have to be visually grouped by color since the label list is just sorted alphabetically in github/gitlab:

  • Issue category:
    • bug
    • enhancement
  • Issue solution (other than fixing and closing it normally):
    • duplicate
    • invalid
    • wontfix
    • worksforme
  • Priority:
    • blocker
    • critical
    • feedback needed
  • Components:
    • docs
    • GUI
    • libs
    • modules
    • packaging
    • python
    • translations
    • unittests
    • Windows specific

Note that the complete issue migration is still to be done (as of Nov. 2019). Hopefully addressed at the GRASS GIS Community Sprint Prague 2019.

8. Setting up the github repository

In order to avoid users being flooded by emails due to the parsing of user contributions which normally triggers an email from github) we reached out to GitHub support in order to temporarily disable these notifications until all source code and selected issues were migrated.

The issue conversion rate was 4 min per trac bug to be converted and uploaded to github. Fairly slow but likely due to the API rate limit imposed and the fact that the migration script above generates a lot of API requests rather than combined ones..
Note to future projects to be migrated: use the new gihub import API (unfortunately we got to know about its existence too late in our migration process).

Here out timings which occurred during the GRASS GIS project migration from SVN to github:

  • grass repo: XX hours (all GRASS GIS 7.x code)
  • grass-legacy repo: XX hours (all GRASS GIS 3.x-6.x code)
  • NNN issues: XX hours – forthcoming.

9. New issue reporting template

In order to guide the user when reporting new issues, we will develop a small template – forthcoming.

10. Email notifications: issues to grass-dev and commits to grass-commit

We changed the settings from SVN post-hook to Github commit notifications and they flow in smoothly into the grass-commit mailing list. Join it to follow the development.

Overall, after now several months of using our new workflow we can state that things work fine.

The post Remarks on SVN-trac to GitHub migration appeared first on GFOSS Blog | GRASS GIS and OSGeo News.

GDAL 2.1 packaged for Fedora 23 and 24

GDAL logoThe new GDAL 2.1 is now also packaged for Fedora 23 and 24 which is possible due to the tireless efforts of various Fedora packagers.

Repo: https://copr.fedorainfracloud.org/coprs/neteler/GDAL/

Installation Instructions:

su

# Fedora 23+24:
# install this extra repo
dnf copr enable neteler/GDAL

# A) in case of update, simply
dnf update

# B) in case of new installation (gdal-devel is optional)
dnf install gdal gdal-python gdal-devel

The post GDAL 2.1 packaged for Fedora 23 and 24 appeared first on GFOSS Blog | GRASS GIS Courses.

Good news for QGIS MapInfo users

So some good news for QGIS users who also need/want to use MapInfo.  QGIS via GDAL 2.0 can support MapInfo TAB file editing. In all older versions of GDAL there was only support for read and/or write but not both.

MapInfo TAB editing has been supported in GDAL 2 but up until this point QGIS has only be built against GDAL 1.xx.  GDAL 2.x is now the default GDAL release in OSGeo4w.

From Jurgen:

2.0.2 is now the default GDAL in OSGeo4W and the nightlies (qgis-ltr-dev,
qgis-rel-dev and qgis-dev) already picked it up.

With the next release the regular packages (2.14 and 2.8) will also be updated
to use it

Even if you don’t want to make the switch to full QGIS you can now use both bits of software and edit in both.

QGIS will still only support a single geometry type per layer so if you open a mixed tab file you will get the geometry type selector.  You can load the layer 3 times if you need the 3 different geometry types.


GDAL/OGR 1.11.0 released

The new version 1.11.0  of GDAL/OGR (http://www.gdal.org/) which offers major new features has been released. GDAL/OGR is a C++ geospatial data access library for raster and vector file formats, databases and web services.  It includes bindings for several languages, and a variety of command line tools.

Highlights:

More complete information on the new features and fixes in the 1.11.0 release can be found at http://trac.osgeo.org/gdal/wiki/Release/1.11.0-News

The new release can be downloaded from:

The post GDAL/OGR 1.11.0 released appeared first on GFOSS Blog | GRASS GIS Courses.

OSGeo Code Sprint, Vienna

This is how OSGeo happens.  These are the folk who bring us a lot of that open-source geo-spatial goodness. You can follow the code sprint on Twitter using the hashtags #csprint and #viennacodesprint14


50th ICA-OSGeo Lab established at Fondazione Edmund Mach (FEM)

We are pleased to announce that the 50th ICA-OSGeo Lab has been established at the GIS and Remote Sensing Unit (Piattaforma GIS & Remote Sensing, PGIS), Research and Innovation Centre (CRI), Fondazione Edmund Mach (FEM), Italy. CRI is a multifaceted research organization established in 2008 under the umbrella of FEM, a private research foundation funded by the government of Autonomous Province of Trento. CRI focuses on studies and innovations in the fields of agriculture, nutrition, and environment, with the aim to generate new sharing knowledge and to contribute to economic growth, social development and the overall improvement of quality of life.

The mission of the PGIS unit is to develop and provide multi-scale approaches for the description of 2-, 3- and 4-dimensional biological systems and processes. Core activities of the unit include acquisition, processing and validation of geo-physical, ecological and spatial datasets collected within various research projects and monitoring activities, along with advanced scientific analysis and data management. These studies involve multi-decadal change analysis of various ecological and physical parameters from continental to landscape level using satellite imagery and other climatic layers. The lab focuses on the geostatistical analysis of such information layers, the creation and processing of indicators, and the production of ecological, landscape genetics, eco-epidemiological and physiological models. The team pursues actively the development of innovative methods and their implementation in a GIS framework including the time series analysis of proximal and remote sensing data.

The GIS and Remote Sensing Unit (PGIS) members strongly support the peer reviewed approach of Free and Open Source software development which is perfectly in line with academic research. PGIS contributes extensively to the open source software development in geospatial (main contributors to GRASS GIS), often collaborating with various other developers and researchers around the globe. In the new ICA-OSGeo lab at FEM international PhD students, university students and trainees are present.

PGIS is focused on knowledge dissemination of open source tools through a series of courses designed for specific user requirement (schools, universities, research institutes), blogs, workshops and conferences. Their recent publication in Trends in Ecology and Evolution underlines the need on using Free and Open Source Software (FOSS) for completely open science. Dr. Markus Neteler, who is leading the group since its formation, has two decades of experience in developing and promoting open source GIS software. Being founding member of the Open Source Geospatial Foundation (OSGeo.org, USA), he served on its board of directors from 2006-2011. Luca Delucchi, focal point and responsible person for the new ICA-OSGeo Lab is member of the board of directors of the Associazione Italiana per l’Informazione Geografica Libera (GFOSS.it, the Italian Local Chapter of OSGeo). He contributes to several Free and Open Source software and open data projects as developer and trainer.

Details about the GIS and Remote Sensing Unit at http://gis.cri.fmach.it/

Open Source Geospatial Foundation (OSGeo) is a not-for-profit organisation founded in 2006 whose mission is to support and promote the collaborative development of open source geospatial technologies and data.

International Cartographic Association (ICA) is the world authoritative body for cartography and GIScience. See also the new ICA-OSGeo Labs website.

Processing Landsat 8 data in GRASS GIS 7: Import and visualization

banner_landsat_rgb

For our analysis example, we’ll obtain (freely – thanks, NASA and USGS!) a Landsat 8 scene from http://earthexplorer.usgs.gov/

First of all, you should register.

1. Landsat 8 download procedure

1. Enter Search Criteria:

  • path/row tab, enter Type WRS2: Path: 16, Row: 35
  • Date range: 01/01/2013 – today
  • Click on the “Data sets >>” button

2. Select Your Data Set(s):

  • Expand the entry + Landsat Archive
        [x] L8 OLI/TIRS
  • Click on the “Results >>” button

(We jump over the additional criteria)

4. Search Results

From the resulting list, we pick the data set:

earthexplorer_selection_lsat8Entity ID: LC80160352013134LGN03
Coordinates: 36.04321,-79.28696
Acquisition Date: 14-MAY-13

Using the “Download options”, you can download the data set (requires login). Select the choice:
[x] Level 1 GeoTIFF Data Product (842.4 MB)

You will receive the file “LC80160352013134LGN03.tar.gz”.

2. Unpacking the downloaded Landsat 8 dataset

To unpack the data, run (or use a graphical tool at your choice):

tar xvfz LC80160352013134LGN03.tar.gz

A series of GeoTIFF files will be extracted: LC80160352013134LGN03_B1.TIF, LC80160352013134LGN03_B2.TIF, LC80160352013134LGN03_B3.TIF, LC80160352013134LGN03_B4.TIF, LC80160352013134LGN03_B5.TIF, LC80160352013134LGN03_B6.TIF, LC80160352013134LGN03_B7.TIF, LC80160352013134LGN03_B8.TIF, LC80160352013134LGN03_B9.TIF, LC80160352013134LGN03_B10.TIF, LC80160352013134LGN03_B11.TIF, LC80160352013134LGN03_BQA.TIF

We may check the metadata with “gdalinfo“:

gdalinfo LC80160352013134LGN03_B1.TIF
Driver: GTiff/GeoTIFF
Files: LC80160352013134LGN03_B1.TIF
Size is 7531, 7331
Coordinate System is:
PROJCS["WGS 84 / UTM zone 17N",
    GEOGCS["WGS 84",
        DATUM["WGS_1984",
            SPHEROID["WGS 84",6378137,298.257223563,
...
Pixel Size = (30.000000000000000,-30.000000000000000)
...

3. Want to spatially subset the Landsat scene first?

If you prefer to cut out a smaller area (subregion), check here for gdal_translate usage examples.

4. Import into GRASS GIS 7

Note: While this Landsat 8 scene covers the area of the North Carolina (NC) sample dataset, it is delivered in UTM rather than the NC's state plane metric projection. Hence we preprocess the data first in its original UTM projection prior to the reprojection to NC SPM.

Using the Location Wizard, we can import the dataset easily into a new location (in case you don't have UTM17N not already created earlier):

grass70 -gui

grass7_loc_wizard1
grass7_loc_wizard2
grass7_loc_wizard3
grass7_loc_wizard4
grass7_loc_wizard5
grass7_loc_wizard6
grass7_loc_wizard7
grass7_loc_wizard8
grass7_loc_wizard9


Now start GRASS GIS 7 and you will find the first band already imported (the others will follow shortly!).

For the lazy folks among us, we can also create a new GRASS GIS Location right away from the dataset on command line:

grass70 -c LC80160352013134LGN03_B10.TIF ~/grassdata/utm17n

5. Importing the remaining Landsat 8 bands

The remaining bands can be easily imported with the raster import tool:

grass7_import1

The bands can now be selected easily for import:

grass7_import2

  • Select "Directory" and navigate to the right one
  • The available GeoTIFF files will be shown automatically
  • Select those you want to import
  • You may rename (double-click) the target name for each band
  • Extend the computation region accordingly automatically

Click on "Import" to get the data into the GRASS GIS location. This takes a few minutes. Close the dialog window then.

In the "Map layers" tab you can select the bands to be shown:

grass7_visualize1

6. The bands of Landsat 8

(cited from USGS)

Landsat 8 Operational Land Imager (OLI) and Thermal Infrared Sensor (TIRS) images consist of nine spectral bands with a spatial resolution of 30 meters for Bands 1 to 7 and 9. New band 1 (ultra-blue) is useful for coastal and aerosol studies. New band 9 is useful for cirrus cloud detection. The resolution for Band 8 (panchromatic) is 15 meters. Thermal bands 10 and 11 are useful in providing more accurate surface temperatures and are collected at 100 meters. Approximate scene size is 170 km north-south by 183 km east-west (106 mi by 114 mi).

Landsat 8 Operational Land Imager (OLI) and Thermal Infrared Sensor (TIRS)Launched February 11, 2013 Bands Wavelength (micrometers) Resolution (meters)
Band 1 - Coastal aerosol 0.43 - 0.45 30
Band 2 - Blue 0.45 - 0.51 30
Band 3 - Green 0.53 - 0.59 30
Band 4 - Red 0.64 - 0.67 30
Band 5 - Near Infrared (NIR) 0.85 - 0.88 30
Band 6 - SWIR 1 1.57 - 1.65 30
Band 7 - SWIR 2 2.11 - 2.29 30
Band 8 - Panchromatic 0.50 - 0.68 15
Band 9 - Cirrus 1.36 - 1.38 30
Band 10 - Thermal Infrared (TIRS) 1 10.60 - 11.19 100
Band 11 - Thermal Infrared (TIRS) 2 11.50 - 12.51 100

* TIRS bands are acquired at 100 meter resolution, but are resampled to 30 meter in delivered data product.

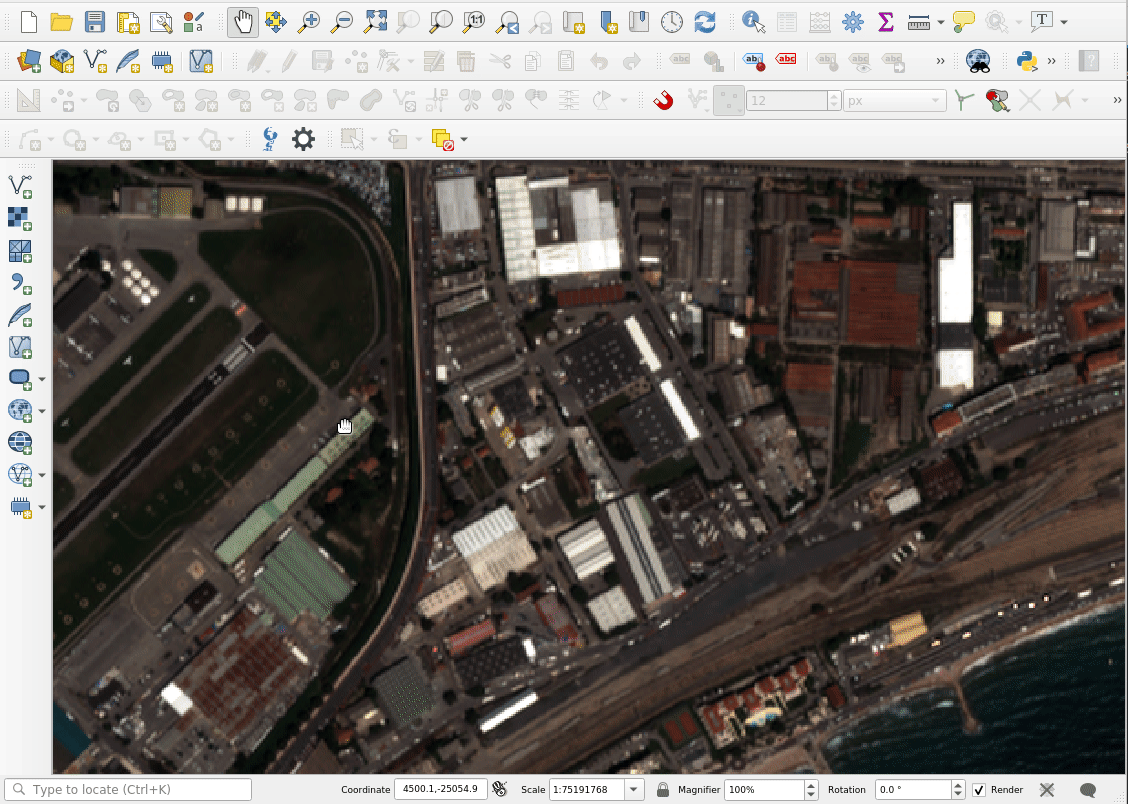
7. Natural color view (RGB composite)

Due to the introduction of a new "Cirrus" band (#1), the BGR bands are now 2, 3, and 4, respectively. See also "Common band combinations in RGB" for Landsat 7 or Landsat 5, and Landsat 8.

From Digital Numer (DN) to reflectance:
Before creating an RGB composite, it is important to convert the digital number data (DN) to reflectance (or optionally radiance). Otherwise the colors of a "natural" RGB composite do not look convincing but rather hazy (see background in the next screenshot). This conversion is easily done using the metadata file which is included in the data set with i.landsat.toar:

grass7_landsat_toar0
grass7_landsat_toar1
grass7_landsat_toar2
grass7_landsat_toar3

Now we are ready to create a nice RGB composite:

grass7_landsat_rgb0

grass7_landsat_rgb1

Select the bands to be visually combined:

grass7_visualize2

... and voilà!

grass7_landsat_rgb2

8. Applying the Landsat 8 Quality Assessment (QA) Band

One of the bands of a Landsat 8 scene is named "BQA" which contains for each pixel a decimal value representing a bit-packed combination of surface, atmosphere, and sensor conditions found during the overpass.  It can be used to judge the overall usefulness of a given pixel.

We can use this information to easily eliminate e.g. cloud contaminated pixels. In short, the QA concept is (cited here from the USGS page):

Cited from http://landsat.usgs.gov/L8QualityAssessmentBand.php‎

For the single bits (0, 1, 2, and 3):
0 = No, this condition does not exist
1 = Yes, this condition exists.

The double bits (4-5, 6-7, 8-9, 10-11, 12-13, and 14-15) represent levels of confidence that a condition exists:
00 = Algorithm did not determine the status of this condition
01 = Algorithm has low confidence that this condition exists (0-33 percent confidence)
10 = Algorithm has medium confidence that this condition exists (34-66 percent confidence)
11 = Algorithm has high confidence that this condition exists (67-100 percent confidence).

Detailed bit patterns (d: double bits; s: single bits):
d  Bit 15 = 0 = cloudy
d  Bit 14 = 0 = cloudy
d  Bit 13 = 0 = not a cirrus cloud
d  Bit 12 = 0 = not a cirrus cloud
d  Bit 11 = 0 = not snow/ice
d  Bit 10 = 0 = not snow/ice
d  Bit 9 = 0 = not populated
d  Bit 8 = 0 = not populated
d  Bit 7 = 0 = not populated
d  Bit 6 = 0 = not populated
d  Bit 5 = 0 = not water
d  Bit 4 = 0 = not water
s  Bit 3 = 0 = not populated
s  Bit 2 = 0 = not terrain occluded
s  Bit 1 = 0 = not a dropped frame
s  Bit 0 = 0 = not fill

Usage example 1:  Creating a mask from a bitpattern

We can create a cloud mask (bit 15+14 are set) from this pattern:
cloud:   1100000000000000

Using the Python shell tab, we can easily convert this into the corresponding decimal number for r.mapcalc:

Cited from http://landsat.usgs.gov/L8QualityAssessmentBand.php‎

Welcome to wxGUI Interactive Python Shell 0.9.8

Type "help(grass)" for more GRASS scripting related information.
Type "AddLayer()" to add raster or vector to the layer tree.

Python 2.7.5 (default, Aug 22 2013, 09:31:58) 
[GCC 4.8.1 20130603 (Red Hat 4.8.1-1)] on linux2
Type "help", "copyright", "credits" or "license" for more information.
>>> int(0b1100000000000000)
49152

Using this decimal value of 49152, we can create a cloud mask:

# set NULL for cloudy pixels, 1 elsewhere:
r.mapcalc "cloudmask = if(LC80160352013134LGN03_BQA == 49152, null(), 1 )"

# apply this mask
r.mask cloudmask

In our sample scene, there are only tiny clouds in the north-east, so no much to be seen. Some spurious cloud pixels are scattered over the scene, too, which could be eliminated (in case of false positives) or kept.

Usage example 2:  Querying the Landsat 8 BQA map and retrieve the bitpattern

Perhaps you prefer to query the BQA map itself (overlay the previously created RGB composite and query the BSA map by selecting it in the Layer Manager). In our example, we query the BQA value of the cloud:

Using again the Python shell tab, we can easily convert the decimal number (used for r.mapcalc) into the corresponding binary representation to verify with the  table values above.

>>> x=61440
>>> print(bin(x & 0xffffffff))
0b1111000000000000

Hence, bits 15,14,13, and 12 are set: cloudy and not a cirrus cloud. Looking at the RGB composite we tend to agree :-) Time to mask out the cloud!

wxGUI menu >> Raster >> Mask [r.mask]

Or use the command line, as shown already above:

# remove existing mask (if active)
r.mask -r

# set NULL for cloudy pixels, 1 elsewhere:
r.mapcalc "cloudmask = if(LC80160352013134LGN03_BQA == 61440, null(), 1 )" --o

# apply the new mask
r.mask cloudmask

The visual effect in the RGB composite is minimal since the cloud is white anyway (as NULL cells, too). However, it is relevant for real calculations such as NDVI (vegetation index) or thermal maps.

We observe dark pixels around the cloud originating from thin clouds. In a subsequent identification/mask step we may eliminate also those pixels with a subsequent filter.

Installing python GDAL into a python virtualenv in OSX

Yes I know its a bit wierd to see the word ‘OSX’ in an article by me…I recently bought a Mac for testing InaSAFE and fooling around with FOSSGIS software on OSX. Besides the 2 or three days it took to get it set up as a development machine for FOSSGIS stuff (as compared to... Read more »

Installing python GDAL into a python virtualenv in OSX

Yes I know its a bit wierd to see the word 'OSX' in an article by me...I recently bought a Mac for testing InaSAFE and fooling around with FOSSGIS software on OSX. Besides the 2 or three days it took to get it set up as a development machine for FOSSGIS stuff (as compared to a few hours - limited mainly by internet speed - on Linux) it hasnt been too bad an experience.

I used William Kyngesburye's excellent packages for installing all the FOSSGIS dependencies (barring QGIS which of course I wanted to build myself). I've been trying to see if I can use OSX as a usable platform for doing GeoDjango work and ran into a few problems:

  • GDAL python package needs compilation when used in a python virtualenv (which of course I use)
  • William's packages provide PostGIS 2.0 whereas GeoDjango really only works out of the box with 1.5 still

In this post I am outlining how I got GDAL to build in my venv. Note that I assume you have Williams frameworks and xcode / compilation toolchain in place.

source venv/bin/activate
pip install --no-install GDAL
cd venv/build/GDAL
python setup.py build_ext \
  --gdal-config=/usr/local/gdal/1.9/bin/gdal-config \
  --library-dirs=/Library/Frameworks/GDAL.framework/Versions/1.9/unix/lib/ \
  --include-dirs=/Library/Frameworks/GDAL.framework/Versions/1.9/Headers/
pip install --no-download GDAL

Now verify it is installed:

pip freeze

You should see GDAL listed. Another check:

>>> from osgeo import gdal
>>> gdal.__version__
'1.9.2'

Confirm it is really using your module in your venv:

>>> gdal.__file__
'/Users/timlinux/dev/python/catalogue/venv/lib/python2.7/site-packages/osgeo/gdal.pyc'

WFS to PostGIS in 1 Step

This is an update to my previous post “WFS to PostGIS in 3 Steps”. Thanks to Even Rouault’s comments and improvements to GDAL, it is now possible to load Latin1-encoded WFS (like the one by data.wien.gv.at) into PostGIS in just one simple step.

To use the following instructions, you’ll have to get the latest GDAL (release-1600-gdal-mapserver.zip)

You only need to run SDKShell.bat to set up the environment and ogr2ogr is ready for action:

C:\Users\Anita>cd C:\release-1600-gdal-mapserver
C:\release-1600-gdal-mapserver>SDKShell.bat
C:\release-1600-gdal-mapserver>ogr2ogr -overwrite -f PostgreSQL PG:"user=myuser password=mypassword dbname=wien_ogd" "WFS:http://data.wien.gv.at/daten/geoserver/ows?service=WFS&request=GetFeature&version=1.1.0&typeName=ogdwien:BEZIRKSGRENZEOGD&srsName=EPSG:4326"

Thanks everyone for your comments and help!


Creating coloured rasters with GDAL

One of the most popular posts on my blog ever is my article about creating GDAL hillshades: ‘A workflow for creating beautiful relief shaded DEMS using GDAL‘. In the techniques outlined in the aforementioned article, colours are assigned across a continuum to and superimposed on top of a hillshaded model. The GDAL tools in QGIS [...]

Generating contours using GDAL ( via shell or QGIS)

I tell you. It always amazes me how much cool stuff you can do with great open source GIS software these days. GDAL is one of those great open source projects that I have just found a great use for (apart from just opening every raster type under the sun in QGIS).

GDAL has the ability to generate contours from a DEM, something that I have always wanted to try for my town but have never been able due to lack of a good DEMs.

Recently we purchased a set of DEMs that cover a large area as part of a study. Each DEM uses a grid size of 1mx1m. Prefect for generating contours.

Using the GdalTools QGIS plugin.

First make sure that you have the latest version of the GdalTools plugin installed (GdalTools should be installed by default with QGIS. If it’s not, search “Gdal” in the plugin installer). Enable the plugin once it’s installed.

Load the DEM into QGIS using the Load Raster icon.

DEM loaded in QGIS

Now head up to the menu Raster->Extraction->Contour

Raster menu in QGIS

Select the settings that you need. For this DEM I am going to generate 250mm contours.

Contour dialog.

Take note of the text area at the bottom of the dialog as that is the exact command sent to GDAL in order to generate the contours. If you take a copy of that you can run it on the command line for batch processing later.

Hit ok.

250mm contours from the DEM

BAM! :)

Using the command line/shell.

Using QGIS for a one off DEM is fine and dandy but what if you have 3000 DEMs that you need to process. To hell with doing that by hand!

Remember the contour tool in QGIS told us the exact command line args to use, so creating a shell script for automating the process is pretty easy.

for f in *.asc
do
  echo "Processing $f"
 gdal_contour -a ELEV -i 0.25 $f $f-250mm.shp
done

The above code will loop though the current directory and process all the DEMs generating 250mm contours for each one. It saves each new contour file as {filename}-250mm.shp. You will need to change *.asc to whatever format your DEM is in.

Copy the above code into a file somewhere and call it generate_contours.sh. This can then be called from the command line using

sh generate_contours.sh

Running sh on Windows

If you’re a windows user you will need to run OsGeo4W Shell in order to use sh.

Loading OsGeo4w shell.

Once the shell is loaded you can just call:

sh generate_contours.sh

Output from running generate_contours.sh

Final remarks

I ran the above sh script on a folder with about 2500 DEMs and it took around 4 hours to complete the whole folder. Of course performance will vary but it seems pretty quick considering.

Once again the possibly to use open source GIS tools to get my work done is amazing.  No expensive software here.

So far I’m not aware of any line smoothing/generalizing abilities using GDAL/OGR.  Although you can import the contours into GRASS and use that: http://grass.osgeo.org/wiki/V.generalize_tutorial

You can also generate the contours using GDAL via Python but that is a topic for another day.


Filed under: Open Source, qgis Tagged: contours, DEM, FOSSGIS, gdal, gis, grid, ogr, Open Source, osgeo, qgis, Quantum GIS, raster

Selecting GDAL Drivers on the fly with QGIS

There is quite an old ticket in the QGIS bug tracker relating to the need to be able to select which GDAL drivers to use. The issues is this: GDAL in some cases provides multiple drivers for the same image type. For example, JPEG2000 datasets can be opened using ECW's proprietary driver, KAKADU (gotta love that name!), OpenJPEG etc. The problem is that there isn't actually any way to choose which driver GDAL should use for a given image format - it works on a first come, first served bases. This is a bit of a problem sometimes when you actually want to be using a different driver. In some work I did recently for SANSA (the South African Space Agency), I built a custom version of QGIS for them. They are particularly keen on the JPEG2000 format since it is an open standard and provides good compression. However the custom build of QGIS I made for them includes the ECW JP2000 driver which unfortunately chokes and dies (no fault of GDAL, it happens down in the ECW code itself) when trying to open their JP2 imagery. Also we would prefer to use a FOSS driver for JP2 in keeping with the general ethos of being a FOSS project. So all this prompted me to implement the needed support to let you disable GDAL drivers at runtime in QGIS which is illustrated a little by the screenshots below.


By default GDAL want to use the ECW JPG2000 driver...(click to enlarge)

By default GDAL want to use the ECW JPG2000 driver...(click to enlarge)

Using the options dialog, you can now disable a driver....(click to enlarge)

Using the options dialog, you can now disable a driver....(click to enlarge)

After the driver is disabled (and restarting QGIS), the alternate JP2 driver is available (click to enlarge)

After the driver is disabled (and restarting QGIS), the alternate JP2 driver is available (click to enlarge)

pixelstats trackingpixel

Improvements to raster performance in QGIS master

Today I committed changes to QGIS master that I started working on at the Lisbon hackfest and finalised this week (along with a unit test yay!). The changes implement improvements to the way in which statistics are gathered for rasters. First a little history: the raster stats code in QGIS is some of the earliest work I have done in QGIS. The code was also hugely inefficient - basically it completely scans every pixel in the file twice! It does this because it extracts minima, maxima, stddev etc. from each band in the raster - and the algorithm used to calculate the stddev requires first calculating the sum of means, hence the second pass. Of course we use the underlying GDAL library to traverse the raster, but we completly bypassed the GDAL stats gathering functions. Now from my testing (see below) the difference of gathering stats in QGIS as opposed to directly in GDAL was not that great. However, the real killer is the fact that QGIS had no reasonable implementation to cache these statistics - either within a session or between sessions. This resulted in quite a lot of  complaints about the slow loading of rasters in QGIS and the spontaneous recollection of stats when making various changes to raster symbology etc.

With the release of 1.7, Radim Blazek implemented 'proper' support for raster providers so that they follow a similar model to the vector providers in QGIS. This opens up room for provider specific optitmisations and for implementing new providers in the future e.g. for PostGIS Raster, Terralib etc. At the Lisbon hackfest, I refactored the provider interface so that it provides a default implementation of stats gathering which can be overloaded by specific providers, each then being able to use best practice for that datasource when gathering stats. I then updated the GDAL Provider to use gdal native calls to fetch statistics.

When GDAl gathers stats, it stores them in a file named after the source raster but with a .aux.xml extension. As a bonus, GDAL also stores histogram data in this file. Thanks to some excellent tips from Etienne (Sky?) on the QGIS mailing list my implementation was further improved so that it actually uses these cached stats from GDAL properly. So let's see how performance is improved with these changes. I tested using a ~650mb tif hillshaded DEM from one of my clients.


Raster Load Performance in QGIS

 Added bonus: My changes also use a more efficient approach for obtaining min/max for a band (before all stats are gathered) and also histgram calculations are cached now. So after the initial gathering of stats and histograms, all activities when working with GDAL rasters should be near instant now. By the way the 1 in the graph above is rounded up - in my usage it was near instant in most cases.

I need to still evaluate whether it will be good to backport these changes to the 1.7 stable tree, so for now if you want to benefit from these changes, you need to be using a nightly build or build from source.

Every 6 months we hold a hackfest / QGIS meeting and many of our users generously donate towards it. I hope the above article gives those who do support our meetings a sense of the tangible benefits that arise from these meetings - there have been many other improvements coming into master that arose from the last hackfest that we all get to enjoy! If you would like to help towards the costs of the next hackfest, visit http://qgis.org and click the 'Donate!' button on the left hand side. Have fun!


pixelstats trackingpixel

Improvements to raster performance in QGIS master

Today I committed changes to QGIS master that I started working on at the Lisbon hackfest and finalised this week (along with a unit test yay!). The changes implement improvements to the way in which statistics are gathered for rasters. First a little history: the raster stats code in QGIS is some of the earliest work I have done in QGIS. The code was also hugely inefficient - basically it completely scans every pixel in the file twice! It does this because it extracts minima, maxima, stddev etc. from each band in the raster - and the algorithm used to calculate the stddev requires first calculating the sum of means, hence the second pass. Of course we use the underlying GDAL library to traverse the raster, but we completly bypassed the GDAL stats gathering functions. Now from my testing (see below) the difference of gathering stats in QGIS as opposed to directly in GDAL was not that great. However, the real killer is the fact that QGIS had no reasonable implementation to cache these statistics - either within a session or between sessions. This resulted in quite a lot of  complaints about the slow loading of rasters in QGIS and the spontaneous recollection of stats when making various changes to raster symbology etc.

With the release of 1.7, Radim Blazek implemented 'proper' support for raster providers so that they follow a similar model to the vector providers in QGIS. This opens up room for provider specific optitmisations and for implementing new providers in the future e.g. for PostGIS Raster, Terralib etc. At the Lisbon hackfest, I refactored the provider interface so that it provides a default implementation of stats gathering which can be overloaded by specific providers, each then being able to use best practice for that datasource when gathering stats. I then updated the GDAL Provider to use gdal native calls to fetch statistics.

When GDAl gathers stats, it stores them in a file named after the source raster but with a .aux.xml extension. As a bonus, GDAL also stores histogram data in this file. Thanks to some excellent tips from Etienne (Sky?) on the QGIS mailing list my implementation was further improved so that it actually uses these cached stats from GDAL properly. So let's see how performance is improved with these changes. I tested using a ~650mb tif hillshaded DEM from one of my clients.

Raster Load Performance in QGIS

 Added bonus: My changes also use a more efficient approach for obtaining min/max for a band (before all stats are gathered) and also histgram calculations are cached now. So after the initial gathering of stats and histograms, all activities when working with GDAL rasters should be near instant now. By the way the 1 in the graph above is rounded up - in my usage it was near instant in most cases.

I need to still evaluate whether it will be good to backport these changes to the 1.7 stable tree, so for now if you want to benefit from these changes, you need to be using a nightly build or build from source.

Every 6 months we hold a hackfest / QGIS meeting and many of our users generously donate towards it. I hope the above article gives those who do support our meetings a sense of the tangible benefits that arise from these meetings - there have been many other improvements coming into master that arose from the last hackfest that we all get to enjoy! If you would like to help towards the costs of the next hackfest, visit http://qgis.org and click the 'Donate!' button on the left hand side. Have fun!

Another cool open source project – OSGeo-Live

Another cool open source project that I have become a part of (as a QGIS packager and tester) is the OSGeo-Live project.  The OSGeo-Live project is a live DVD/USB/Virtual Machine built on xUbuntu(striped down Ubuntu linux) that has a lot of cool open source geo spatial programs all set up and ready to use.

The OSGeo-Live project contains:

  • Browser clients
  • A small sample of crisis management software
  • All the popular database engines (PostGIS, SpaitalLite etc)
  • Pretty much all the open source desktop GIS apps (QGIS, uDig etc)
  • Open Source GPS navigation apps and globes.
  • A collection of handy spatial tools
  • A ready to go web services ready to try in your browser or desktop GIS.
  • Some sample data to get started with for each project
  • And quick starts for each program.

The full list of software contained on the OSGeo-Live project can be found at http://live.osgeo.org/en/overview/overview.html

This is a good project if you want to get into the OSGeo tools and experiment but don’t want to install them on main machine until you know what you need.

As it is a live DVD/USB/Virtual Machine some apps will run slower than what they do on a native install but overall the speed is usable and good enough for testing.

Even better is that it was born in Australia :)

The project is also commercial supported by a Australian company http://lisasoft.com

So give it a try if you are interested in the OSGeo movement, which you should be if you are reading my blog :)


Filed under: Open Source, qgis Tagged: gdal, gis, mapping, Open Source, osgeo, osgeo-live, OSS, Quantum GIS

Frank Warmerdam to become a Google guy

If you follow the osgeo planet blog aggregator, you may have noticed Frank Warmerdam's recent blog post mentioning that he is off to work for Google. If I think back to the blog posts I have written, GDAL features in a great many of them - its a mainstay tool for me and barely a day goes buy that I don't gdal_translate some file or what-have-you. Hell, I just finished running a batch job that ran for about 3 weeks comprised of nothing more than bash script and GDAL commands.

In QGIS too, GDAL is one of the key underpinnings of our project - it is only now 8 years or so into the project that we are starting to abstract the use of GDAL for reading rasters away a little to make space of other raster provider types. And of course OGR is one of the main ways that our users interact with vector data from within QGIS.

Personally, Frank has also been extremely helpful whenever I have wondered into the #gdal IRC channel looking for help. Reading his blog post made me think that Google doesn't quite realise yet just how lucky they are to get him. If Google has any heart, they will make Frank a 'minister without portfolio' and just tell him to keep working on GDAL and enjoy the free food in their cafetarias. Here's hoping at least that he still gets to spend a little time on the software that so many of use love using and depend on.

pixelstats trackingpixel

3D DXF from MapInfo Tab or ESRI Shape (or anything) using OGR

Note:The following post requires gdal 1.8

A lot of times we need to send/use 3D dxf files, we used to use FME however FME is not free or cheap. So I went looking for a free solution.

If you have gdal 1.8 it’s just one simple command line run using, what is becoming my favorite GIS tool, ogr2ogr.

All you have to do is run:

ogr2ogr -f "DXF" {outFile} {inFile} -zfield {ColumnWithZValue}

So in my case I ran:

ogr2ogr -f "DXF" C:\Temp\contourswarwick.dxf C:\Temp\Contours.TAB -zfield Height

I haven’t fully tested it but {outfile} can be any file ogr supports.

and the output:

Top view of contours

Top view of contour layer

Contours side view

The side view of the above image.

In the words of, the not so great, Charlie Sheen. WINNING!

Happy mapping :D


Filed under: MapInfo, Open Source Tagged: 3D, ESRI, gdal, gis, mapinfo, mapping, ogr, Open Source, OSS

  • Page 1 of 2 ( 24 posts )
  • >>
  • gdal

Back to Top

Sustaining Members