Related Plugins and Tags

QGIS Planet

(Fr) [Équipe Oslandia] Florent, développeur SIG

Sorry, this entry is only available in French.

(Fr) [Equipe Oslandia] Gwendoline, développeur QGIS web

Sorry, this entry is only available in French.

(Fr) [Témoignage client] Émilie Bigorne, géomaticienne EPTB Loire

Sorry, this entry is only available in French.

Detecting close encounters using MobilityDB 1.0

It’s been a while since we last talked about MobilityDB in 2019 and 2020. Since then, the project has come a long way. It joined OSGeo as a community project and formed a first PSC, including the project founders Mahmoud Sakr and Esteban Zimányi as well as Vicky Vergara (of pgRouting fame) and yours truly.

This post is a quick teaser tutorial from zero to computing closest points of approach (CPAs) between trajectories using MobilityDB.

Setting up MobilityDB with Docker

The easiest way to get started with MobilityDB is to use the ready-made Docker container provided by the project. I’m using Docker and WSL (Windows Subsystem Linux on Windows 10) here. Installing WLS/Docker is out of scope of this post. Please refer to the official documentation for your operating system.

Once Docker is ready, we can pull the official container and fire it up:

docker pull mobilitydb/mobilitydb
docker volume create mobilitydb_data
docker run --name "mobilitydb" -d -p 25432:5432 -v mobilitydb_data:/var/lib/postgresql mobilitydb/mobilitydb
psql -h localhost -p 25432 -d mobilitydb -U docker

Currently, the container provides PostGIS 3.2 and MobilityDB 1.0:

Loading movement data into MobilityDB

Once the container is running, we can already connect to it from QGIS. This is my preferred way to load data into MobilityDB because we can simply drag-and-drop any timestamped point layer into the database:

For this post, I’m using an AIS data sample in the region of Gothenburg, Sweden.

After loading this data into a new table called ais, it is necessary to remove duplicate and convert timestamps:

CREATE TABLE AISInputFiltered AS
SELECT DISTINCT ON("MMSI","Timestamp") *
FROM ais;

ALTER TABLE AISInputFiltered ADD COLUMN t timestamp;
UPDATE AISInputFiltered SET t = "Timestamp"::timestamp;

Afterwards, we can create the MobilityDB trajectories:

CREATE TABLE Ships AS
SELECT "MMSI" mmsi,
tgeompoint_seq(array_agg(tgeompoint_inst(Geom, t) ORDER BY t)) AS Trip,
tfloat_seq(array_agg(tfloat_inst("SOG", t) ORDER BY t) FILTER (WHERE "SOG" IS NOT NULL) ) AS SOG,
tfloat_seq(array_agg(tfloat_inst("COG", t) ORDER BY t) FILTER (WHERE "COG" IS NOT NULL) ) AS COG
FROM AISInputFiltered
GROUP BY "MMSI";

ALTER TABLE Ships ADD COLUMN Traj geometry;
UPDATE Ships SET Traj = trajectory(Trip);

Once this is done, we can load the resulting Ships layer and the trajectories will be loaded as lines:

Computing closest points of approach

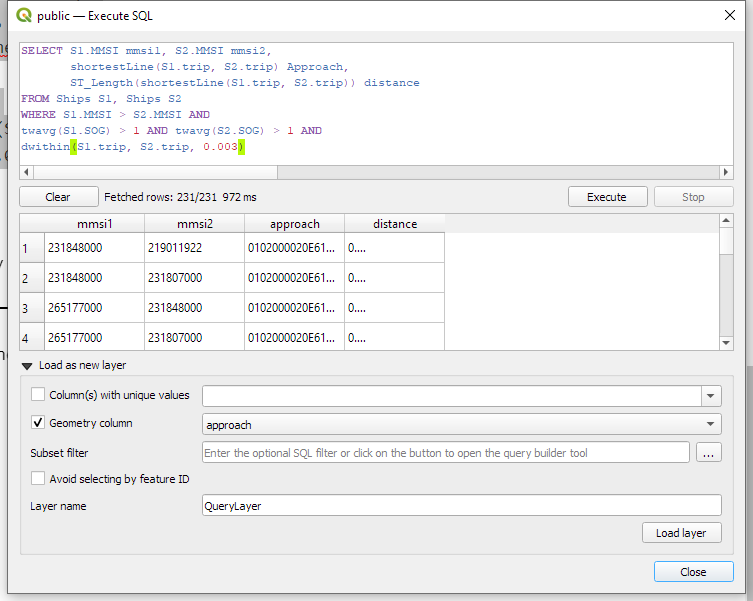
To compute the closest point of approach between two moving objects, MobilityDB provides a shortestLine function. To be correct, this function computes the line connecting the nearest approach point between the two tgeompoint_seq. In addition, we can use the time-weighted average function twavg to compute representative average movement speeds and eliminate stationary or very slowly moving objects:

SELECT S1.MMSI mmsi1, S2.MMSI mmsi2, 
       shortestLine(S1.trip, S2.trip) Approach,
       ST_Length(shortestLine(S1.trip, S2.trip)) distance
FROM Ships S1, Ships S2
WHERE S1.MMSI > S2.MMSI AND
twavg(S1.SOG) > 1 AND twavg(S2.SOG) > 1 AND
dwithin(S1.trip, S2.trip, 0.003)

In the QGIS Browser panel, we can right-click the MobilityDB connection to bring up an SQL input using Execute SQL:

The resulting query layer shows where moving objects get close to each other:

To better see what’s going on, we’ll look at individual CPAs:

Having a closer look with the Temporal Controller

Since our filtered AIS layer has proper timestamps, we can animate it using the Temporal Controller. This enables us to replay the movement and see what was going on in a certain time frame.

I let the animation run and stopped it once I spotted a close encounter. Looking at the AIS points and the shortest line, we can see that MobilityDB computed the CPAs along the trajectories:

A more targeted way to investigate a specific CPA is to use the Temporal Controllers’ fixed temporal range mode to jump to a specific time frame. This is helpful if we already know the time frame we are interested in. For the CPA use case, this means that we can look up the timestamp of a nearby AIS position and set up the Temporal Controller accordingly:

More

I hope you enjoyed this quick dive into MobilityDB. For more details, including talks by the project founders, check out the project website.


This post is part of a series. Read more about movement data in GIS.

Inscribed and bounding circles in PostGIS

Today, I’m revisiting work from 2017. In Brezina, Graser & Leth (2017), we looked at different ways to determine the width of sidewalks in Vienna based on the city’s street surface database.

Image source: Brezina, Graser & Leth (2017)

Inscribed and circumscribed circles were a natural starting point. Circumscribed or bounding circle tools (the smallest circle to enclose an input polygon) have been commonly available in desktop GIS and spatial databases. Inscribed circle tools (the largest circle that fits into an input polygon) used to be less readily available. Lately, support has improved since ST_MaximumInscribedCircle has been added in PostGIS 3.1.0 (requires GEOS >= 3.9.0).

The tricky thing is that ST_MaximumInscribedCircle does not behave like ST_MinimumBoundingCircle. While the bounding circle function returns the circle geometry, the inscribed circle function returns a record containing information on the circle center and radius. Handling the resulting records involves some not so intuitive SQL.

Here is what I’ve come up with to get both the circle geometries as well as the radius values:

WITH foo AS 
(
	SELECT id, 
		ST_MaximumInscribedCircle(geom) AS inscribed_circle,
		ST_MinimumBoundingRadius(geom) AS bounding_circle
	FROM demo.sidewalks 
)
SELECT
	id,
	(bounding_circle).radius AS bounding_circle_radius,
	ST_MinimumBoundingCircle(geom) AS bounding_circle_geom, 
	(inscribed_circle).radius AS inscribed_circle_radius,
	ST_Buffer((inscribed_circle).center, (inscribed_circle).radius) AS inscribed_circle_geom
FROM foo

And here is how the results look like in QGIS, with purple shapeburst fills for bounding circles and green shapeburst fills for inscribed circles:

References

Brezina, T., Graser, A., & Leth, U. (2017). Geometric methods for estimating representative sidewalk widths applied to Vienna’s streetscape surfaces database. Journal of Geographical Systems, 19(2), 157-174, doi:10.1007/s10109-017-0245-2.

(Fr) Oslandia recrute : Ingénieur(e) développement d’applications SIG ( Python / SQL / QGIS ) – OSL2110A

Sorry, this entry is only available in French.

(Fr) Oslandia recrute : ingénieur(e) développement C++ / Python – OSL2011B

Sorry, this entry is only available in French.

Publication de l’extension COVADIS RAPEA pour QWAT et QGEP

QWAT est une application open source de gestion des réseaux d’eau potable émanant des collectivités de Pully, le SIGE à Vevey, Morges et Lausanne.
QGEP est son homologue dédiée à la gestion des eaux usées et pluviales, initiée par le groupe utilisateur QGIS Suisse.

L’échange de données entre institutions est une pierre angulaire des politiques de l’eau. Ces échanges se basent sur des formats d’échanges standardisés. Ainsi les Cantons de Fribourg (format aquaFRI) ou de Vaud (format SIRE) conditionnent certaines subventions publiques à la transmission des données selon des formats pré-définis et permettent à ces échelons administratifs d’avoir une vision globale des réseaux humides.

Dans le cadre d’une expérimentation des outils QWAT (eau potable) et QGEP (eaux usées), Charentes Eaux a souhaité mettre en œuvre des extensions dédiées au standard d’échange de données sur les réseaux d’eau Français, le Géostandard Réseaux d’adduction d’eau potable et d’assainissement (RAEPA) défini par la Commission de validation des données pour l’information spatialisée (COVADIS).

Oslandia a été mandaté pour mettre en œuvre des instances de QWAT et QGEP, réaliser les extensions RAEPA pour chacun de ces outils, et aider Charente Eaux à charger les données des collectivités membres de ce syndicat mixte.

https://charente-eaux.fr/le-syndicat/qui-sommes-nous/

Le travail a été publié pour QWAT sous forme d’une extension standardisée dans le dépôt l’organisation QWAT https://github.com/qwat/extension_fr_raepa/

Pour QGEP, il n’existe pas encore de fonctionnalité pour gérer d’extension, le dépôt https://gitlab.com/Oslandia/qgep_extension_raepa/ contient donc les définitions de données et de vues à rajouter manuellement au modèle de données.

La compatibilité des modèles de données a été évaluée et le choix a été fait de ne faire que des vues dédiées à l’export de données. Il est techniquement possible de faire des vues éditables pour permettre le chargement de données via ces vues depuis des fichiers suivant le gabarit de données RAEPA. Le niveau de simplification et d’agrégation des listes de valeurs rend ce travail peu générique dans l’état actuel du géostandard (v1.1), il est donc plus pertinent à ce stade de réaliser des scripts de chargement sans passer par ce pivot dans le cas de Charente-Eaux

(Fr) Financement mutualisé du logiciel libre: le cas QGIS

Sorry, this entry is only available in French.

Movement data in GIS #29: power your web apps with movement data using mobilitydb-sqlalchemy

This is a guest post by Bommakanti Krishna Chaitanya @chaitan94

Introduction

This post introduces mobilitydb-sqlalchemy, a tool I’m developing to make it easier for developers to use movement data in web applications. Many web developers use Object Relational Mappers such as SQLAlchemy to read/write Python objects from/to a database.

Mobilitydb-sqlalchemy integrates the moving objects database MobilityDB into SQLAlchemy and Flask. This is an important step towards dealing with trajectory data using appropriate spatiotemporal data structures rather than plain spatial points or polylines.

To make it even better, mobilitydb-sqlalchemy also supports MovingPandas. This makes it possible to write MovingPandas trajectory objects directly to MobilityDB.

For this post, I have made a demo application which you can find live at https://mobilitydb-sqlalchemy-demo.adonmo.com/. The code for this demo app is open source and available on GitHub. Feel free to explore both the demo app and code!

In the following sections, I will explain the most important parts of this demo app, to show how to use mobilitydb-sqlalchemy in your own webapp. If you want to reproduce this demo, you can clone the demo repository and do a “docker-compose up –build” as it automatically sets up this docker image for you along with running the backend and frontend. Just follow the instructions in README.md for more details.

Declaring your models

For the demo, we used a very simple table – with just two columns – an id and a tgeompoint column for the trip data. Using mobilitydb-sqlalchemy this is as simple as defining any regular table:

from flask_sqlalchemy import SQLAlchemy
from mobilitydb_sqlalchemy import TGeomPoint

db = SQLAlchemy()

class Trips(db.Model):
   __tablename__ = "trips"
   trip_id = db.Column(db.Integer, primary_key=True)
   trip = db.Column(TGeomPoint)

Note: The library also allows you to use the Trajectory class from MovingPandas as well. More about this is explained later in this tutorial.

Populating data

When adding data to the table, mobilitydb-sqlalchemy expects data in the tgeompoint column to be a time indexed pandas dataframe, with two columns – one for the spatial data  called “geometry” with Shapely Point objects and one for the temporal data “t” as regular python datetime objects.

from datetime import datetime
from shapely.geometry import Point

# Prepare and insert the data
# Typically it won’t be hardcoded like this, but it might be coming from 
# other data sources like a different database or maybe csv files
df = pd.DataFrame(
   [
       {"geometry": Point(0, 0), "t": datetime(2012, 1, 1, 8, 0, 0),},
       {"geometry": Point(2, 0), "t": datetime(2012, 1, 1, 8, 10, 0),},
       {"geometry": Point(2, -1.9), "t": datetime(2012, 1, 1, 8, 15, 0),},
   ]
).set_index("t")

trip = Trips(trip_id=1, trip=df)
db.session.add(trip)
db.session.commit()

Writing queries

In the demo, you see two modes. Both modes were designed specifically to explain how functions defined within MobilityDB can be leveraged by our webapp.

1. All trips mode – In this mode, we extract all trip data, along with distance travelled within each trip, and the average speed in that trip, both computed by MobilityDB itself using the ‘length’, ‘speed’ and ‘twAvg’ functions. This example also shows that MobilityDB functions can be chained to form more complicated queries.

mobilitydb-sqlalchemy-demo-1

trips = db.session.query(
   Trips.trip_id,
   Trips.trip,
   func.length(Trips.trip),
   func.twAvg(func.speed(Trips.trip))
).all()

2. Spatial query mode – In this mode, we extract only selective trip data, filtered by a user-selected region of interest. We then make a query to MobilityDB to extract only the trips which pass through the specified region. We use MobilityDB’s ‘intersects’ function to achieve this filtering at the database level itself.
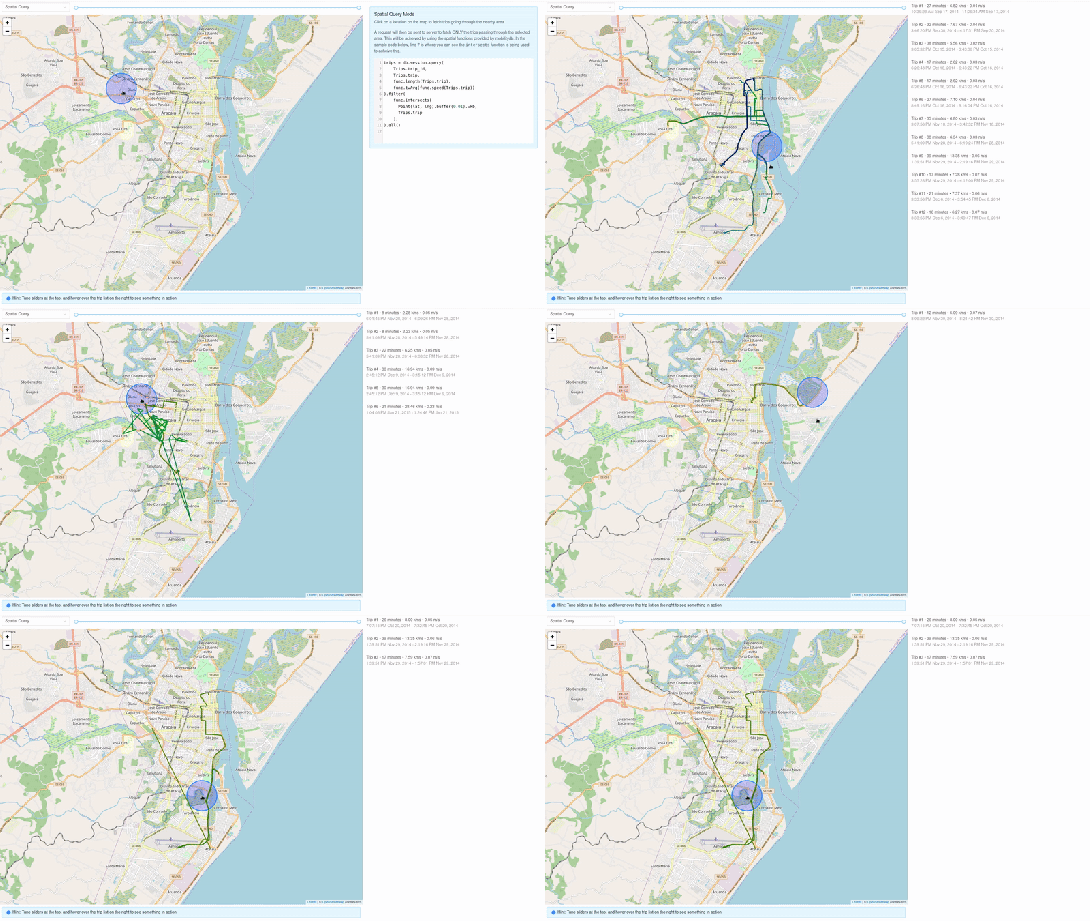
mobilitydb-sqlalchemy-demo-2

trips = db.session.query(
   Trips.trip_id,
   Trips.trip,
   func.length(Trips.trip),
   func.twAvg(func.speed(Trips.trip))
).filter(
   func.intersects(Point(lat, lng).buffer(0.01).wkb, Trips.trip),
).all()

Using MovingPandas Trajectory objects

Mobilitydb-sqlalchemy also provides first-class support for MovingPandas Trajectory objects, which can be installed as an optional dependency of this library. Using this Trajectory class instead of plain DataFrames allows us to make use of much richer functionality over trajectory data like analysis speed, interpolation, splitting and simplification of trajectory points, calculating bounding boxes, etc. To make use of this feature, you have set the use_movingpandas flag to True while declaring your model, as shown in the below code snippet.

class TripsWithMovingPandas(db.Model):
   __tablename__ = "trips"
   trip_id = db.Column(db.Integer, primary_key=True)
   trip = db.Column(TGeomPoint(use_movingpandas=True))

Now when you query over this table, you automatically get the data parsed into Trajectory objects without having to do anything else. This also works during insertion of data – you can directly assign your movingpandas Trajectory objects to the trip column. In the below code snippet we show how inserting and querying works with movingpandas mode.

from datetime import datetime
from shapely.geometry import Point

# Prepare and insert the data
# Typically it won’t be hardcoded like this, but it might be coming from 
# other data sources like a different database or maybe csv files
df = pd.DataFrame(
   [
       {"geometry": Point(0, 0), "t": datetime(2012, 1, 1, 8, 0, 0),},
       {"geometry": Point(2, 0), "t": datetime(2012, 1, 1, 8, 10, 0),},
       {"geometry": Point(2, -1.9), "t": datetime(2012, 1, 1, 8, 15, 0),},
   ]
).set_index("t")

geo_df = GeoDataFrame(df)
traj = mpd.Trajectory(geo_df, 1)

trip = Trips(trip_id=1, trip=traj)
db.session.add(trip)
db.session.commit()

# Querying over this table would automatically map the resulting tgeompoint 
# column to movingpandas’ Trajectory class
result = db.session.query(TripsWithMovingPandas).filter(
   TripsWithMovingPandas.trip_id == 1
).first()

print(result.trip.__class__)
# <class 'movingpandas.trajectory.Trajectory'>

Bonus: trajectory data serialization

Along with mobilitydb-sqlalchemy, recently I have also released trajectory data serialization/compression libraries based on Google’s Encoded Polyline Format Algorithm, for python and javascript called trajectory and trajectory.js respectively. These libraries let you send trajectory data in a compressed format, resulting in smaller payloads if sending your data through human-readable serialization formats like JSON. In some of the internal APIs we use at Adonmo, we have seen this reduce our response sizes by more than half (>50%) sometimes upto 90%.

Want to learn more about mobilitydb-sqlalchemy? Check out the quick start & documentation.


This post is part of a series. Read more about movement data in GIS.

(Fr) Oslandia recrute : Ingénieur(e) développement d&#8217;applications SIG ( Python / SQL / QGIS )

Sorry, this entry is only available in French.

QGIS Snapping improvements

A few months ago, we proposed to the QGIS grant program to make improvements to the snap cache in QGIS. The community vote selected our project which was funded by QGIS.org. Developments are now mostly finished.

In short, snapping is crucial for editing geospatial features. It is the only way to ensuring they are topologically related, ie, connected vertices have exactly the same coordinates even if manual digitizing on screen is imprecise by nature.  Snapping correctly supposes QGIS have in memory an indexed cache of the geometries to snap to. And maintainting this cache when data is modified, sometimes by another user or database logic, can be a real challenge. This it exactly what this work adresses.

The proposal was divided into two different tasks:

  • Manage circular dependencies
  • Relax the snap cache index build

Manage cicular data dependencies

Data dependencies

Data dependency is an existing feature that allows you to configure QGIS to reload layers (and their snapping cache) when a layer is modified.

It is useful when you store your data in a database and you set up triggers to maintain consistency between the different tables of your data model.

For instance, say you have topological informations containing lines and nodes. Nodes are part of lines and lines go through nodes. Then, you move a node in QGIS, and save your modifications to the database. In order to keep the data consistent, a trigger updates the geometry of the line going through the modified node.

Node 2 is modified, Line 1 is updated accordingly

QGIS, as a database client, has no information that the line layer currently displayed in the canvas needs to be refreshed after the trigger. Although the map canvas will be up to date, because QGIS fetches data for display without any caching system, the snapping cache is not and you’ll end up with ghost snapping highlights issues.

Snapping highlights (light red) differ from real line (orange)

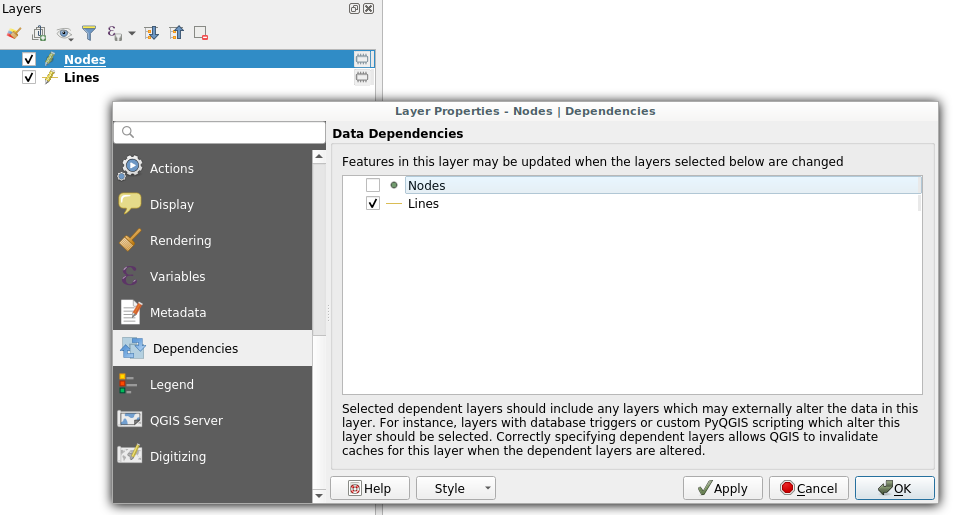
Defining a dependency between nodes and lines layers tells QGIS that it has to refresh the line layer when a node is modified.

Dependencies configuration: Lines layer will be refreshed whenever Nodes layer is modified

It also have to work the other way, modifying a line should update the nodes to ensure they still are on the line.

Circular data dependencies

So here we are, lines depend on nodes which depend on lines which depend on nodes which…

That’s what circular dependencies is about. This specific behavior was previously forbidden and needed a special way to deal with it. Thanks to this recent development, it is now possible.

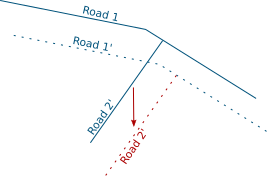
It’s also possible to add the layer itself as one of its own dependencies. It helps dealing with specific cases where one feature modification could lead to a modification of another feature in the same layer (to keep consistency on road networks for instance).

Road 2 is modified, Road 1 is updated accordingly

This feature is available in the next QGIS LTR version 3.10.

Relax the snapping cache index build

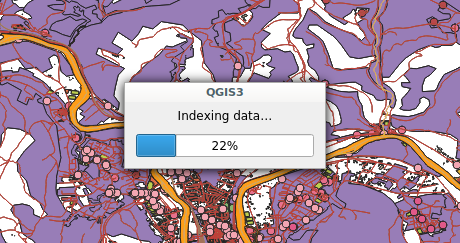
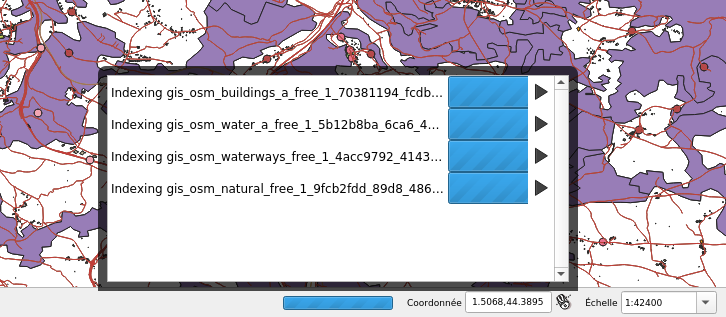
If you work in QGIS with huge projects displaying a lot of vector data, and you enable snapping while editing these data, you probably already met this dialog:

Snap indexing dialog

This dialog informs you that data are currently being indexed so you can snap on them while you will edit feature geometry. And for big projects, this dialog can last for a really long time. Let’s work on speeding it up!

What’s a snap index?

Let’s say you want to move a line and snap it onto another one. While you drag your line with the mouse, QGIS will look for an existing geometry beneath the mouse cursor (with a certain pixel tolerance) every time you move your mouse. Without spatial index, QGIS will have to go through every geometry in your layer to check if the given geometry is beneath the cursor position. This would be very ineffective.

In order to prevent this, QGIS keeps an index where vector data are stored in a way that it can quickly find out what geometry is beneath the mouse cursor. The building of this data structure takes time and that is what the progress dialog is about.

Firstly: Parallelize snap index build

If you want to be able to snap on all layers in your project, then QGIS will have to build one snap index for each layer. This operation was made sequentially meaning that if you have for instance 20 layers and the index building last approximatively 3 seconds for each, then the whole index building will last 1 minute. We made modifications to QGIS so that index building could be done in parallel. As a result, the total index building time could theoretically be 3 seconds!

4 layers snap index being built in parallel

However, parallel operations are limited by the number of CPU cores of your machine, meaning that if you have 4 cores (core i7 for instance) then the total time will be up to 4 times faster than when the building is sequential (and last 15 seconds in our example).

Secondly: relax the snap build

For big projects, parallelizing index building is not enough and still takes too much time. Futhermore, to reduce snap index building, an existing optimisation was to build the spatial index for a specific area of interest (determined according to the displayed area and layer size). As a consequence, when you’ve done waiting for an index currently building and you move the map or zoom in/out, you could possibly trigger another snap index building and wait again.

So, the idea was to avoid waiting at all. Snap index is now built whenever it needs to (when you first enable snapping, when you move or zoom) but the user doesn’t have to wait for the build to be over and can continue what it was doing (creating feature, moving…). Snapping highlights will be missing when the index is currently being built and will appear gradually as soon as they finished. That’s what we call the relaxing mode.

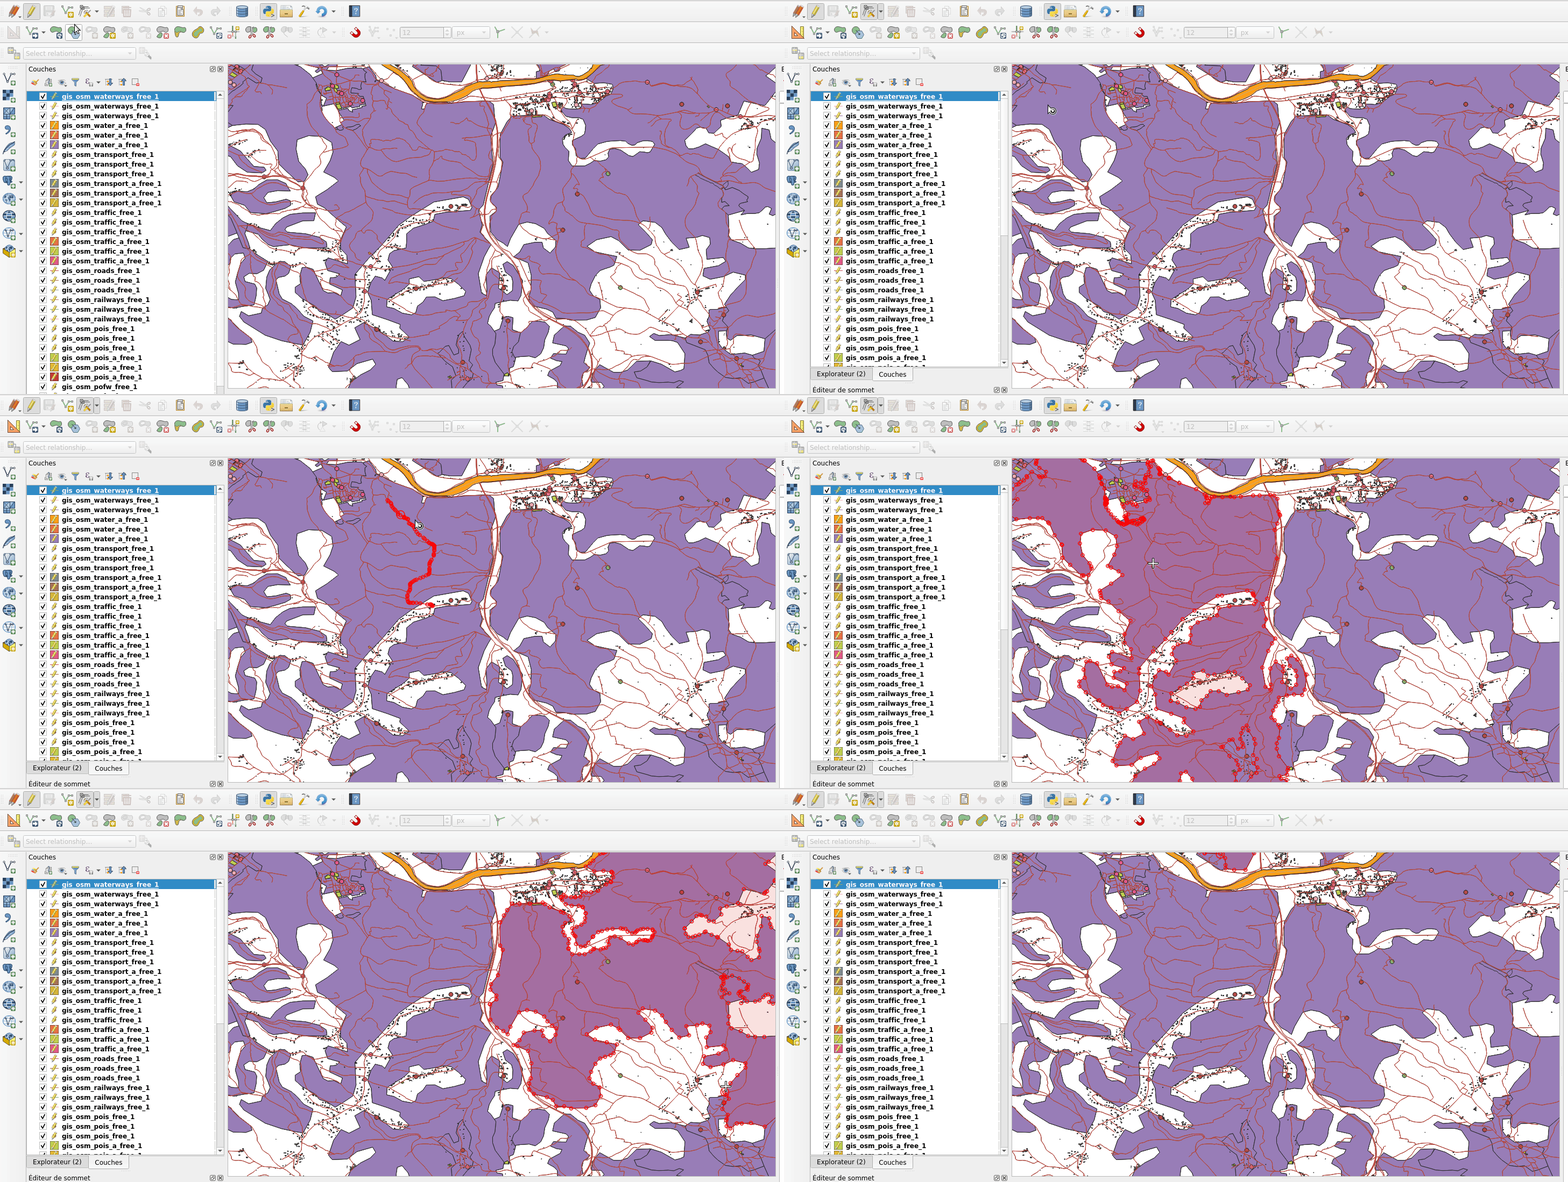
No waiting dialog, snapping highlights appears as soon as snap index is ready

This feature has been merged into current QGIS master and will be present in future QGIS 3.12 release. We keep working on this feature in order to make it more stable and efficient.

What’s next

We’ll continue to improve this feature in the coming days, if you have the chance to test it and encounter issues please let us know on the QGIS tracker. If you think about a missing feature or just want to know more about QGIS, feel free to contact us at [email protected]. And please have a look at our support offering for QGIS.

Many thanks to QGIS grant program for funding these new features. Thanks also to all the people involved in reviewing the code and helping to better understand the existing mechanism.


Movement data in GIS #25: moving object databases

Recently there has been some buzz on Twitter about a new moving object database (MOD) called MobilityDB that builds on PostgreSQL and PostGIS (Zimányi et al. 2019). The MobilityDB Github repo has been published in February 2019 but according to the following presentation at PgConf.Russia 2019 it has been under development for a few years:

Of course, moving object databases have been around for quite a while. The two most commonly cited MODs are HermesDB (Pelekis et al. 2008) which comes as an extension for either PostgreSQL or Oracle and is developed at the University of Piraeus and SECONDO (de Almeida et al. 2006) which is a stand-alone database system developed at the Fernuniversität Hagen. However, both MODs remain at the research prototype level and have not achieved broad adoption.

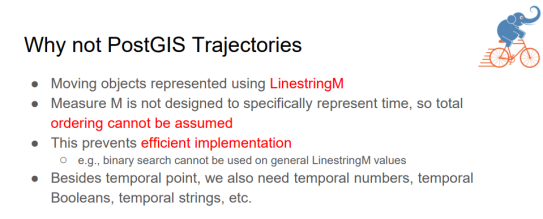
It will be interesting to see if MobilityDB will be able to achieve the goal they have set in the title of Zimányi et al. (2019) to become “a mainstream moving object database system”. It’s promising that they are building on PostGIS and using its mature spatial analysis functionality instead of reinventing the wheel. They also discuss why they decided that PostGIS trajectories (which I’ve written about in previous posts) are not the way to go:

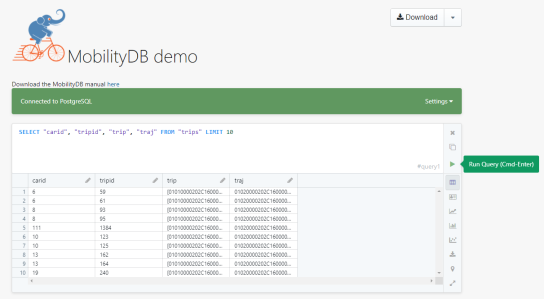
However, the presentation does not go into detail whether there are any straightforward solutions to visualizing data stored in MobilityDB.

According to the Github readme, MobilityDB runs on Linux and needs PostGIS 2.5. They also provide an online demo as well as a Docker container with MobilityDB and all its dependencies. If you give it a try, I would love to hear about your experiences.

References

  • de Almeida, V. T., Guting, R. H., & Behr, T. (2006). Querying moving objects in secondo. In 7th International Conference on Mobile Data Management (MDM’06) (pp. 47-47). IEEE.
  • Pelekis, N., Frentzos, E., Giatrakos, N., & Theodoridis, Y. (2008). HERMES: aggregative LBS via a trajectory DB engine. In Proceedings of the 2008 ACM SIGMOD international conference on Management of data (pp. 1255-1258). ACM.
  • Zimányi, E., Sakr, M., Lesuisse, A., & Bakli, M. (2019). MobilityDB: A Mainstream Moving Object Database System. In Proceedings of the 16th International Symposium on Spatial and Temporal Databases (pp. 206-209). ACM.

This post is part of a series. Read more about movement data in GIS.

Movement data in GIS #23: trajectories in context

Today’s post continues where “Why you should be using PostGIS trajectories” leaves off. It’s the result of a collaboration with Eva Westermeier. I had the pleasure to supervise her internship at AIT last year and also co-supervised her Master’s thesis [0] on the topic of enriching trajectories with information about their geographic context.

Context-aware analysis of movement data is crucial for different domains and applications, from transport to ecology. While there is a wealth of data, efficient and user-friendly contextual trajectory analysis is still hampered by a lack of appropriate conceptual approaches and practical methods. (Westermeier, 2018)

Part of the work was focused on evaluating different approaches to adding context information from vector datasets to trajectories in PostGIS. For example, adding land cover context to animal movement data or adding information on anchoring and harbor areas to vessel movement data.

Classic point-based model vs. line-based model

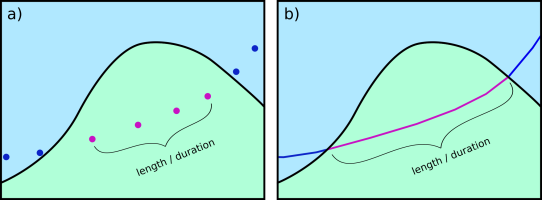
The obvious approach is to intersect the trajectory points with context data. This is the classic point data model of contextual trajectories. It’s straightforward to add context information in the point-based model but it also generates large numbers of repeating annotations. In contrast, the line data model using, for example, PostGIS trajectories (LinestringM) is more compact since trajectories can be split into segments at context borders. This creates one annotation per segment and the individual segments are convenient to analyze (as described in part #12).

Spatio-temporal interpolation as provided by the line data model offers additional advantages for the analysis of annotated segments. Contextual segments start and end at the intersection of the trajectory linestring with context polygon borders. This means that there are no gaps like in the point-based model. Consequently, while the point-based model systematically underestimates segment length and duration, the line-based approach offers more meaningful segment length and duration measurements.

Schematic illustration of a subset of an annotated trajectory in two context classes, a) systematic underestimation of length or duration in the point data model, b) full length or duration between context polygon borders in the line data model (source: Westermeier (2018))

Another issue of the point data model is that brief context changes may be missed or represented by just one point location. This makes it impossible to compute the length or duration of the respective context segment. (Of course, depending on the application, it can be desirable to ignore brief context changes and make the annotation process robust towards irrelevant changes.)

Schematic illustration of context annotation for brief context changes, a) and b)
two variants for the point data model, c) gapless annotation in the line data model (source: Westermeier (2018) based on Buchin et al. (2014))

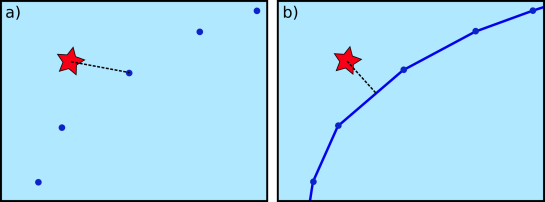
Beyond annotations, context can also be considered directly in an analysis, for example, when computing distances between trajectories and contextual point objects. In this case, the point-based approach systematically overestimates the distances.

Schematic illustration of distance measurement from a trajectory to an external
object, a) point data model, b) line data model (source: Westermeier (2018))

The above examples show that there are some good reasons to dump the classic point-based model. However, the line-based model is not without its own issues.

Issues

Computing the context annotations for trajectory segments is tricky. The main issue is that ST_Intersection drops the M values. This effectively destroys our trajectories! There are ways to deal with this issue – and the corresponding SQL queries are published in the thesis (p. 38-40) – but it’s a real bummer. Basically, ST_Intersection only provides geometric output. Therefore, we need to reconstruct the temporal information in order to create usable trajectory segments.

Finally, while the line-based model is well suited to add context from other vector data, it is less useful for context data from continuous rasters but that was beyond the scope of this work.

Conclusion

After the promising results of my initial investigations into PostGIS trajectories, I was optimistic that context annotations would be a straightforward add-on. The line-based approach has multiple advantages when it comes to analyzing contextual segments. Unfortunately, generating these contextual segments is much less convenient and also slower than I had hoped. Originally, I had planned to turn this work into a plugin for the Processing toolbox but the results of this work motivated me to look into other solutions. You’ve already seen some of the outcomes in part #20 “Trajectools v1 released!”.

References

[0] Westermeier, E.M. (2018). Contextual Trajectory Modeling and Analysis. Master Thesis, Interfaculty Department of Geoinformatics, University of Salzburg.


This post is part of a series. Read more about movement data in GIS.

French Ministry in charge of the ecological transition selected Oslandia

Ministère de la Transition Écologique et Solidaire Logo

The French ministry of the ecological transition  selected Oslandia for two of the three packages of its call for tender procedure dedicated to geomatic tools.  We are very proud to dedicate our team to one of the strongest support of geomatics and Open Source in France for the next 2 to 4 years.

First package is dedicated to expert studies covering spatial databases, software, components, protocols, norms and standards in the geomatics fields.

Second package provides support and development for QGIS,  the spatial cartridge PostGIS of PostgreSQL and their components. We are really happy to continue a common work already engaged in the previous contract.

This is again another proof that we face a major tendency of open source investment, where geomatics components are currently among the most dynamic and strongest open source projects. This is also a confirmation that actors are now integrating deeply the economic rationale of open source contribution inside their politics.

Movement data in GIS #15: writing a PL/pgSQL stop detection function for PostGIS trajectories

Do you sometimes start writing an SQL query and around at line 50 you get the feeling that it might be getting out of hand? If so, it might be useful to start breaking it down into smaller chunks and wrap those up into custom functions. Never done that? Don’t despair! There’s an excellent PL/pgSQL tutorial on postgresqltutorial.com to get you started.

To get an idea of the basic structure of a PL/pgSQL function and to proof that PostGIS datatypes work just fine in this context, here’s a basic function that takes a trajectory geometry and outputs its duration, i.e. the difference between its last and first timestamp:

CREATE OR REPLACE FUNCTION AG_Duration(traj geometry) 
RETURNS numeric LANGUAGE 'plpgsql'
AS $BODY$ 
BEGIN
RETURN ST_M(ST_EndPoint(traj))-ST_M(ST_StartPoint(traj));
END; $BODY$;

My end goal for this exercise was to implement a function that takes a trajectory and outputs the stops along this trajectory. Commonly, a stop is defined as a long stay within an area with a small radius. This leads us to the following definition:

CREATE OR REPLACE FUNCTION AG_DetectStops(
   traj geometry, 
   max_size numeric, 
   min_duration numeric)
RETURNS TABLE(sequence integer, geom geometry) 
-- implementation follows here!

Note how this function uses RETURNS TABLE to enable it to return all the stops that it finds. To add a line to the output table, we need to assign values to the sequence and geom variables and then use RETURN NEXT.

Another reason to use PL/pgSQL is that it enables us to write loops. And loops I wanted for my stop detection function! Specifically, I wanted to go through all the points in the trajectory:

FOR pt IN SELECT (ST_DumpPoints(traj)).geom LOOP
-- here comes the magic!
END LOOP;

Eventually the function should go through the trajectory and identify all segments that stay within an area with max_size diameter for at least min_duration time. To test for the area size, we can use:

IF ST_MaxDistance(segment,pt) <= max_size THEN is_stop := true; 

Putting everything together, my current implementation looks like this:

CREATE OR REPLACE FUNCTION AG_DetectStops(
   traj geometry,
   max_size numeric,
   min_duration numeric)
RETURNS TABLE(sequence integer, geom geometry) 
LANGUAGE 'plpgsql'
AS $BODY$
DECLARE 
   pt geometry;
   segment geometry;
   is_stop boolean;
   previously_stopped boolean;
   stop_sequence integer;
   p1 geometry;
BEGIN
segment := NULL;
sequence := 0;
is_stop := false;
previously_stopped := false;
p1 := NULL;
FOR pt IN SELECT (ST_DumpPoints(traj)).geom LOOP
   IF segment IS NULL AND p1 IS NULL THEN 
      p1 := pt; 
   ELSIF segment IS NULL THEN 
      segment := ST_MakeLine(p1,pt); 
      p1 := NULL;
      IF ST_Length(segment) <= max_size THEN is_stop := true; END IF; ELSE segment := ST_AddPoint(segment,pt); -- if we're in a stop, we want to grow the segment, otherwise we remove points to the specified min_duration IF NOT is_stop THEN WHILE ST_NPoints(segment) > 2 AND AG_Duration(ST_RemovePoint(segment,0)) >= min_duration LOOP
            segment := ST_RemovePoint(segment,0); 
         END LOOP;
      END IF;
      -- a stop is identified if the segment stays within a circle of diameter = max_size
      IF ST_Length(segment) <= max_size THEN is_stop := true; ELSIF ST_Distance(ST_StartPoint(segment),pt) > max_size THEN is_stop := false;
      ELSIF ST_MaxDistance(segment,pt) <= max_size THEN is_stop := true; ELSE is_stop := false; END IF; -- if we found the end of a stop, we need to check if it lasted long enough IF NOT is_stop AND previously_stopped THEN IF ST_M(ST_PointN(segment,ST_NPoints(segment)-1))-ST_M(ST_StartPoint(segment)) >= min_duration THEN
            geom := ST_RemovePoint(segment,ST_NPoints(segment)-1); 
            RETURN NEXT;
            sequence := sequence + 1;
            segment := NULL;
            p1 := pt;
         END IF;
      END IF;
   END IF;
   previously_stopped := is_stop;
END LOOP;
IF previously_stopped AND AG_Duration(segment) >= min_duration THEN 
   geom := segment; 
   RETURN NEXT; 
END IF;
END; $BODY$;

While this function is not really short, it’s so much more readable than my previous attempts of doing this in pure SQL. Some of the lines for determining is_stop are not strictly necessary but they do speed up processing.

Performance still isn’t quite where I’d like it to be. I suspect that all the adding and removing points from linestring geometries is not ideal. In general, it’s quicker to find shorter stops in smaller areas than longer stop in bigger areas.

Let’s test! 

Looking for a testing framework for PL/pgSQL, I found plpgunit on Github. While I did not end up using it, I did use its examples for inspiration to write a couple of tests, e.g.

CREATE OR REPLACE FUNCTION test.stop_at_beginning() RETURNS void LANGUAGE 'plpgsql'
AS $BODY$
DECLARE t0 integer; n0 integer;
BEGIN
WITH temp AS ( SELECT AG_DetectStops(
   ST_GeometryFromText('LinestringM(0 0 0, 0 0 1, 0.1 0.1 2, 2 2 3)'),
   1,1) stop 
)
SELECT ST_M(ST_StartPoint((stop).geom)), 
       ST_NPoints((stop).geom) FROM temp INTO t0, n0;	
IF t0 = 0 AND n0 = 3
   THEN RAISE INFO 'PASSED - Stop at the beginning of the trajectory';
   ELSE RAISE INFO 'FAILED - Stop at the beginning of the trajectory';
END IF;
END; $BODY$;

Basically, each test is yet another PL/pgSQL function that doesn’t return anything (i.e. returns void) but outputs messages about the status of the test. Here I made heavy use of the PERFORM statement which executes the provided function but discards the results:


Update: The source code for this function is now available on https://github.com/anitagraser/postgis-spatiotemporal

Movement data in GIS #12: why you should be using PostGIS trajectories

In short: both writing trajectory queries as well as executing them is considerably faster using PostGIS trajectories (as LinestringM) rather than the commonly used point-based approach.

Here are a couple of examples to give you an impression of the differences.

Spoiler alert! Trajectory queries are up to 500 times faster than comparable point-based queries.

A quick look at indexing

In both cases, we have indexed the tracker id, geometry, and time columns to speed up query processing.

The trajectory table has 3 indexes

  • gist (time_range)
  • gist (track gist_geometry_ops_nd)
  • btree (tracker)

The point-based table has 4 indexes

  • gist (pt)
  • btree (trajectory_id)
  • btree (tracker)
  • btree (t)

Length

First, let’s see how to determine trajectory length for all observed moving objects (identified by a tracker id).

Using the point-based approach, we first need to ensure that the points are in the correct temporal order, create the lines, and finally sum up their length:

WITH ordered AS (
 SELECT trajectory_id, tracker, t, pt
 FROM geolife.trajectory_pt
 ORDER BY t
), tmp AS (
 SELECT trajectory_id, tracker, st_makeline(pt) traj
 FROM ordered 
 GROUP BY trajectory_id, tracker
)
SELECT tracker, round(sum(ST_Length(traj::geography)))
FROM tmp
GROUP BY tracker 
ORDER BY tracker

With trajectories, we can go right to computing lengths:

SELECT tracker, round(sum(ST_Length(track::geography)))
FROM geolife.trajectory_ext
GROUP BY tracker
ORDER BY tracker

On my test system, the trajectory query run time is 22.7 sec instead of 43.0 sec for the point-based approach:

Duration

Compared to trajectory length, duration is less complicated in the point-based approach:

WITH tmp AS (
 SELECT trajectory_id, tracker, min(t) start_time, max(t) end_time
 FROM geolife.trajectory_pt
 GROUP BY trajectory_id, tracker
)
SELECT tracker, sum(end_time - start_time)
FROM tmp
GROUP BY tracker
ORDER BY tracker

Still, the trajectory query is less complex and much faster at 31 ms instead of 6.0 sec:

SELECT tracker, sum(upper(time_range) - lower(time_range))
FROM geolife.trajectory_ext
GROUP BY tracker
ORDER BY tracker

Temporal filter

Extracting trajectories that occurred during a certain time frame is another common use case:

WITH tmp AS (
 SELECT trajectory_id, tracker, min(t) start_time, max(t) end_time
 FROM geolife.trajectory_pt
 GROUP BY trajectory_id, tracker
)
SELECT trajectory_id, tracker, start_time, end_time
FROM tmp
WHERE end_time > '2008-11-26 11:00'
AND start_time < '2008-11-26 15:00'
ORDER BY tracker

This point-based query takes 6.0 sec while the shorter trajectory query finishes in 12 ms:

SELECT id, tracker, time_range
FROM geolife.trajectory_ext
WHERE time_range && '[2008-11-26 11:00+1,2008-11-26 15:00+01]'::tstzrange

or equally fast (12 ms) by making use of the n-dimensional index:

WHERE track &&&	ST_Collect(
 ST_MakePointM(-180, -90, extract(epoch from '2008-11-26 11:00'::timestamptz)),
 ST_MakePointM(180, 90, extract(epoch from '2008-11-26 15:00'::timestamptz))
)

Spatial filter

Finally, of course, let’s have a look at spatial filters, for example, trajectories that start in a certain area:

WITH my AS ( 
 SELECT ST_Buffer(ST_SetSRID(ST_MakePoint(116.31894,39.97472),4326),0.0005) areaA
), tmp AS (
 SELECT trajectory_id, tracker, min(t) t 
 FROM geolife.trajectory_pt
 GROUP BY trajectory_id, tracker
)
SELECT distinct traj.tracker, traj.trajectory_id 
FROM tmp
JOIN geolife.trajectory_pt traj
ON tmp.trajectory_id = traj.trajectory_id AND traj.t = tmp.t
JOIN my
ON ST_Within(traj.pt, my.areaA)

This point-based query takes 6.0 sec while the shorter trajectory query finishes in 488 ms:

WITH my AS ( 
 SELECT ST_Buffer(ST_SetSRID(ST_MakePoint(116.31894, 39.97472),4326),0.0005) areaA
)
SELECT id, tracker, ST_AsText(track)
FROM geolife.trajectory_ext
JOIN my
ON areaA && track
AND ST_Within(ST_StartPoint(track), areaA)

For more generic “does this trajectory intersect another geometry”, the points can also be aggregated to a linestring on the fly but that takes 21.9 sec:

I’ll be presenting more work on PostGIS trajectories at GI_Forum in Salzburg in July. In the talk, I’ll also have a look at the custom PG-Trajectory datatype. Here’s the full open-access paper:

Graser, A. (2018) Evaluating Spatio-temporal Data Models for Trajectories in PostGIS Databases. GI_Forum ‒ Journal of Geographic Information Science, 1-2018, 16-33. DOI: 10.1553/giscience2018_01_s16.

You can find my fork of the PG-Trajectory project – including all necessary fixes – on Bitbucket.


This post is part of a series. Read more about movement data in GIS.

Movement data in GIS #10: open tools for AIS tracks from MarineCadastre.gov

MarineCadastre.gov is a great source for AIS data along the US coast. Their data formats and tools though are less open. Luckily, GDAL – and therefore QGIS – can read ESRI File Geodatabases (.gdb).

MarineCadastre.gov also offer a Track Builder script that creates lines out of the broadcast points. (It can also join additional information from the vessel and voyage layers.) We could reproduce the line creation step using tools such as Processing’s Point to path but this post will show how to create PostGIS trajectories instead.

First, we have to import the points into PostGIS using either DB Manager or Processing’s Import into PostGIS tool:

Then we can create the trajectories. I’ve opted to create a materialized view:

The first part of the query creates a temporary table called ptm (short for PointM). This step adds time stamp information to each point. The second part of the query then aggregates these PointMs into trajectories of type LineStringM.

CREATE MATERIALIZED VIEW ais.trajectory AS
 WITH ptm AS (
   SELECT b.mmsi,
     st_makepointm(
       st_x(b.geom), 
       st_y(b.geom), 
       date_part('epoch', b.basedatetime)
     ) AS pt,
     b.basedatetime t
   FROM ais.broadcast b
   ORDER BY mmsi, basedatetime
 )
 SELECT row_number() OVER () AS id,
   st_makeline(ptm.pt) AS st_makeline,
   ptm.mmsi,
   min(ptm.t) AS min_t,
   max(ptm.t) AS max_t
 FROM ptm
 GROUP BY ptm.mmsi
WITH DATA;

The trajectory start and end times (min_t and max_t) are optional but they can help speed up future queries.

One of the advantages of creating trajectory lines is that they render many times faster than the original points.

Of course, we end up with some artifacts at the border of the dataset extent. (Files are split by UTM zone.) Trajectories connect the last known position before the vessel left the observed area with the position of reentry. This results, for example, in vertical lines which you can see in the bottom left corner of the above screenshot.

With the trajectories ready, we can go ahead and start exploring the dataset. For example, we can visualize trajectory speed and/or create animations:

Purple trajectory segments are slow while green segments are faster

We can also perform trajectory analysis, such as trajectory generalization:

This is a first proof of concept. It would be great to have a script that automatically fetches the datasets for a specified time frame and list of UTM zones and loads them into PostGIS for further processing. In addition, it would be great to also make use of the information in the vessel and voyage tables, thus splitting up trajectories into individual voyages.


Read more:

Refresh your maps FROM postgreSQL !

Continuing our love story with PostgreSQL and QGIS, we asked QGIS.org a grant application during early 2017 spring.

The idea was to take benefit of very advanced PostgreSQL features, that probably never were used in a Desktop GIS client before.

Today, let’s see what we can do with the PostgreSQL NOTIFY feature!

Ever dreamt of being able to trigger things from outside QGIS? Ever wanted a magic stick to trigger actions in some clients from a database action?

X All The Y Meme | REFRESH QGIS FROM THE DATABASE !!! | image tagged in memes,x all the y | made w/ Imgflip meme maker


NOTIFY is a PostgreSQL specific feature allowing to generate notifications on a channel and optionally send a message — a payload in PG’s dialect .

In short, from within a transaction, we can raise a signal in a PostgreSQL queue and listen to it from a client.

In action

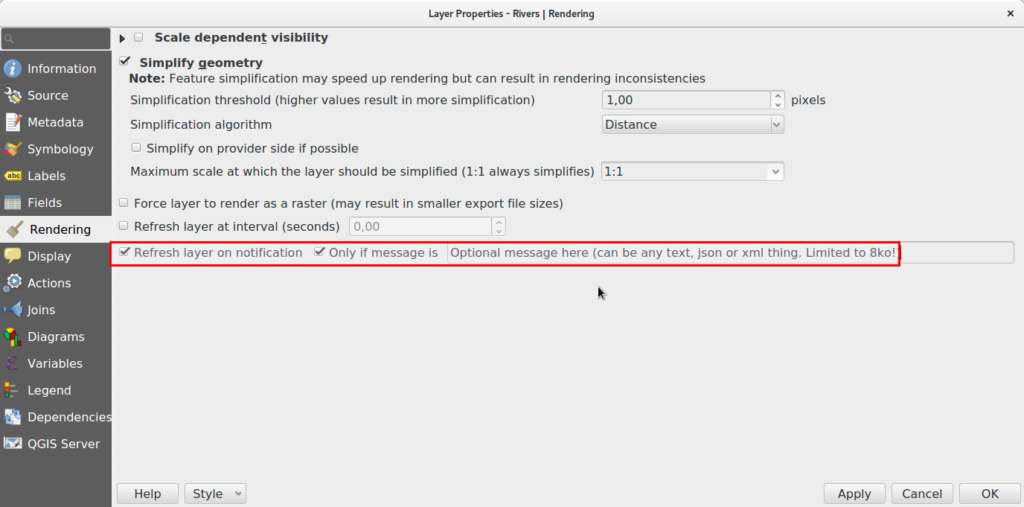
We hardcoded a channel named “qgis” and made QGIS able to LISTEN to NOTIFY events and transform them into Qt’s signals. The signals are connected to layer refresh when you switch on this rendering option.

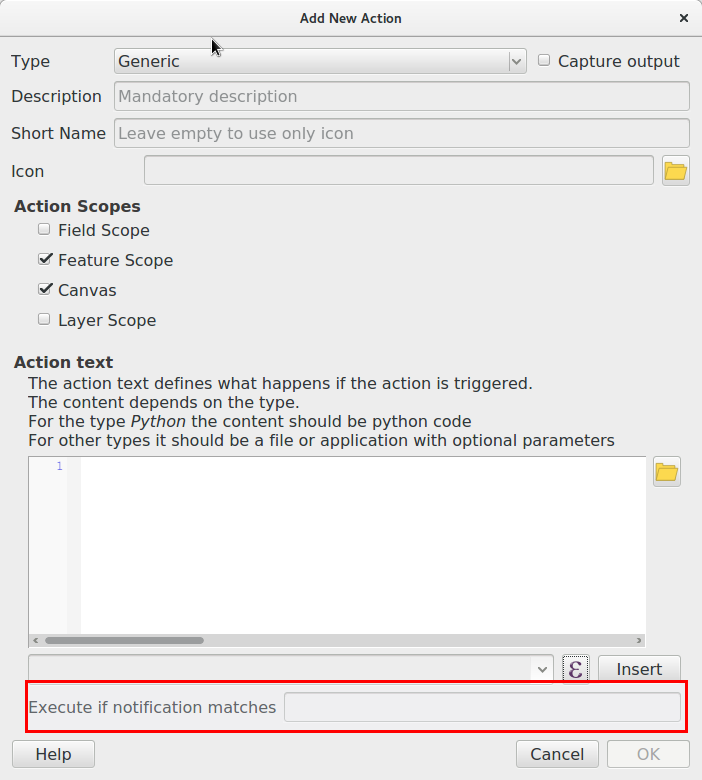
Optionnally, adding a message filter will only redraw the layer for some specific events.

This mechanism is really versatile and we now can imagine many possibilities, maybe like trigger a notification message to your users from the database, interact with plugins, or even code a chat between users of the same database  (ok, this is stupid) !


More than just refresh layers?

The first implementation we chose was to trigger a layer refresh because we believe this is a good way for users to discover this new feature.

But QGIS rocks hey, doing crazy things for limited uses is not the way.

Thanks to feedback on the Pull Request, we added the possibility to trigger layer actions on notification.

That should be pretty versatile since you can do almost anything with those actions now.

Caveats

QGIS will open a permanent connection to PostgreSQL to watch the notify signals. Please keep that in mind if you have several clients and a limited number of connections.

Notify signals are only transmitted with the transaction, so when the COMMIT is raised. So be aware that this might not help you if users are inside an edit session.

QGIS has a lot of different caches, for attribute table for instance. We currently have no specific way to invalidate a specific cache, and then order QGIS to refresh it’s attribute table.

There is no way in PG to list all channels of a database session, that’s why we couldn’t propose a combobox list of available signals in the renderer option dialog. Anyway, to avoid too many issues, we decided to hardcode the channel name in QGIS with the name “qgis”. If this is somehow not enough for your needs, please contact us!

Conclusion

The github pull request is here : https://github.com/qgis/QGIS/pull/5179

We are convinced this would be really useful for real time application, let us know if that makes some bells ring on your side!

More to come soon, stay tuned!


Undo Redo stack is back QGIS Transaction groups

Let’s keep on looking at what we did in QGIS.org grant application of early 2017 spring.

At Oslandia, we use a lot the transaction groups option of QGIS. It was an experimental feature in QGIS 2.X allowing to open only one common Postgres transaction for all layers sharing the same connection string.

Transaction group option

When activated, that option will bring many killer features:

  • Users can switch all the layers in edit mode at once. A real time saver.
  • Every INSERT, UPDATE or DELETE is forwarded immediately to the database, which is nice for:
    • Evaluating on the fly if database constraints are satisfied or not. Without transaction groups this is only done when saving the edits and this can be frustrating to create dozens of features and having one of them rejected because of a foreign key constraint…
    • Having triggers evaluated on the fly.  QGIS is so powerful when dealing with “thick database” concepts that I would never go back to a pure GIS ignoring how powerful databases can be !
    • Playing with QgsTransaction.ExecuteSQL allows to trigger stored procedures in PostgreSQL in a beautiful API style interface. Something like
SELECT invert_pipe_direction('pipe1');
  • However, the implementation was flagged “experimental” because some caveats where still causing issues:
    • Committing on the fly was breaking the logic of the undo/redo stack. So there was no way to do a local edit. No Ctrl+Z!  The only way to rollback was to stop the edit session and loose all the work. Ouch.. Bad!
    • Playing with ExecuteSQL did not dirty the QGIS edit buffer. So, if during an edit session no edit action was made using QGIS native tools, there was no clean way to activate the “save edits” icon.
    • When having some failures in the triggers, QGIS may loose DB connection and thus create a silent ROLLBACK.

We decided to try to restore the undo/redo stack by saving the history edits in PostgreSQL SAVEPOINTS and see if we could restore the original feature in QGIS.

And.. it worked!

Let’s see that in action:


Potential caveats ?

At start, we worried about how heavy all those savepoints would be for the database. It turns out that maybe for really massive geometries, and heavy editing sessions, this could start to weight a bit, but honestly far away from PostgreSQL capabilities.


Up to now, we didn’t really find any issue with that..

And we didn’t address the silent ROLLBACK that occurs sometimes, because it is generated by buggy stored procedures, easy to solve.

Some new ideas came to us when working in that area. For instance, if a transaction locks a feature, QGIS just… wait for the lock to be released. I think we should find a way to advertise those locks to the users, that would be great! If you’re interested in making that happen, please contact us.


More to come soon, stay tuned!


  • Page 1 of 4 ( 67 posts )
  • >>
  • postgis

Back to Top

Sustaining Members