Related Plugins and Tags

QGIS Planet

(Fr) QSoccer : QGIS, football, what else ?

Sorry, this entry is only available in French.

Store and visualize your raster in the Cloud with COG and QGIS

We have recently been working for the French Space Agency ( CNES ) who needed to store and visualize satellite rasters in a cloud platform. They want to access the image raw data, with no transformation, in order to fullfill deep analysis like instrument calibration. Using classic cartographic server standard like WMS or TMS is not an option because those services transform datasets in already rendered tiles.

We chose to use a quite recent format managed by GDAL, the COG (Cloud Optimize Geotiff) and target OVH cloud platform for it provides OpenStack, a open source cloud computing platform.

How it works

A COG file is a GEOTiff file which inner structure is tiled, meaning that the whole picture is divided in fixed size tile (256 x 256 pixels for instance) so you can efficiently retrieve parts of the raster. In addition to the HTTP/1.1 standard feature range request, it is possible to get specific tiles of an image through the network without downloading the entire raster.

We used a service provided by OpenStack, called Object Storage to serve the COG imagery. Object storage allows to store and retrieve file as objects using HTTP GET/POST requests.

Why not WCS ?

Web Coverage Service standard could have been an option. A WCS server can serve raw data according to a given geographic extent. It’s completely possible to deploy a container or a VPS (Virtual Private Server) running a WCS Server in a cloud plateform. The main advantages of the COG solution over WCS Server is that you don’t have to deal with the burden of deploying a server, like giving it ressources, configuring load balancing, handle updates, etc…

The beauty of COG solution is its simplicity. It is only HTTP requests, and everything else (rendering for instance) is done on the client side.

Step by step

Here are the different steps you’d have to go through if you’re willing to navigate in a big raster image directly from the cloud.

First, let’s generate a COG file

gdal_translate inputfile.tif cogfile.tif -co TILED=YES -co COPY_SRC_OVERVIEWS=YES -co COMPRESS=DEFLATE

Install your openstack-client, it can be achieved easily with Python pip install command line

$ pip install python-openstackclient

Next, configure your openstack client in order to generate an athentification token. To do so you need to download your project specific openrc file to setup your environment)

$ source myproject-openrc.sh
Please enter your OpenStack Password for project myproject as user myuser:
**********
$ openstack token issue                                 
+------------+-----------------------------------------------------------------------------------------------------------------------------------------------------------------------------------------+
| Field      | Value                                                                                                                                                                                   |
+------------+-----------------------------------------------------------------------------------------------------------------------------------------------------------------------------------------+
| expires    | 2020-07-21T08:15:12+0000                                                                                                                                                                |
| id         | xxxx_my_token_xxxx
| project_id | 97e2e750f1904b41b76f80a50dabde0a                                                                                                                                                        |
| user_id    | 18f7ccaf1a2d4344a4e35f0d84eb065e                                                                                                                                                        |
+------------+-----------------------------------------------------------------------------------------------------------------------------------------------------------------------------------------+

You are now good to push you COG file to the cloud instance

openstack object create MyContainer cogfile.tif --name cogfile.tif

Before starting QGIS, 2 environment variables need to be set.  (replace xxxx_my_token_xxxx with the token you’d just come to generate)

$ export SWIFT_AUTH_TOKEN=xxxx_my_token_xxxx
$ export SWIFT_STORAGE_URL=https://storage.sbg.cloud.ovh.net/v1/AUTH_$OS_PROJECT_ID

It can also be done directly from the QGIS Python console by setting those variable using the os.environ.

Finally, add a cloud raster data source in in QGIS

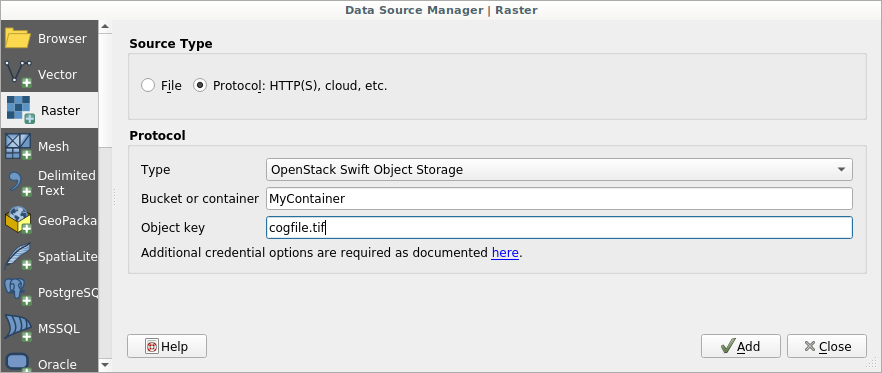
You can now navigating into your image directly reading it from the cloud

© CNES 2018, Distribution Airbus DS

Performances

While panning in the map, QGIS will download only few tiles from the image in order to cover the view extent. The display latency that you could see in the video depends essentially on:

  • The number of band of your image
  • The pixel size
  • Your internet connection (mine, the one use for the video, is not an awesome one)

Note that the white flickering that you could see when you move in the map and the raster is refreshed should be removed in next version of QGIS according to this QEP.

What’s next ?

Thanks so much to the GDAL and QGIS contributors for adding such a nice feature ! It brings lots of possibilities for organizations that have to deal with great number of big raster and just want to explore part of it.

We are already thinking about further improvments (ease authentification, better integration with processing…), so if you’re willing to fund them or just want to know more about QGIS, feel free to contact us at [email protected]. And please have a look at our support offering for QGIS.

Publication de l’extension COVADIS RAPEA pour QWAT et QGEP

QWAT est une application open source de gestion des réseaux d’eau potable émanant des collectivités de Pully, le SIGE à Vevey, Morges et Lausanne.
QGEP est son homologue dédiée à la gestion des eaux usées et pluviales, initiée par le groupe utilisateur QGIS Suisse.

L’échange de données entre institutions est une pierre angulaire des politiques de l’eau. Ces échanges se basent sur des formats d’échanges standardisés. Ainsi les Cantons de Fribourg (format aquaFRI) ou de Vaud (format SIRE) conditionnent certaines subventions publiques à la transmission des données selon des formats pré-définis et permettent à ces échelons administratifs d’avoir une vision globale des réseaux humides.

Dans le cadre d’une expérimentation des outils QWAT (eau potable) et QGEP (eaux usées), Charentes Eaux a souhaité mettre en œuvre des extensions dédiées au standard d’échange de données sur les réseaux d’eau Français, le Géostandard Réseaux d’adduction d’eau potable et d’assainissement (RAEPA) défini par la Commission de validation des données pour l’information spatialisée (COVADIS).

Oslandia a été mandaté pour mettre en œuvre des instances de QWAT et QGEP, réaliser les extensions RAEPA pour chacun de ces outils, et aider Charente Eaux à charger les données des collectivités membres de ce syndicat mixte.

https://charente-eaux.fr/le-syndicat/qui-sommes-nous/

Le travail a été publié pour QWAT sous forme d’une extension standardisée dans le dépôt l’organisation QWAT https://github.com/qwat/extension_fr_raepa/

Pour QGEP, il n’existe pas encore de fonctionnalité pour gérer d’extension, le dépôt https://gitlab.com/Oslandia/qgep_extension_raepa/ contient donc les définitions de données et de vues à rajouter manuellement au modèle de données.

La compatibilité des modèles de données a été évaluée et le choix a été fait de ne faire que des vues dédiées à l’export de données. Il est techniquement possible de faire des vues éditables pour permettre le chargement de données via ces vues depuis des fichiers suivant le gabarit de données RAEPA. Le niveau de simplification et d’agrégation des listes de valeurs rend ce travail peu générique dans l’état actuel du géostandard (v1.1), il est donc plus pertinent à ce stade de réaliser des scripts de chargement sans passer par ce pivot dans le cas de Charente-Eaux

(Fr) Rechercher une adresse avec QGIS

Sorry, this entry is only available in French.

QGIS Server 3 : OGC Certification work for WFS 1.1.0

QGIS Server is an open source OGC data server which uses QGIS engine as backend. It becomes really awesome because a simple desktop qgis project file can be rendered as web services with exactly the same rendering, and without any mapfile or xml coding by hand.

QGIS Server provides a way to serve OGC web services like WMS, WCS, WFS and WMTS resources from a QGIS project, but can also extend services like GetPrint which takes advantage of QGIS’s map composer power to generate high quality PDF outputs.

Since the 3.0.2 version, QGIS Server is certified as an official OGC reference implementation for WMS 1.3.0 and reports are generated in a daily continuous integration to avoid regressions.


Thus, the next step was naturally to take a look at the WFS 1.1.0 thanks to the support of the QGIS Grant Program

Side note, this Grant program is made possible thanks to your direct sponsoring and micro-donations to QGIS.org.

TEAM Engine test suite for WFS 1.1.0

We use a tool provided by the OGC Compliance Program to run dedicated tests on the server : Teamengine (Test, Evaluation, And Measurement Engine).

Test suites are available through a web interface. However, for the needs of continuous integration, these tests have to be run without user interaction. In the case of WMS 1.3.0, nothing more easy than using the REST API:

$ curl "http://localhost:8081/teamengine/rest/suites/wms/1.20/run?queryable=queryable&basic=basic&capabilities-url=http://172.17.0.2/qgisserver?REQUEST=GetCapabilities%26SERVICE=WMS%26VERSION=1.3.0%26MAP=/data/teamengine_wms_130.qgs


However, the WFS 1.1.0 test suite does not provide a REST API and makes the situation less straightforward. We switched to using TEAM Engine directly from command line:

$ cd te_base
$ ./bin/unix/test.sh -source=wfs/1.1.0/ctl/main.ctl -form=params.xml

The params.xml file allows to configure underlying tests. In this particular case, the GetCapabilities URL of the QGIS Server to test is given.  Results are available thanks to the viewlog.sh shell script:

$ ./bin/unix/viewlog.sh -logdir=te_base/users/root/ -session=s0001
Test wfs:wfs-main type Mandatory (s0001) Failed (InheritedFailure)
   Test wfs:readiness-tests type Mandatory (s0001/d68e38807_1) Failed (InheritedFailure)
      Test ctl:SchematronValidatingParser type Mandatory (s0001/d68e38807_1/d68e588_1) Failed
      Test wfs:basic-main type Mandatory (s0001/d68e38807_1/d68e636_1) Failed (InheritedFailure)
         Test wfs:run-GetCapabilities-basic-cc-GET type Mandatory (s0001/d68e38807_1/d68e636_1/d68e28810_1) Failed (InheritedFailure)
            Test wfs:wfs-1.1.0-Basic-GetCapabilities-tc1 type Mandatory (s0001/d68e38807_1/d68e636_1/d68e28810_1/d68e1095_1) Passed
               Test ctl:assert-xpath type Mandatory (s0001/d68e38807_1/d68e636_1/d68e28810_1/d68e1095_1/d68e1234_1) Passed
            Test wfs:wfs-1.1.0-Basic-GetCapabilities-tc2 type Mandatory (s0001/d68e38807_1/d68e636_1/d68e28810_1/d68e1100_1) Passed
               Test ctl:assert-xpath type Mandatory (s0001/d68e38807_1/d68e636_1/d68e28810_1/d68e1100_1/d68e1305_1) Passed
            Test wfs:wfs-1.1.0-Basic-GetCapabilities-tc3 type Mandatory (s0001/d68e38807_1/d68e636_1/d68e28810_1/d68e1105_1) Passed
               Test ctl:assert-xpath type Mandatory (s0001/d68e38807_1/d68e636_1/d68e28810_1/d68e1105_1/d68e1558_1) Passed
               Test ctl:assert-xpath type Mandatory (s0001/d68e38807_1/d68e636_1/d68e28810_1/d68e1105_1/d68e1582_1) Passed
               Test ctl:assert-xpath type Mandatory (s0001/d68e38807_1/d68e636_1/d68e28810_1/d68e1105_1/d68e1606_1) Passed
...
...

Finally, a Python script has been written to read these logs and generate HTML report easily readable. Thanks to our QGIS-Server-CertifSuite, providing the continuous integration infrastructure with Docker images, these reports are also generated daily.

Bugfix and Conclusion

First results were clear: a lot of work is necessary to have a QGIS Server certified for WFS 1.1.0!

We started fixing the issues one by one:

And now we have a much better support than 6 months ago

However, some work still need to be done to finally obtain the OGC certification for WFS 1.1.0. To be continued!

Please contact us if you want QGIS server to become a reference implementation for all OGC service !

“QGZ” – A new default project file format for QGIS

Last year we had the opportunity to implement ‘.QGZ’ as  anew variant of  the QGIS 3 project file format.

This is simply a zipped container for the QGS xml file. We took benefit of that container to store the auxiliary storage database into it – only if users choose that optional format though.

In classical mode, the auxiliary database is saved as a .qgd file  along the xml file.

qgd auxiliary storage file


qgz file format saving

When choosing the zipped container, the qgd file falls into the qgz, and this becomes totally transparent for end users. No more issues, you can’t delete it or forget to copy it when sharing project files!

The great news today is that for qgis 3.2, qgz will be the default format!

This will offers many possibilities like embbeding:

  • Resources like fonts, SVG, color ramps, and all styling informations
  • A unified container for off-line editing embedding data into a gpkg format
  • plugins, scripts, processing algorithms and modelers

If you are interested in going further this, please contact us!

QGIS 3 compiling on Windows

As the Oslandia team work exclusively on GNU/Linux, the exercise of compiling QGIS 3 on Windows 8 is not an everyday’s task :). So we decided to share our experience, we bet that will help some of you.

Cygwin

The first step is to download Cygwin and to install it in the directory C:\cygwin (instead of the default C:\cygwin64). During the installation, select the lynx package:


Once installed, you have to click on the Cygwin64 Terminal icon newly created on your desktop:

Then, we’re able to install dependencies and download some other installers:

[pastacode lang=”bash” manual=”%24%20cd%20%2Fcygdrive%2Fc%2FUsers%2Fhenri%2FDownloads%0A%24%20lynx%20-source%20rawgit.com%2Ftranscode-open%2Fapt-cyg%2Fmaster%2Fapt-cyg%20%3E%20apt-cyg%0A%24%20install%20apt-cyg%20%2Fbin%0A%24%20apt-cyg%20install%20wget%20git%20flex%20bison%0A%24%20wget%20http%3A%2F%2Fdownload.microsoft.com%2Fdownload%2FD%2F2%2F3%2FD23F4D0F-BA2D-4600-8725-6CCECEA05196%2Fvs_community_ENU.exe%0A%24%20chmod%20u%2Bx%20vs_community_ENU.exe%0A%24%20wget%20https%3A%2F%2Fcmake.org%2Ffiles%2Fv3.7%2Fcmake-3.7.2-win64-x64.msi%0A%24%20wget%20http%3A%2F%2Fdownload.osgeo.org%2Fosgeo4w%2Fosgeo4w-setup-x86_64.exe%0A%24%20chmod%20u%2Bx%20osgeo4w-setup-x86_64.exe” message=”” highlight=”” provider=”manual”/]

CMake

The next step is to install CMake. To do that, double clic on the file cmake-3.7.2-win64-x64.msi previously downloaded with wget. You should choose the next options during the installation:


Visual Studio

Then, we have to install Visual Studio and C++ tools. Double click on the vs_community_ENU.exe file and select the Custom installation. On the next page, you have to select Visual C++ chekbox:


OSGeo4W

In order to compile QGIS, some dependencies provided by the OSGeo4W installer are required. Double click on osgeo4w-setup-x86_64.exe and select the Advanced Install mode. Then, select the next packages:

  •  expat
  • fcgi
  • gdal
  • grass
  • gsl-devel
  • iconv
  • libzip-devel
  • libspatialindex-devel
  • pyqt5
  • python3-devel
  • python3-qscintilla
  • python3-nose2
  • python3-future
  • python3-pyyaml
  • python3-mock
  • python3-six
  • qca-qt5-devel
  • qca-qt5-libs
  • qscintilla-qt5
  • qt5-devel
  • qt5-libs-debug
  • qtwebkit-qt5-devel
  • qtwebkit-qt5-libs-debug
  • qwt-devel-qt5
  • sip-qt5
  • spatialite
  • oci
  • qtkeychain

QGIS

To start this last step, we have to create a file C:\OSGeo4W\OSGeo4W-dev.bat containing something like:

[pastacode lang=”bash” manual=”%40echo%20off%20%0Aset%20OSGEO4W_ROOT%3DC%3A%5COSGeo4W64%0Acall%20%22%25OSGEO4W_ROOT%25%5Cbin%5Co4w_env.bat%22%20%0Acall%20%22%25OSGEO4W_ROOT%25%5Cbin%5Cqt5_env.bat%22%20%0Acall%20%22%25OSGEO4W_ROOT%25%5Cbin%5Cpy3_env.bat%22%20%0Aset%20VS140COMNTOOLS%3D%25PROGRAMFILES(x86)%25%5CMicrosoft%20Visual%20Studio%2014.0%5CCommon7%5CTools%5C%20%0Acall%20%22%25PROGRAMFILES(x86)%25%5CMicrosoft%20Visual%20Studio%2014.0%5CVC%5Cvcvarsall.bat%22%20amd64%20%0Aset%20INCLUDE%3D%25INCLUDE%25%3B%25PROGRAMFILES(x86)%25%5CMicrosoft%20SDKs%5CWindows%5Cv7.1A%5Cinclude%20%0Aset%20LIB%3D%25LIB%25%3B%25PROGRAMFILES(x86)%25%5CMicrosoft%20SDKs%5CWindows%5Cv7.1A%5Clib%20%0Apath%20%25PATH%25%3B%25PROGRAMFILES%25%5CCMake%5Cbin%3Bc%3A%5Ccygwin%5Cbin%20%0A%40set%20GRASS_PREFIX%3D%22%25OSGEO4W_ROOT%25%5Capps%5Cgrass%5Cgrass-7.2.1%20%0A%40set%20INCLUDE%3D%25INCLUDE%25%3B%25OSGEO4W_ROOT%25%5Cinclude%20%0A%40set%20LIB%3D%25LIB%25%3B%25OSGEO4W_ROOT%25%5Clib%3B%25OSGEO4W_ROOT%25%5Clib%20%0A%0A%40cmd%20″ message=”” highlight=”” provider=”manual”/]

According to your environment, some variables should probably be adapted. Then in the Cygwin terminal:

[pastacode lang=”bash” manual=”%24%20cd%20C%3A%5C%0A%24%20git%20clone%20git%3A%2F%2Fgithub.com%2Fqgis%2FQGIS.git%0A%24%20.%2FOSGeo4W-dev.bat%0A%3E%20cd%20QGIS%2Fms-windows%2Fosgeo4w” message=”” highlight=”” provider=”manual”/]

In this directory, you have to edit the file package-nightly.cmd to replace:

[pastacode lang=”bash” manual=”cmake%20-G%20Ninja%20%5E” message=”” highlight=”” provider=”manual”/]

by:

[pastacode lang=”bash” manual=”cmake%20-G%20%22Visual%20Studio%2014%202015%20Win64%22%20%5E” message=”” highlight=”” provider=”manual”/]

Moreover, we had to update the environment variable SETUAPI_LIBRARY according to the current position of the Windows Kits file SetupAPI.Lib:

[pastacode lang=”bash” manual=”set%20SETUPAPI_LIBRARY%3DC%3A%5CProgram%20Files%20(x86)%5CWindows%20Kits%5C8.1%5CLib%5Cwinv6.3%5Cum%5Cx64%5CSetupAPI.Lib” message=”” highlight=”” provider=”manual”/]

And finally, we just have to compile with the next command:

[pastacode lang=”markup” manual=”%3E%20package-nightly.cmd%202.99.0%201%20qgis-dev%20x86_64″ message=”” highlight=”” provider=”manual”/]

Victory!

And see you soon for the generation of OSGEO4W packages 😉

Source

https://github.com/qgis/QGIS/blob/ab859c9bdf8a529df9805ff54e7250921a74d877/doc/msvc.t2t


  • Page 1 of 1 ( 8 posts )
  • non classé

Back to Top

Sustaining Members