 !<tl><dr>
Local Authorities work with people and assets. Most people have an address and assets are mostly located somewhere. As my old geography teacher used to say, “everything has geography, geography is everything”. For people who work in Local Authorities being able to find an accurate and up-to-date address easily is key to being able to deliver a service quickly and efficiently. If GIS officers had their way even more of the Council back office systems across the country would hook up to the corporate GI database and do cool stuff with spatial information.
At the recent AGI GeoCom and FOSS4G conferences in Nottingham during Maptember QGIS 2.0 was launched and garnered a lot of attention from people interested in finding solutions to save money and time and still deliver great results. I came away with a resolution to push for the use of QGIS at work in an attempt to get a desktop GIS onto more desktops while not breaking the bank. I had also met Simon Miles (@geosmiles) and eagerly followed his talk of creating a hybrid GI infrastructure using a mix of open-source and proprietary software.
QGIS fitted the bill with its extensive range of functionality, growing list of available plugins, super easy connectivity to a range of data sources including Oracle, SQL Server and PostGIS, all of which we use. The one thing it was lacking was a search plugin to let the users search the corporate address gazetteer for postal address and street names. Our existing GIS has such a plugin and it works well but not with the imminent upgrades. There had to be something that could connect to the gazetteer table in our PostGIS database, search and display an address.
 Enter the QGIS Gazetteer Plugin developed by Astun Technology, Nathan Woodrow and Matt Walker. Add some keen peeps from the UK QGIS User Group and some social networking and stuff begins to happen.
After downloading and installing the plugin I soon hit a brick wall – or rather a firewall – the security at work wouldn’t let the Yahoo and Geonames gazetteers work and we don’t have Astun’s iShareGIS software stack. I delved into the code to see if I could work out what was happening and hit another wall – how does this Python stuff work? Nought for two after one over.
After some chat on the UK QGIS Google+ group I found some people in Local Government across the UK who have managed to get the plugin to work and work well. Simon Miles (Royal Borough of Windsor and Maidenhead), Kevin Williams (Neath-Port Talbot) and Matt Travis (Dartmoor National Park) rallied to my call and soon I had some code in my grubby mitts. An hour after that I had a working plugin searching our address and street gazetteers, postcodes and planning applications. Listed buildings, building warrants and others soon followed. I shared the plugin with some of our power users and they were very impressed and have even started asking for enhancements.
This whole process is a great example of how a User Group can work when coupled with FOSS4G fans, social media, open-source software and a common problem to solve. Being able to present a working solution to users and managers in just a few days certainly strengthens the case for using QGIS alongside the traditional GIS tools and maybe, in time, replacing them.
What follows is a rather more technical description of the installation and configuration of just about the single most useful application a Council officer could ask for. If you want the short version and can do the tech stuff then go to https://github.com/mixedbredie/qgis-gazetteer-search and get it, otherwise hang in there to the end…
What you need:
1. QGIS 2.0 installed
2. the QGIS Gazetteer plugin installed
3. a PostGIS database with some gazetteer tables
4. an Apache2 web server

1. QGIS
Install QGIS 2.0 – I used the standalone installer from http://www.qgis.org/en/site/forusers/download.html
2. QGIS Gazetteer Plugin
Install the QGIS Gazetteer plugin from https://github.com/AstunTechnology/QGIS-Gazetteer-Plugin by downloading the zip file and extracting into your .qgis2 folder. This is located at
C:\Documents and Settings\<Username>\.qgis2\python\plugins\ (Windows XP) or
C:\Users\<Username>\.qgis2\python\plugins\ (Windows 7+).
Make sure that the extracted directory is called “gazetteersearch”. Matt Walker (@_walkermatt) has upgraded the plugin to work with QGIS 2.0 and added a few enhancements like an OpenStreetMap search.
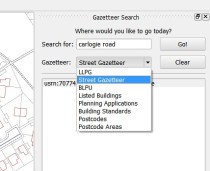
In the “gazetteers” sub directory there a “config.ini” file which needs to be edited to list the datasets we want to search. I’ll show how to connect to the address and street gazetteers and a table of postcode areas.
I deleted the GeoNames, Yahoo and AstunTechnology lines and inserted the following:
[LLPG]
gazetteer:llpg
[LSG]
gazetteer:lsg
[Postcode]
gazetteer:postcodes
Create three files in the gazetteers folder – llpg.py, lsg.py and postcodes.py
In the llpg.py file put:
import json
import collections
url = "http://10.135.1.69/cgi-bin/llpg_pg.py"
params = {
    'address': '##searchstring##'
}
def parseRequestResults (data):
json_result = json.loads (data)
    for item in json_result:
        result = collections.namedtuple ('Result', ['description','x','y','zoom', 'epsg'])
        result.description = item['address']
        result.x = float (item['easting'])
        result.y = float (item['northing'])
        result.zoom = 1250
        result.epsg = 27700
        yield result
In the lsg.py file put:
import json
import collections
url = "http://10.12.345.678/cgi-bin/lsg_pg.py"
params = {
    'address': '##searchstring##'
}
def parseRequestResults (data):
json_result = json.loads (data)
for item in json_result:
        result = collections.namedtuple ('Result', ['description','x','y','zoom', 'epsg'])
        result.description = item['address']
        result.x = float (item['easting'])
        result.y = float (item['northing'])
        result.zoom = 2500
        result.epsg = 27700
        yield result
In the postcodes.py file put:
import json
import collections
url = "http://10.12.345.678/cgi-bin/postcodes_pg.py"
params = {
    'postcode': '##searchstring##'
}
def parseRequestResults (data):
    json_result = json.loads (data)
    for item in json_result:
        result = collections.namedtuple ('Result', ['description','x','y','zoom', 'epsg'])
        result.description = item['postcode']
        result.x = float (item['easting'])
        result.y = float (item['northing'])
        result.zoom = 2500
        result.epsg = 27700
        yield result
You need to set the correct server IP address in the URL and link to the correct file in the cgi-bin. You can also set the zoom scale for the results and I use ESPG:27700 as everything we have is in British National Grid.
If you restart QGIS and enable the plugin you’ll see there are now four search options in the drop-down list. Right, now to make sure PostGIS has the correct information.
3. PostGIS Database
The installation and configuration of PostgreSQL and PostGIS is more than this post is going to address but you’ll need to have one. With some tables in it with some data that can be searched. We load our address and street gazetteers into PostGIS on a daily basis and these tables are used by the plugin for searching and displaying records. Our tables have a UPRN (Unique Property Reference Number) field and an ADDRESS field with a full address in it (name number street town locality postcode). The address gazetteer has a point geometry. The street gazetteer has a USRN (Unique Street Reference Number) and a NAME field with the full descriptive name of the street in it. It has a line geometry. Almost any table can be searched as long as it has a unique id, a text field for searching, and some geometry.
Our address gazetteer already had the correct fields in so nothing had to be done but the street gazetteer needed some changes. I created a view of the streets to change the name of the fields to fit with what the plugin was expecting:
CREATE OR REPLACE VIEW angusdata.search_lsg_streets AS
SELECT a.usrn AS uprn,
btrim(pg_catalog.concat('usrn:', btrim(a.usrn::text), ' ', btrim(a.street::text), ' ', btrim(a.locality::text), ' ', btrim(a.town::text))) AS address,a.geometry
FROM lsg_streets a;
This changes the USRN field to UPRN and concatenates USRN, STREET, LOCALITY and TOWN to create an ADDRESS field and then adds the geometry.
The Postcodes table has polygon geometry and a postcode field and the python script that creates the web service has been tweaked to work with this. The next section will explain how to create the web services on Apache2.
4. Apache
I have a local Apache2 webserver running on my PC but it’s pretty easy to get one set up on server if you chat to the right people :-) so get one installed (http://www.apachehaus.com/cgi-bin/download.plx). The plugin uses the web services running in the Apache2 cgi-bin to connect to the PostGIS database to query the gazetteers. You’ll also need to have Python (http://www.python.org/download/releases/2.7.5/) installed on the same machine. And the Python psycopg2 module (http://www.stickpeople.com/projects/python/win-psycopg/).
First up, the Apache2 server needs to be configured to allow use of the cgi-bin. Edit the httpd.conf file and make the following changes.
Uncomment the following lines to enable the modules:
LoadModule access_compat_module modules/mod_access_compat.so
LoadModule cgi_module modules/mod_cgi.so
LoadModule proxy_fcgi_module modules/mod_proxy_fcgi.so
LoadModule rewrite_module modules/mod_rewrite.so
Set the server name to its IP address:
ServerName 10.12.345.678:80
Allow access to the server:
<Directory />
  Options Indexes FollowSymLinks ExecCGI
  AllowOverride All
  Order allow,deny
  Allow from all
  Require all granted
</Directory>
Set the file that Apache will serve if a directory is requested:
<IfModule dir_module>
  DirectoryIndex index.html index.htm index.php index.php3
</IfModule>
Allow access to the CGI directory and enable it to handle python scripts:
<Directory "${SRVROOT}/cgi-bin">
  Options Indexes FollowSymLinks ExecCGI
  AllowOverride All
  Order allow,deny
  Allow from all
  Require all granted
  AddHandler cgi-script .cgi .py
</Directory>
This is a pretty basic configuration and it could probably be improved but it works on my system.
Then in the CGI-BIN directory create some files, one for each web service and to match the gazetteers listed in the config file. I created three files called llpg_pg.py, lsg_pg.py and postcodes_pg.py.
In the llpg_pg.py file the SQL query selects the records that match the search string and uses the point geometry of the records to return to the plugin.
#!D:/Python27/python.exe
# -*- coding: UTF-8 -*-
import cgi
import json
import psycopg2
sql = """select a.uprn, a.address, ST_X(a.geometry), ST_Y(a.geometry)
from angusdata.address_gazetteer a
where a.address ilike '%%' || (%(p_address)s) || '%%'
order by address"""
form = cgi.FieldStorage ()
connection = psycopg2.connect ("host='10.12.345.678' port='5432' dbname='postgisdb' user='username' password='password'")
cursor = connection.cursor ()
cursor.execute (sql, {"p_address": form["address"].value})
list = []
for record in cursor:
    data = dict (zip (["uprn", "address", "easting", "northing"], record))
    list.append (data)
print "Content-Type: application/json\n"
print json.dumps (list, indent = 4)
In the lsg_pg.py file the SQL query selects the records from the view and converts the line geometry to a centroid point.
#!D:/Python27/python.exe
# -*- coding: UTF-8 -*-
import cgi
import json
import psycopg2
sql = """select a.uprn, a.address, ST_X(ST_Centroid(a.geometry)), ST_Y(ST_Centroid(a.geometry))
from angusdata.search_lsg_streets a
where a.address ilike '%%' || (%(p_address)s) || '%%'
order by address"""
form = cgi.FieldStorage ()
connection = psycopg2.connect ("host='10.12.345.678' port='5432' dbname='postgisdb' user='username' password='password'")
cursor = connection.cursor ()
cursor.execute (sql, {"p_address": form["address"].value})
list = []
for record in cursor:
    data = dict (zip (["uprn", "address", "easting", "northing"], record))
    list.append (data)
print "Content-Type: application/json\n"
print json.dumps (list, indent = 4)
In the postcodes_pg.py file the SQL query turns the polygon geometry into a point geometry using the PostGIS ST_PointOnSurface function. The psycopg2 parameters have been tweaked to use the postcode tables fields.
#!D:/Python27/python.exe
# -*- coding: UTF-8 -*-
import cgi
import json
import psycopg2
sql = """select a.postcode, ST_X(ST_Pointonsurface(a.geometry)), ST_Y(ST_Pointonsurface(a.geometry))
from thirdparty.os_codepointpoly a
where a.postcode ilike '%%' || (%(p_postcode)s) || '%%'
order by postcode"""
form = cgi.FieldStorage ()
connection = psycopg2.connect ("host='10.12.345.678' port='5432' dbname='postgisdb' user='username' password='password'")
cursor = connection.cursor ()
cursor.execute (sql, {"p_postcode": form["postcode"].value})
list = []
for record in cursor:
    data = dict (zip (["postcode", "easting", "northing"], record))
    list.append (data)
print "Content-Type: application/json\n"
print json.dumps (list, indent = 4)
Make sure the #!shebang at the top of the python script has the correct path to your Python installation.
Check the Apache2 log files if there are any errors.
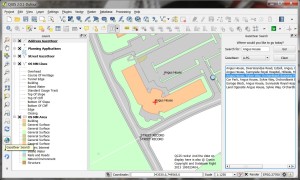
Right, we have QGIS installed with the gazetteer search plugin configured to use the new gazetteers. The PostGIS tables and views are presenting the data in format required by the web services. The Apache2 server is configure to allow access and the python scripts are in the cgi-bin. Fire up QGIS, refresh the plugin and enter a search term and hit GO! Awesome! Mine works, at least.
None of this would have been possible without the UK QGIS group and the input from Matt, Kevin and Simon. Big thanks to Matt Walker and Jo Cook for recent updates to the plugin. Use the comments to tell us how to do it better.