
Comparison of SOM Classification and Unsupervised KMeans image classification in SEXTANTE
faunaliagis
Page 1 of 1 (6 posts)
Last update:
Fri Jul 26 19:30:30 2024
 •
•
 •
•

 •
•
 •
•

faunaliagis
Sextante is quickly becoming the goto geoprocessing toolbox for me. I’ve been working with Sextante 1.0.8 on QGIS 1.8 and lately I’ve started looking into Sextante 1.1 for QGIS 2. This post highlights some of the main differences between the two versions. I’m sure there are many more hidden gems I have not discovered so far.
One thing you will notice if you have used previous versions of Sextante is that the new version comes with a simplified interface which groups tools into three categories: geoalgorithms, models, and scripts. If you prefer the old style grouping by algorithm source such as GDAL, GRASS, etc. you can switch to the Advanced interface.
Let’s start with the bad news: Models created in 1.0.8 are not compatible with 1.1 since many of the algorithms have been rearranged in new categories and Sextante cannot find them by their old names anymore, e.g.
1.0.8 … ALGORITHM:ftools:fixeddistancebuffer
1.1 … ALGORITHM:qgis:fixeddistancebuffer
The great news is that the modeler has been improved greatly. Model representations now show the flow of input and output data through the model steps much more clearly:

Sextante 1.0.8 modeler

Sextante 1.1 modeler
I also found the new modeler much more stable – no crashes so far. *fingerscrossed*
Another nice new feature is Sextante commander which can be started using the shortcut Ctrl+Alt+M. It’s a quick launch solution for all Sextante algorithms:
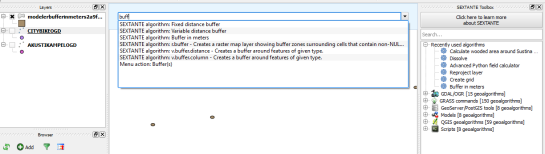
At FOSS4G, I’ll be presenting some work I did evaluation OSM using Sextante 1.0.8. I’d love to hear how you are using Sextante.

Advanced Python field calculator is one of the numerous tools in Sextante for QGIS. It’s extremely powerful but it doesn’t use the syntax of QGIS’ default field calculator (the one you can access via attribute table). Therefore, here comes a short introduction:
If you want to reproduce this example, I used a dataset of town areas from the new open government data site of Lower Austria.
The upper half of the Advanced Python field calculator is rather self-explanatory but the lower half is where it gets interesting: Code in the global expression section will be executed only once before the calculator starts iterating through all the features of the input layer. Therefore, this is the correct place to import necessary modules or to calculate variables that will be used in subsequent calculations. Code in the formula section will be evaluated for each feature in the input layer. As shown in the following example, this is where we can calculate new values, e.g. the area of the polygons in km²:

As you can see, the feature geometry can be accessed using $geom.
If you want to access an existing attribute, that’s possible using <attribute_name>.
Anyway, this is the resulting layer’s attribute table including the new areaKM2 field:

Thanks to Victor for pointing me to the documentation of FieldPyculator which Advanced Python field calculator is based on.

This post covers how to add you own tools to expand Sextante’s ftools toolbox.
I was looking through Sextante for a tool that inserts additional nodes into a linestring at intervals of my choice. I couldn’t find that exact tool but I found something similar: Densify Geometries in ftools which adds the same number of nodes to all line segments. So I decided to modify Densify Geometries to fit my requirements.
Ftools scripts (such as DensifyGeometries.py) are located in ~/.qgis/python/plugins/sextante/ftools. To create my modified version, I just copied the original and modified the code to accept a densification interval instead of a number of nodes. Since I didn’t know how to add my new tool to Sextante I contacted the developer mailing list and after a short coffee break I had the answer (thanks Alexander!):
The new algorithm has to be exposed in the provider FToolsAlgorithmProvider.py. To do that: Add an import statement for the new algorithm (using existing statements as examples) and add the algorithm to the list self.alglist in the __init__() method. That’s it!

Sextante automatically creates the input form you can see in above screenshot. Very handy! And the new tool can be added to geoprocessing models just like any of the original ones.

