Related Plugins and Tags

QGIS Planet

Movement data in GIS #20: Trajectools v1 released!

In previous posts, I already wrote about Trajectools and some of the functionality it provides to QGIS Processing including:

There are also tools to compute heading and speed which I only talked about on Twitter.

Trajectools is now available from the QGIS plugin repository.

The plugin includes sample data from MarineCadastre downloads and the Geolife project.

Under the hood, Trajectools depends on GeoPandas!

If you are on Windows, here’s how to install GeoPandas for OSGeo4W:

  1. OSGeo4W installer: install python3-pip
  2. Environment variables: add GDAL_VERSION = 2.3.2 (or whichever version your OSGeo4W installation currently includes)
  3. OSGeo4W shell: call C:\OSGeo4W64\bin\py3_env.bat
  4. OSGeo4W shell: pip3 install geopandas (this will error at fiona)
  5. From https://www.lfd.uci.edu/~gohlke/pythonlibs/#fiona: download Fiona-1.7.13-cp37-cp37m-win_amd64.whl
  6. OSGeo4W shell: pip3 install path-to-download\Fiona-1.7.13-cp37-cp37m-win_amd64.whl
  7. OSGeo4W shell: pip3 install geopandas
  8. (optionally) From https://www.lfd.uci.edu/~gohlke/pythonlibs/#rtree: download Rtree-0.8.3-cp37-cp37m-win_amd64.whl and pip3 install it

If you want to use this functionality outside of QGIS, head over to my movingpandas project!

Porting Processing scripts to QGIS3

I’ll start with some tech talk first. Feel free to jump to the usage example further down if you are here for the edge bundling plugin.

As you certainly know, QGIS 3 brings a lot of improvements and under-the-hood changes. One of those changes affects all Python scripts. They need to be updated to Python 3 and the new PyQGIS API. (See the official migration guide for details.)

To get ready for the big 3.0 release, I’ve started porting my Processing tools. The edge bundling script is my first candidate for porting to QGIS 3. I also wanted to use this opportunity to “upgrade” from a simple script to a plugin that integrates into Processing.

I used Alexander Bruy’s “prepair for Processing” plugin as a template but you can also find an example template in your Processing folder. (On my system, it is located in C:\OSGeo4W64\apps\qgis-dev\python\plugins\processing\algs\exampleprovider.)

Since I didn’t want to miss the advantages of a good IDE, I set up PyCharm as described by Heikki Vesanto. This will give you code completion for Python 3 and PyQGIS which is very helpful for refactoring and porting. (I also tried Eclipse with PyDev but if you don’t have a favorite IDE yet, I find PyCharm easier to install and configure.)

My PyCharm startup script qgis3_pycharm.bat is a copy of C:\OSGeo4W64\bin\python-qgis-dev.bat with the last line altered to start PyCharm:

@echo off
call "%~dp0\o4w_env.bat"
call qt5_env.bat
call py3_env.bat
@echo off<span data-mce-type="bookmark" style="display: inline-block; width: 0px; overflow: hidden; line-height: 0;" class="mce_SELRES_start"></span>
path %OSGEO4W_ROOT%\apps\qgis-dev\bin;%PATH%
set QGIS_PREFIX_PATH=%OSGEO4W_ROOT:\=/%/apps/qgis-dev
set GDAL_FILENAME_IS_UTF8=YES
rem Set VSI cache to be used as buffer, see #6448
set VSI_CACHE=TRUE
set VSI_CACHE_SIZE=1000000
set QT_PLUGIN_PATH=%OSGEO4W_ROOT%\apps\qgis-dev\qtplugins;%OSGEO4W_ROOT%\apps\qt5\plugins
set PYTHONPATH=%OSGEO4W_ROOT%\apps\qgis-dev\python;%PYTHONPATH%
start /d "C:\Program Files\JetBrains\PyCharm\bin\" pycharm64.exe

In PyCharm File | Settings, I configured the OSGeo4W Python 3.6 interpreter and added qgis-dev and the plugin folder to its path:

With this setup done, we can go back to the code.

I first resolved all occurrences of import * in my script to follow good coding practices. For example:

from qgis.core import *

became

from qgis.core import QgsFeature, QgsPoint, QgsVector, QgsGeometry, QgsField, QGis<span data-mce-type="bookmark" style="display: inline-block; width: 0px; overflow: hidden; line-height: 0;" class="mce_SELRES_start"></span>

in this PR.

I didn’t even run the 2to3 script that is provided to make porting from Python 2 to Python 3 easier. Since the edge bundling code is mostly Numpy, there were almost no changes necessary. The only head scratching moment was when Numpy refused to add a map() return value to an array. So (with the help of Stackoverflow of course) I added a work around to convert the map() return value to an array as well:

flocal_x = map(forcecalcx, subtr_x, subtr_y, distance)
electrostaticforces_x[e_idx, :] += np.array(list(flocal_x))

The biggest change related to Processing is that the VectorWriter has been replaced by a QgsFeatureSink. It’s defined as a parameter of the edgebundling QgsProcessingAlgorithm:

self.addParameter(QgsProcessingParameterFeatureSink(
   self.OUTPUT,
   self.tr("Bundled edges"),
   QgsProcessing.TypeVectorLine)
)

And when the algorithm is run, the sink is filled with the output features:

(sink, dest_id) = self.parameterAsSink(
   parameters, self.OUTPUT, context,
   source.fields(), source.wkbType(), source.sourceCrs()
)

# code that creates features

sink.addFeature(feat, QgsFeatureSink.FastInsert)

The ported plugin is available on Github.

The edge bundling plugin in action

I haven’t uploaded the plugin to the official plugin repository yet, but you can already download if from Github and give it a try:

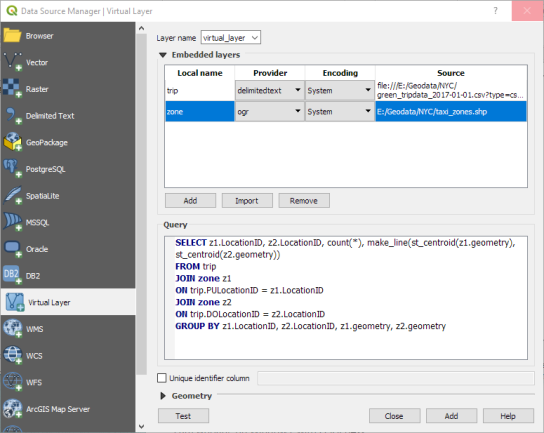
For this example, I’m using taxi pick-up and drop-off data provided by the NYC Taxi & Limousine Commission. I downloaded the January 2017 green taxi data and extracted all trips for the 1st of January. Then I created origin-destination (OD) lines using the QGIS virtual layer feature:

To get an interesting subset of the data, I extracted only those OD flows that cross the East River and have a count of at least 5 taxis:

Now the data is ready for bundling.

If you have installed the edge bundling plugin, the force-directed edge bundling algorithm should be available in the Processing toolbox. The UI of the edge bundling algorithm looks pretty much the same as it did for the QGIS 2 Processing script:

Since this is a small dataset with only 148 OD flows, the edge bundling processes is pretty quick and we can explore the results:

Beyond this core edge bundling algorithm, the repository also contains two more scripts that still need to be ported. They include dependencies on sklearn, so it will be interesting to see how straightforward it is to convert them.

Getting started writing QGIS 2.x plugins

This post shows how to quickly and easily create a small QGIS plugin for counting the number of features within a vector layer.

To get started, you will need QGIS and Qt Designer (to design the user interface) installed. If you are on Windows, I suggest WinPython which provides Qt Designer and Spyder (a Python IDE).

The great thing about creating plugins for QGIS: There is a plugin for that! It’s called Plugin Builder. And while you are at it, also install Plugin Reloader. Reloader is very useful for plugin developers because it lets you quickly reload your plugin without having to restart QGIS every time you make changes to the code.

installPluginBuilder

Plugin Builder will create all the files we need for our plugin. Just start it and select a name for your plugin class (one word in CamelCase), as well as a name for the plugin itself and the plugin menu entry (can be multiple words). Once you press Ok, you’re asked to select a folder to store the plugin. You can save directly to the QGIS plugin folder ~\.qgis2\python\plugins.

pluginBuilder

Next, open the newly created folder (in my case ~\.qgis2\python\plugins\BuilderTest). Amongst other files, it contains the user interface file ui_buildertest.ui. Our plugin will count the number of features in a vector layer. Therefore, it needs a combobox which allows the user to select a layer. Open the .ui file in Qt Designer and add a combobox to the dialog. Change the object name of the combobox to layerCombo. We’ll later use this name in the plugin code to add items to the combobox. Save the dialog and close Qt Designer.

qtDesigner

Now, we need to compile the .ui and the resources.qrc file to turn the dialog and the icon into usable Python code. This is done on the command line. On Windows, I suggest using the OSGeo4W Shell. Navigate to the plugin folder and run:

pyuic4 -o ui_buildertest.py ui_buildertest.ui
pyrcc4 -o resources_rc.py resources.qrc

If you enable and run the plugin now, you will already see the dialog but the combobox will be empty. To populate the combobox, we need to write a few lines of code in buildertest.py. First, we’ll fetch all loaded layers and add all vector layers to the combobox. Then, we’ll add code to compute and display the number of features in the selected layer. To achieve this, we expand the run() method:

def run(self):        
    # show the dialog
    self.dlg.show()

    layers = QgsMapLayerRegistry.instance().mapLayers().values()
    for layer in layers:
        if layer.type() == QgsMapLayer.VectorLayer:
            self.dlg.layerCombo.addItem( layer.name(), layer ) 
         
    # Run the dialog event loop
    result = self.dlg.exec_()
    # See if OK was pressed
    if result == 1:
        # do something useful 
        index = self.dlg.layerCombo.currentIndex()
        layer = self.dlg.layerCombo.itemData(index)
        QMessageBox.information(self.iface.mainWindow(),"hello world","%s has %d features." %(layer.name(),layer.featureCount()))

When you are done with the code, you can use Plugin Reloader to load the new version. When you start the plugin now, the combobox will be populated with the names of the vector layers in your current project. And on pressing Ok, the plugin will compute and display the number of features.

builderTEst

builderTestResult

For more information on PyQGIS and more code samples I warmly recommend the PyQGIS Cookbook. Have fun!


TimeManager for QGIS 2.0

As I’m sure you have already heard, QGIS 2.0 will come with a new Python API including many improvements and a generally more pythonic way of doing things. But of course that comes with a price: Old plugins (pre 2.0) won’t work anymore unless they are updated to the new version. Therefore all plugin developers are encouraged to take the time and update their plugins. An overview of changes and howto for updates is available on the QGIS wiki.

TimeManager for QGIS 2.0 will be available from day 1 of the new release. I’ve tested the usual work flows but don’t hesitate to let me know if you find any problems. The whole update process took two to three hours … sooo many signals to update … but all in all, it was far less painful than expected, thanks to everyone who contributed to the wiki update instructions!


3 Reasons to Move Your QGIS Plugins to the New Repository

  1. Since the release of QGIS 1.8, Plugin Installer no longer includes the “add 3rd party repositories” button. This was an intentional design choice!
  2. The new official plugin repository at plugins.qgis.org keeps everything in one place making it easier for users to find documentation and report issues. It will also provide many long-wanted features such as a rating system for plugins. You can already sort by number of downloads to discover the most popular plugins.
  3. Last but not least: New users will not be able to discover your plugin if it is not in the repository.

Go ahead to plugins.qgis.org and upload your plugin now!


  • Page 1 of 1 ( 5 posts )
  • plugin development

Back to Top

Sustaining Members