Related Plugins and Tags

QGIS Planet

Stand-alone PyQGIS scripts with OSGeo4W

PyQGIS scripts are great to automate spatial processing workflows. It’s easy to run these scripts inside QGIS but it can be even more convenient to run PyQGIS scripts without even having to launch QGIS. To create a so-called “stand-alone” PyQGIS script, there are a few things that need to be taken care of. The following steps show how to set up PyCharm for stand-alone PyQGIS development on Windows10 with OSGeo4W.

An essential first step is to ensure that all environment variables are set correctly. The most reliable approach is to go to C:\OSGeo4W64\bin (or wherever OSGeo4W is installed on your machine), make a copy of qgis-dev-g7.bat (or any other QGIS version that you have installed) and rename it to pycharm.bat:

Instead of launching QGIS, we want that pycharm.bat launches PyCharm. Therefore, we edit the final line in the .bat file to start pycharm64.exe:

In PyCharm itself, the main task to finish our setup is configuring the project interpreter:

First, we add a new “system interpreter” for Python 3.7 using the corresponding OSGeo4W Python installation.

To finish the interpreter config, we need to add two additional paths pointing to QGIS\python and QGIS\python\plugins:

That’s it! Now we can start developing our stand-alone PyQGIS script.

The following example shows the necessary steps, particularly:

  1. Initializing QGIS
  2. Initializing Processing
  3. Running a Processing algorithm
import sys

from qgis.core import QgsApplication, QgsProcessingFeedback
from qgis.analysis import QgsNativeAlgorithms

QgsApplication.setPrefixPath(r'C:\OSGeo4W64\apps\qgis-dev', True)
qgs = QgsApplication([], False)
qgs.initQgis()

# Add the path to processing so we can import it next
sys.path.append(r'C:\OSGeo4W64\apps\qgis-dev\python\plugins')
# Imports usually should be at the top of a script but this unconventional 
# order is necessary here because QGIS has to be initialized first
import processing
from processing.core.Processing import Processing

Processing.initialize()
QgsApplication.processingRegistry().addProvider(QgsNativeAlgorithms())
feedback = QgsProcessingFeedback()

rivers = r'D:\Documents\Geodata\NaturalEarthData\Natural_Earth_quick_start\10m_physical\ne_10m_rivers_lake_centerlines.shp'
output = r'D:\Documents\Geodata\temp\danube3.shp'
expression = "name LIKE '%Danube%'"

danube = processing.run(
    'native:extractbyexpression',
    {'INPUT': rivers, 'EXPRESSION': expression, 'OUTPUT': output},
    feedback=feedback
    )['OUTPUT']

print(danube)

QGIS 3 compiling on Windows

As the Oslandia team work exclusively on GNU/Linux, the exercise of compiling QGIS 3 on Windows 8 is not an everyday’s task :). So we decided to share our experience, we bet that will help some of you.

Cygwin

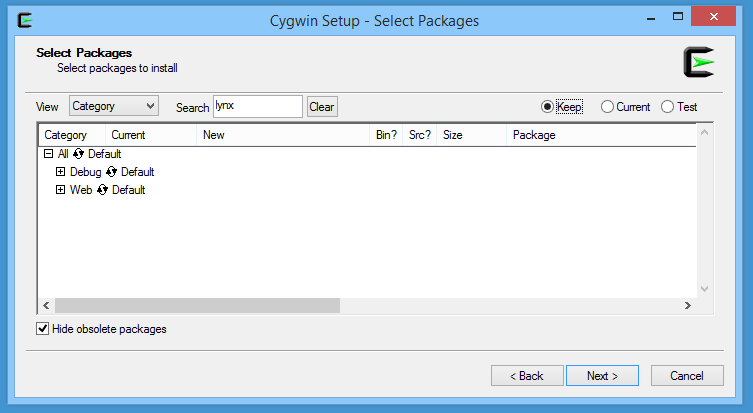
The first step is to download Cygwin and to install it in the directory C:\cygwin (instead of the default C:\cygwin64). During the installation, select the lynx package:


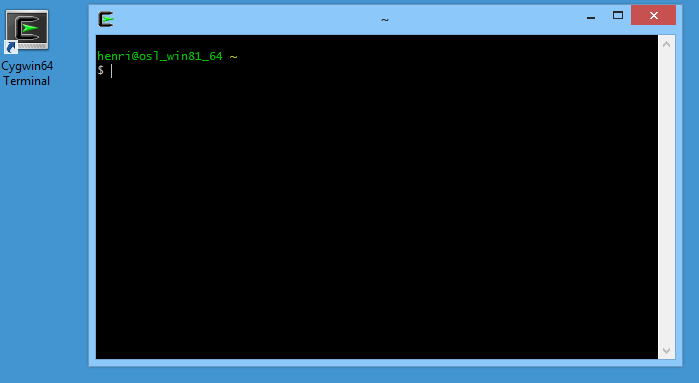
Once installed, you have to click on the Cygwin64 Terminal icon newly created on your desktop:

Then, we’re able to install dependencies and download some other installers:

[pastacode lang=”bash” manual=”%24%20cd%20%2Fcygdrive%2Fc%2FUsers%2Fhenri%2FDownloads%0A%24%20lynx%20-source%20rawgit.com%2Ftranscode-open%2Fapt-cyg%2Fmaster%2Fapt-cyg%20%3E%20apt-cyg%0A%24%20install%20apt-cyg%20%2Fbin%0A%24%20apt-cyg%20install%20wget%20git%20flex%20bison%0A%24%20wget%20http%3A%2F%2Fdownload.microsoft.com%2Fdownload%2FD%2F2%2F3%2FD23F4D0F-BA2D-4600-8725-6CCECEA05196%2Fvs_community_ENU.exe%0A%24%20chmod%20u%2Bx%20vs_community_ENU.exe%0A%24%20wget%20https%3A%2F%2Fcmake.org%2Ffiles%2Fv3.7%2Fcmake-3.7.2-win64-x64.msi%0A%24%20wget%20http%3A%2F%2Fdownload.osgeo.org%2Fosgeo4w%2Fosgeo4w-setup-x86_64.exe%0A%24%20chmod%20u%2Bx%20osgeo4w-setup-x86_64.exe” message=”” highlight=”” provider=”manual”/]

CMake

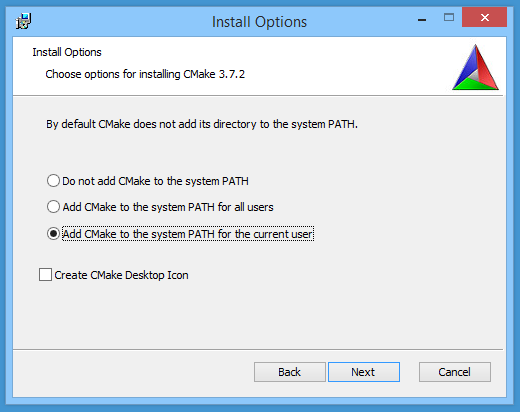
The next step is to install CMake. To do that, double clic on the file cmake-3.7.2-win64-x64.msi previously downloaded with wget. You should choose the next options during the installation:


Visual Studio

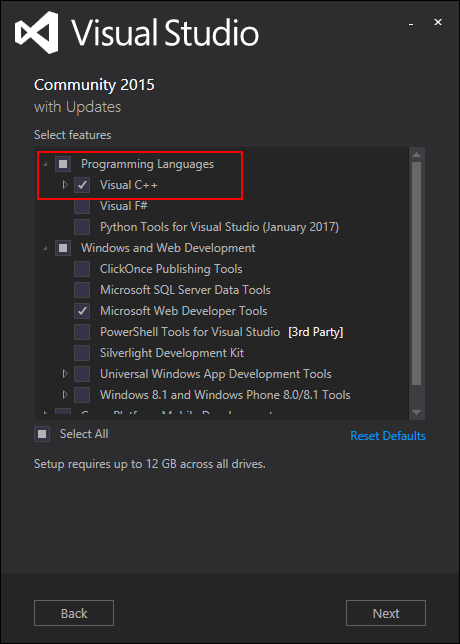
Then, we have to install Visual Studio and C++ tools. Double click on the vs_community_ENU.exe file and select the Custom installation. On the next page, you have to select Visual C++ chekbox:


OSGeo4W

In order to compile QGIS, some dependencies provided by the OSGeo4W installer are required. Double click on osgeo4w-setup-x86_64.exe and select the Advanced Install mode. Then, select the next packages:

  •  expat
  • fcgi
  • gdal
  • grass
  • gsl-devel
  • iconv
  • libzip-devel
  • libspatialindex-devel
  • pyqt5
  • python3-devel
  • python3-qscintilla
  • python3-nose2
  • python3-future
  • python3-pyyaml
  • python3-mock
  • python3-six
  • qca-qt5-devel
  • qca-qt5-libs
  • qscintilla-qt5
  • qt5-devel
  • qt5-libs-debug
  • qtwebkit-qt5-devel
  • qtwebkit-qt5-libs-debug
  • qwt-devel-qt5
  • sip-qt5
  • spatialite
  • oci
  • qtkeychain

QGIS

To start this last step, we have to create a file C:\OSGeo4W\OSGeo4W-dev.bat containing something like:

[pastacode lang=”bash” manual=”%40echo%20off%20%0Aset%20OSGEO4W_ROOT%3DC%3A%5COSGeo4W64%0Acall%20%22%25OSGEO4W_ROOT%25%5Cbin%5Co4w_env.bat%22%20%0Acall%20%22%25OSGEO4W_ROOT%25%5Cbin%5Cqt5_env.bat%22%20%0Acall%20%22%25OSGEO4W_ROOT%25%5Cbin%5Cpy3_env.bat%22%20%0Aset%20VS140COMNTOOLS%3D%25PROGRAMFILES(x86)%25%5CMicrosoft%20Visual%20Studio%2014.0%5CCommon7%5CTools%5C%20%0Acall%20%22%25PROGRAMFILES(x86)%25%5CMicrosoft%20Visual%20Studio%2014.0%5CVC%5Cvcvarsall.bat%22%20amd64%20%0Aset%20INCLUDE%3D%25INCLUDE%25%3B%25PROGRAMFILES(x86)%25%5CMicrosoft%20SDKs%5CWindows%5Cv7.1A%5Cinclude%20%0Aset%20LIB%3D%25LIB%25%3B%25PROGRAMFILES(x86)%25%5CMicrosoft%20SDKs%5CWindows%5Cv7.1A%5Clib%20%0Apath%20%25PATH%25%3B%25PROGRAMFILES%25%5CCMake%5Cbin%3Bc%3A%5Ccygwin%5Cbin%20%0A%40set%20GRASS_PREFIX%3D%22%25OSGEO4W_ROOT%25%5Capps%5Cgrass%5Cgrass-7.2.1%20%0A%40set%20INCLUDE%3D%25INCLUDE%25%3B%25OSGEO4W_ROOT%25%5Cinclude%20%0A%40set%20LIB%3D%25LIB%25%3B%25OSGEO4W_ROOT%25%5Clib%3B%25OSGEO4W_ROOT%25%5Clib%20%0A%0A%40cmd%20″ message=”” highlight=”” provider=”manual”/]

According to your environment, some variables should probably be adapted. Then in the Cygwin terminal:

[pastacode lang=”bash” manual=”%24%20cd%20C%3A%5C%0A%24%20git%20clone%20git%3A%2F%2Fgithub.com%2Fqgis%2FQGIS.git%0A%24%20.%2FOSGeo4W-dev.bat%0A%3E%20cd%20QGIS%2Fms-windows%2Fosgeo4w” message=”” highlight=”” provider=”manual”/]

In this directory, you have to edit the file package-nightly.cmd to replace:

[pastacode lang=”bash” manual=”cmake%20-G%20Ninja%20%5E” message=”” highlight=”” provider=”manual”/]

by:

[pastacode lang=”bash” manual=”cmake%20-G%20%22Visual%20Studio%2014%202015%20Win64%22%20%5E” message=”” highlight=”” provider=”manual”/]

Moreover, we had to update the environment variable SETUAPI_LIBRARY according to the current position of the Windows Kits file SetupAPI.Lib:

[pastacode lang=”bash” manual=”set%20SETUPAPI_LIBRARY%3DC%3A%5CProgram%20Files%20(x86)%5CWindows%20Kits%5C8.1%5CLib%5Cwinv6.3%5Cum%5Cx64%5CSetupAPI.Lib” message=”” highlight=”” provider=”manual”/]

And finally, we just have to compile with the next command:

[pastacode lang=”markup” manual=”%3E%20package-nightly.cmd%202.99.0%201%20qgis-dev%20x86_64″ message=”” highlight=”” provider=”manual”/]

Victory!

And see you soon for the generation of OSGEO4W packages 😉

Source

https://github.com/qgis/QGIS/blob/ab859c9bdf8a529df9805ff54e7250921a74d877/doc/msvc.t2t


Installing PySAL for OSGeo4W

Today’s post is a summary of how to install PySAL on Windows for OSGeo4W Python.

The most important resource was https://trac.osgeo.org/osgeo4w/wiki/ExternalPythonPackages

In the OSGeo4W Shell run:

C:\Users\anita_000\Desktop>curl http://python-distribute.org/distribute_setup.py | python

Update: Note that python-distribute.org has gone down since I posted this. See http://www.gossamer-threads.com/lists/python/python/1158958 for more info.

Then download https://raw.githubusercontent.com/pypa/pip/master/contrib/get-pip.py to the Desktop and run:

C:\Users\anita_000\Desktop>python get-pip.py

When pip is ready, install PySAL:

C:\Users\anita_000\Desktop>pip install pysal

Test the installation:

C:\Users\anita_000\Desktop>python
Python 2.7.5 (default, May 15 2013, 22:44:16) [MSC v.1500 64 bit (AMD64)] on win 32
Type "help", "copyright", "credits" or "license" for more information.
>>> import pysal

  • Page 1 of 1 ( 4 posts )
  • osgeo4w

Back to Top

Sustaining Members