Related Plugins and Tags

QGIS Planet

Upcoming User Group Meetings

There are two upcoming user group meetings – one in Edinburgh and one in London. Tickets are available through Eventbrite. If you want to attend the Scottish event, click here, or if the South East is closer then click here.

As ever, we are always keen to hear from the users and if you have something you would like to share with the rest of the user group then please get in touch.  Lightning talks or longer 20 minute presentations welcomed.

Click here to get the FINAL AGENDA May 2015.


Formação SIG: Produção cartográfica com QGIS

A NaturalGIS acrescentou à sua oferta de cursos QGIS uma formação de produção cartográfica, que permitirá aprender a produzir eficientemente mapas de elevada qualidade recorrendo às funcionalidades mais recentes de QGIS.

O curso cobrirá as opções avançadas de simbologia para camadas vectoriais e raster e etiquetas, o compositor de mapas e automatização de produção cartográfica, entre outros. Este curso é ideal para aprender tirar o maior partido do QGIS para criar mapas temáticos e cartografia para os instrumentos de gestão territorial, como por exemplo, PDM, PP, PU, etc.

A primeira edição terá lugar em Lisboa de 4 a 6 de Maio 2015.

Mais informações em: http://www.naturalgis.pt/formacoes.html#tr3

Inscrições em: http://www.naturalgis.pt/subscricao.html

Mapas espantosos com QGIS!
Aprenda a criar mapas tematicos com QGIS

Conteúdo Programático:

  1. Controlar ordem das camadas
  2. Simbologia vectores
  3. Simbologia rasters
  4. Simbologia por categorias
  5. Simbologia por quantidades
  6. Simbologia baseada em regras
  7. Simbologia avançada - níveis
  8. Modos de rendering e transparência
  9. Etiquetas
  10. Criação de símbolos compostos
  11. Gestor de símbolos
  12. Gravar, Importar e exportar símbolos
  13. Compositor de impressão
  14. Elementos do mapa (Escala gráfica, Norte, Legenda,…)
  15. Grelhas de coordenadas
  16. Mapas de enquadramento
  17. Optimização da produção de cartografia
  18. Filtrar legenda consoante visibilidade
  19. A ferramenta “atlas”
  20. Criar séries de mapas com a ferramenta “atlas”
  21. Presets e estilos múltiplos
  22. Controlo dos elementos e formato do mapa através dos atributos
  23. Criação de cartogramas
  24. Criação automática de mapas de ocorrência

Formação SIG: Produção cartográfica com QGIS

A NaturalGIS acrescentou à sua oferta de cursos QGIS uma formação de produção cartográfica, que permitirá aprender a produzir eficientemente mapas de elevada qualidade recorrendo às funcionalidades mais recentes de QGIS.

O curso cobrirá as opções avançadas de simbologia para camadas vectoriais e raster e etiquetas, o compositor de mapas e automatização de produção cartográfica, entre outros. Este curso é ideal para aprender tirar o maior partido do QGIS para criar mapas temáticos e cartografia para os instrumentos de gestão territorial, como por exemplo, PDM, PP, PU, etc.

A primeira edição terá lugar em Lisboa de 4 a 6 de Maio 2015.

Mais informações em: https://www.naturalgis.pt/formacoes.html#tr3

Inscrições em: https://www.naturalgis.pt/subscricao.html

Mapas espantosos com QGIS!
Aprenda a criar mapas tematicos com QGIS

Conteúdo Programático:

  1. Controlar ordem das camadas
  2. Simbologia vectores
  3. Simbologia rasters
  4. Simbologia por categorias
  5. Simbologia por quantidades
  6. Simbologia baseada em regras
  7. Simbologia avançada - níveis
  8. Modos de rendering e transparência
  9. Etiquetas
  10. Criação de símbolos compostos
  11. Gestor de símbolos
  12. Gravar, Importar e exportar símbolos
  13. Compositor de impressão
  14. Elementos do mapa (Escala gráfica, Norte, Legenda,…)
  15. Grelhas de coordenadas
  16. Mapas de enquadramento
  17. Optimização da produção de cartografia
  18. Filtrar legenda consoante visibilidade
  19. A ferramenta “atlas”
  20. Criar séries de mapas com a ferramenta “atlas”
  21. Presets e estilos múltiplos
  22. Controlo dos elementos e formato do mapa através dos atributos
  23. Criação de cartogramas
  24. Criação automática de mapas de ocorrência

QGIS 2.8 LTR has landed

qgisorg_banner28

It’s finally here! QGIS 2.8 LTR “Wien” is officially available for download now.

What’s an LTR

LTR stands for “Long Term Release”. This means that QGIS now has a system in place to provide a one-year stable release with backported bug fixes. The idea behind LTR is to have a stable platform for enterprises and organizations that don’t want to update their software and training materials more often than once a year. To make the LTR a success, users and developers alike should be aware that bug fixes should be applied to both the LTR branch as well as the normal development branch. If you are interested in the details, you can find more info in the corresponding QGIS Enhancement Proposal.

Users who enjoy working with the cutting-edge version will be able to follow the regular four-monthly release cycle like last year.

What’s new?

This new version comes with many great new features which you can explore in the official visual changelog. It’s really hard to pick but my personal favorites are:

On the layer styling front, there are two great additions: raster image fills and a live heatmap renderer which makes it possible to create dynamic heatmaps on the fly.

raster image fill

Raster image fill symbol layer type

Another feature I’m sure many of you will enjoy is the support for custom prefixes for joins.

Custom join prefixes

Custom join prefixes

Last but not least, I want to point your attention to the great improvements to the rule-based legend which is now structured in a nice tree.

Rule-based renderer legend tree

Rule-based renderer legend tree

Don’t forget to check out the other new features!

Thanks!

None of this would have been possible without the great QGIS community and all the many different people involved in running the project. Thanks a lot to all of you and a special shout out for the sponsors! *applause*

sponsors


A QGIS plugin to run (common) spatial queries with PostGIS

QGIS Processing toolbox is extremely flexible and it allows easily to implement QGIS tools (with a GUI) that are based on command line utilities (see this and this).

When the underlying command line program is ogr2ogr (or any other GDAL/OGR utility) possibilities become endeless. For example ogr2ogr can be used to convert formats or run arbitrary (Spatial) SQL queries.

One possibility is to run Spatial SQL queries using input PostGIS layers and getting as output a PostGIS layer. The intersting bit is that the Spatial SQL query will be run by the server/machine (where the input layers are stored), so possibly not by the destkop machine where you are running ogr2ogr.

Usually to run a (Spatial) SQL query in PostGIS a user would open one of the many SQL shells available (PgAdmin, QGIS DB Manager, phppgadmin, psql, etc.) and run something like the following:


CREATE TABLE dissolved AS
SELECT attribute1,(ST_Dump(ST_Union(a.geom))).geom::geometry(Polygon,4326) as geom
FROM input_table a
GROUP BY attribute1;


and that is ok for us geo-geeks, but what about average Jane/Joe?

Isn’t this much easier?

Dissolve PostGIS polygons

With this plugin for the QGIS Processing toolbox (available in the official QGIS plugin repository) we aim to bring into QGIS a set of tools to allow basic PostGIS users to run common queries (Dissolve, Clip, Difference, etc.), using as input PostGIS layer and getting as output PostGIS layer(s).

PostGIS QGIS Processing tools

Please note that the plugin is still in the early stages of development and that it will be greatly improved once the Processing toolbox will support features like multi-attribute selection, adding to (QGIS) map output layers other than shapefiles, and others.

New geoprocessing tools in the QGIS Processing toolbox

QGIS 2.8 was not officially announced yet and, as always happens in the QGIS project, new features are already being added to QGIS master, aka next future release, in this case 2.10.

At NaturalGIS we do our share of effort, especially regarding improvements for the QGIS “Processing” toolbox, and recently started to add new geoprocessing tools for vectors. At the time we are writing the tools we added are:

  • Buffer
  • Single sided buffer (or offset lines)
  • Clip by extent
  • Clip by polygon
  • Create points along lines
  • Dissolve
ogr2ogr geoprocessing tools for QGIS Processing toolbox
New QGIS geoprocessing tools

Some are completely new, like the Single sided buffer (or offset lines), Clip (vector) by extent (a similar tool is already available in QGIS but only to clip rasters layers) and Create points along lines, others are not (Buffer, Clip by polygon and Dissolve) as there are already plenty of alternatives in QGIS. The point here is that this “new” tools are quite faster than the already existing QGIS counterparts, or they offer new options.

For example the “Dissolve” tool is on average several times faster (up to 7 times, in our simple tests) than the QGIS counterpart, moreover the tool has the ability to compute some statistics on numerical attributes. See the image below:

ogr2ogr geoprocessing Dissolve tool
Dissolve with stats

Under the hood the work is done by that great software that is ogr2ogr. In this case is used to run spatial SQL queries, using as engine SQLite/Spatialite

More of this ogr2ogr/sql based tools will be added in the next future, especially when a few missing features will be added to the QGIS Processing toolbox, meanwhile you can help us testing the above ones.

Under MS Windows you can install the development version of QGIS using the OSGeo4W installer. Under Ubuntu GNU/Linux you can use the nightly builds repository.

A new QGIS tool (based on ogr2ogr) to import vectors in PostGIS

In QGIS there are many tools that can be used to import vectors inside a PostGIS database, each one has pros and cons:

  • SPIT core plugin: available since early QGIS releases but now unmaintained tool and therefore candidate to be removed from future QGIS releases. It has the advantage to allow import several vectors in one run, but on the other hand it does not have an option to launder table/columns names and is overall quite slow especially for fair large vectors.
  • DB Manager: it has several pros, like supporting drag & drop import and a few important other options, but misses to allow import several vectors and is overall slow especially for fair large vectors.
  • QGIS browser: it allows import vectors using drag & drop but as the above tools missed to allow multiple vectors import. Overall slow especially for fair large vectors.
  • Processing toolbox ”Import into PostGIS”: it can import several vectors at once because, as any other tool in the QGIS Processing toolbox, it can run in batch mode. Overall slow especially for fair large vectors.

There are of course also command line alternatives, in particular shp2pgsql (together with psql) and ogr2ogr. Each one is rich of options/switches and they can be scripted to import several vectors in one go. While shp2pgsql is installed were PostGIS is installed, usually it is not on common users desktop machines. On the other hand ogr2ogr is installed and available on any machine where QGIS is installed because is part of the GDAL/OGR libary, that is basic dependency of any QGIS installation.

We compared how importing vectors in PostGIS performed using ogr2ogr compared to the tools available in QGIS, and then also compared to shp2pgsql. In short, the results are the following:

  • even without recurring to any particular switch/trick, ogr2ogr is on average much more faster than any available tools available in QGIS.
  • ogr2ogr and shp2pgsql performed in a similar way.

To compare ogr2ogr and shp2pgsql we used as input dataset a 4 million features (polygons) shapefile (1.3GB of space occupied) and also a small subset of it (4000 features, 10MB) using PostGIS installed on the local machine (Ubuntu GNU/Linux 14.04).

Without using any particular switch to make imports faster (like “-D” for shp2pgsql or “-config PG_USE_COPY YES” for ogr2ogr) ogr2ogr is much faster than shp2pgsql/psql with the small dataset (2.5 seconds against 35 seconds).

With the large dataset things gets the other way, with shp2pgsql/psql ending the task in 17 minutes against 19.5 minutes with ogr2ogr.

Adding the options “-D” to shp2pgsql and “-config PG_USE_COPY YES” to ogr2ogr is possible to get a dramatic improvement of the performace of both tools: ogr2ogr takes 0.8 seconds to process the small dataset and 2.21 minutes the process the big dataset, while shp2pgsql/psql takes respectively 24 seconds and 1.56 minutes.

ogr2ogr seemed a good choice to create a new tool for QGIS to allow import vectors in a fast way. We implemented such tool as part of the QGIS Processing toolbox and therefore is available the brand new QGIS 2.8 release.

QGIS Processing tools to import vector layers in PostGIS
The new tool(s) in the QGIS Processing toolbox

The tool also exposes options that are not usually available in any other QGIS tool. Aming the others: Vector dimensions, Append, Append and add new fields, Skip failures, Simplification, Densification, Import selected features by extent, Import clipped features by extent and a few others.

Tool GUI
Tool GUI

QGIS Instant Print Plugin

As a side product of a customer project, we’re publishing a QGIS plugin for printing maps to a file with just two mouse clicks.

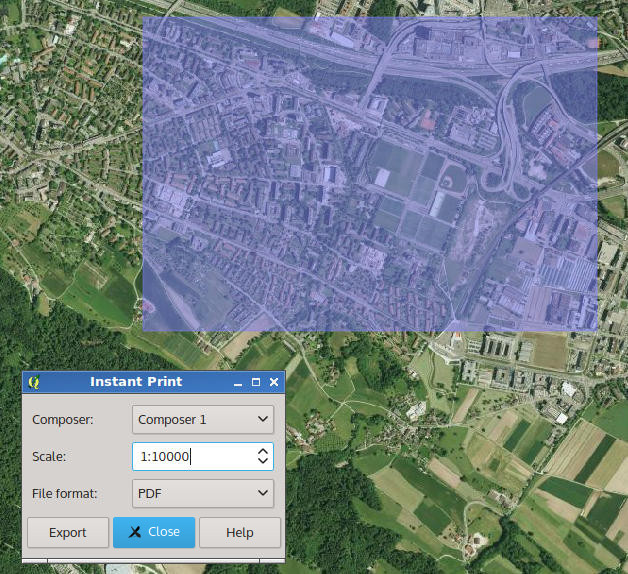
To use the instant print tool, a composer needs to be created first. The only requirement is that it contains exactly one map item.

The instant print tool can then be activated from the plugin toolbar by clicking on the plugin icon icon.

In the dialog window which appears, one can pick the composer to use as page layout. A selection rectangle is displayed in the map canvas, sized according to the size of the map item in the composer and the scale chosen in the instant print dialog. The selection rectangle can be freely dragged around to choose the region one wishes to print. When dragging the selection rectangle, the previous rectangle is shown shaded and can be used as a snap reference when setting the new region. While the instant print tool is active, the canvas can be panned with the middle mouse button.

screenshot

To instant print tool can be installed with the QGIS plugin manager and the sources are available on Github.

Compiling OTB Orfeo ToolBox software on Centos/Scientific Linux

The Orfeo ToolBox (OTB), an open-source C++ library for remote sensing images processing, is offering a wealth of algorithms to perform Image manipulation, Data pre-processing, Features extraction, Image Segmentation and Classification, Change detection, Hyperspectral processing, and SAR processing.

Since there is no (fresh) RPM package available for Centos or Scientific Linux, here some quick hints (no full tutorial, though) how to get OTB easily locally compiled. We are following the Installation Chapter.

Importantly, you need to have some libraries installed including GDAL. Be sure that it has been compiled with the “–with-rename-internal-libtiff-symbols” and ” –with-rename-internal-libgeotiff-symbols” flags to avoid namespace collision a.k.a segmentation fault of OTB as per “2.2.4 Building your own qualified Gdal“. We’ll configure and build with the GDAL-internal Tiff and Geotiff libraries that supports BigTiff files

# configure GDAL
./configure \
 --without-libtool \
 --with-geotiff=internal --with-libtiff=internal \
 --with-rename-internal-libtiff-symbols=yes \
 --with-rename-internal-libgeotiff-symbols=yes \
...
make
make install

The compilation of the OTB source code requires “cmake” and some other requirements which you can install via “yum install …”. Be sure to have the following structure for compiling OTB, i.e. store the source code in a subdirectory. The binaries will then be compiled in a “build” directory parallel to the OTB-SRC directory:

OTB-4.4.0/
|-- build/
`-- OTB-SRC/
    |-- Applications/
    |-- CMake/
    |-- CMakeFiles/
    |-- Code/
    |-- Copyright/
    |-- Examples/
    |-- Testing/
    `-- Utilities/

Now it is time to configure everything for OTB. Since I didn’t want to bother with “ccmake”, below the magic lines to compile and install OTB into its own subdirectory within /usr/local/. We’ll use as many internal libraries as possible according to the table in the installation guide. The best way is to save the following lines as a text script “cmake_otb.sh” for easier (re-)use, then run it:

#!/bin/sh

OTBVER=4.4.0
(
mkdir -p build
cd build

cmake -DCMAKE_INSTALL_PREFIX:PATH=/usr/local/otb-$OTBVER \
      -DOTB_USE_EXTERNAL_ITK=OFF -DOTB_USE_EXTERNAL_OSSIM=OFF \
      -DOTB_USE_EXTERNAL_EXPAT=OFF -DOTB_USE_EXTERNAL_BOOST=OFF \
      -DOTB_USE_EXTERNAL_TINYXML=OFF -DOTB_USE_EXTERNAL_LIBKML=OFF \
      -DOTB_USE_EXTERNAL_MUPARSER=OFF \
       ../OTB-SRC/

make -j4
# note: we assume to have write permission in /usr/local/otb-$OTBVER
make install
)

That’s it!

In order to use the freshly compiled OTB, be sure to add the new directories for the binaries and the libraries to your PATH and LD_LIBRARY_PATH variables, e.g. in $HOME/.bashrc:

export PATH=$PATH:/usr/local/bin:/usr/local/otb-4.4.0/bin
export LD_LIBRARY_PATH=/usr/local/lib:/usr/local/lib64/:/usr/local/otb-4.4.0/lib/otb/

Enjoy OTB! And thanks to the OTB developers for making it available.

The post Compiling OTB Orfeo ToolBox software on Centos/Scientific Linux appeared first on GFOSS Blog | GRASS GIS Courses.

Hack to adjust map symbols location in QGIS

EN | PT

Now and then I get too many map symbols (points) in the same place, and I thought how nice it would be if we could drag n’ drop them around without messing with their geometries position, just like we do with labels. That thought gave me an idea for a cool hack.

Choose your point layer and start by creating two new fields called symbX and symbY (Type: Decimal number; Size: 20; Precision: 5). Now go the layer properties and in the Style tab edit your symbol. For each level of your symbol select “map units” as the offset units, and set the following expression in the offset data define properties option:


CASE WHEN symbX IS NOT NULL AND symbY IS NOT NULL THEN
    tostring($x - symbX) + ',' + tostring($y - symbY)
ELSE
    '0,0'
END

Screenshot from 2015-02-22 18:18:43

Be aware that, if your coordinates have negative values, you need to adapt the code. E.g., If you have negative values in X you should use “tostring(symbX -$x)” instead.

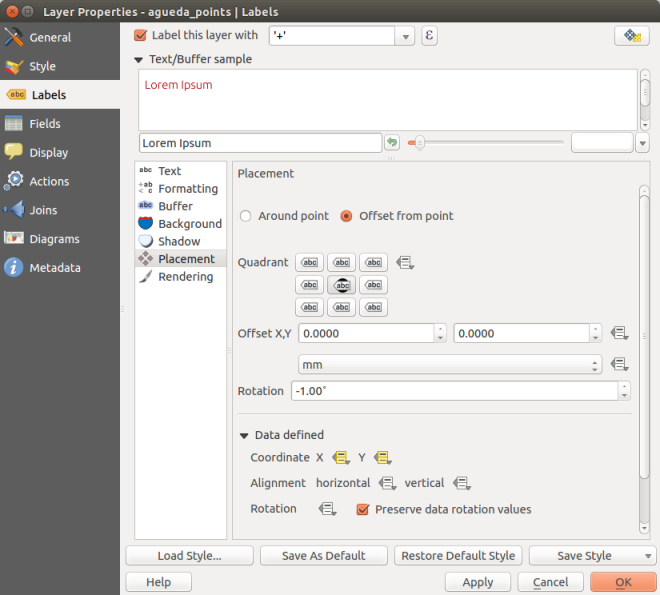
Now, temporarly  label your layer with a small convenient text (I used a centered ‘+’ (plus sign) with a white buffer) and set its coordinates to data defined using the symbX and symbY Fields.

Screenshot from 2015-02-22 22:42:07

From this point on, when you use the move label tool, not only the label position change but also the actual symbol! Pretty cool, isn’t it?

anim

Notice that the features geometries are not changed during the process. Also, remember that in this case you can also add leading lines to connect the symbols to the original position of the points.

Loading MasterMap: Free, Easy and Fast

We've developed a new graphical loading tool for OS MasterMap data focussing on usability and performance to make it easy to load national Ordnance Survey MasterMap datasets in a matter of hours.

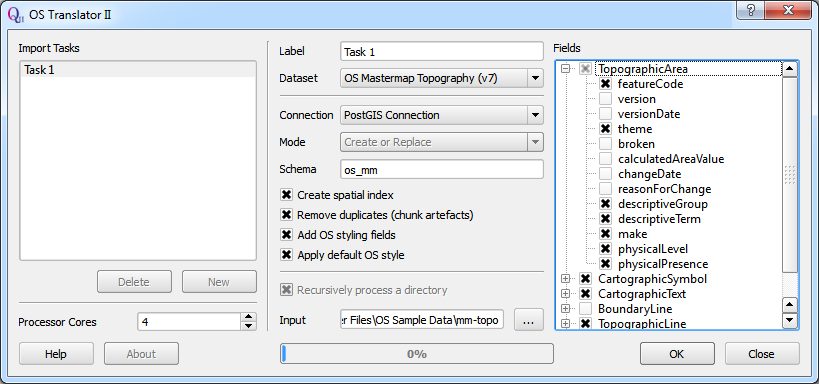
OS Translator II - Load OS MasterMap into PostGIS quickly, easily and for free

The tool is OS Translator II - it makes use of the excellent GDAL library and is available now in the official QGIS Plugins repository.

This blog post talks about some simple benchmarks we've carried out.

If you are interested in using this tool and not familiar with Postgresql/PostGIS, you can sign up to one of our support packages and we will be able to set you up and running within a couple of hours!

Results

National load times were as follows:

  • MasterMap Topography (National) 20 hrs 21 mins 1
  • MasterMap ITN (National) < 6 mins

Installing PostgreSQL, PostGIS and QGIS took less than 10 minutes.

1 This is the most time-consuming test which filled the SSD on the first attempt. Importing to a tablespace on the main HDD completed after 20.3 hours but showed the import of tile 1592959-TR0585-5c3268.gz to have failed with this error. Until this issue is resolved the tile would need to be loaded and de-duplicated manually (e.g. using ogr2ogr to import and a SQL query to de-duplicate) to complete the dataset. De-duplication removes duplicate features caused by the chunking / supply process.

Comparison With Other Open Source Tools

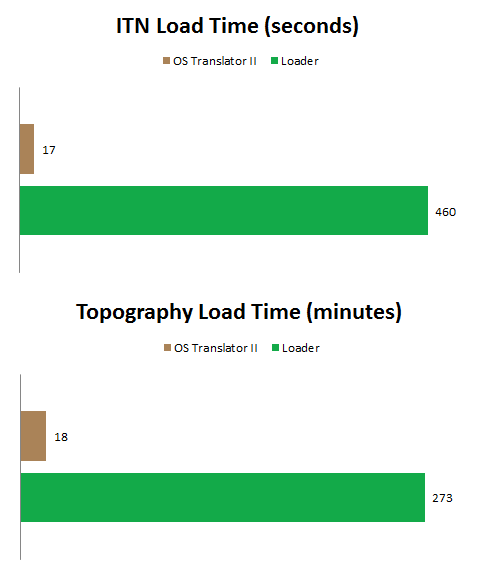
We were curious as to how OS Translator II load times compared with other open loading methods so we did some basic tests using the "SU" tile of MasterMap Topography and ITN datasets and compared it with the popular Loader scripts. The results looked like this:

OS Translator II Benchmarks

Please note that OS Translator II had an unfair advantage in these tests as it automatically takes advantage of multiple-CPU cores whereas Loader presently does not.

Hardware and Software

We used the following hardware and software configuration:

  • CPU Intel Core i7 4790K (Haswell) @ 4GHz
  • Memory 32GB PC3-12800
  • Disk(s) Samsung 840 EVO 250GB SSD and Seagate Barracuda ST2000DM001 2TB HDD2
  • OS Microsoft Windows 7 Professional (64-bit)
  • PostgreSQL 9.4.1 (x64)
  • PostGIS 2.1.5 (x64)
  • QGIS 2.6.1 (Brighton)
  • OS Translator II 1.0
  • Python 2.7.9 (win32)
  • lxml 3.2.3 (win32)
  • Loader Master (067a511313, 20th February 2014)

2 Operating system and source gml.gz files located on the SSD and default PostgreSQL tablespace stored on secondary 2TB HDD.

PostgreSQL Configuration

The following changes were made to the default PostgreSQL configuration:

  • shared_buffers 512MB
  • work_mem 16MB
  • maintenance_work_mem 128MB / 1024MB3
  • checkpoint_segments 6
  • random_page_cost 2.0
  • fsync off

3 maintenance_work_mem was set to 1024MB for the national load of MasterMap Topography layer only.

Turning fsync off is dangerous and can lead to data loss in the event of an unexpected power outage. Always switch fsync back on after loading and never use this option on a database containing critical data.

You may also like...

Mergin Maps, a field data collection app based on QGIS. Mergin Maps makes field work easy with its simple interface and cloud-based sync. Available on Android, iOS and Windows. Screenshots of the Mergin Maps mobile app for Field Data Collection
Get it on Google Play Get it on Apple store

New stable release of GRASS GIS 7.0.0!

The GRASS GIS Development team has announced the release of the new major version GRASS GIS 7.0.0. This version provides many new functionalities including spatio-temporal database support, image segmentation, estimation of evapotranspiration and emissivity from satellite imagery, automatic line vertex densification during reprojection, more LIDAR support and a strongly improved graphical user interface experience. GRASS GIS 7.0.0 also offers significantly improved performance for many raster and vector modules: “Many processes that would take hours now take less than a minute, even on my small laptop!” explains Markus Neteler, the coordinator of the development team composed of academics and GIS professionals from around the world. The software is available for Linux, MS-Windows, Mac OSX and other operating systems.

Detailed announcement and software download:
http://grass.osgeo.org/news/42/15/GRASS-GIS-7-0-0/

About GRASS GIS
The Geographic Resources Analysis Support System (http://grass.osgeo.org/), commonly referred to as GRASS GIS, is an open source Geographic Information System providing powerful raster, vector and geospatial processing capabilities in a single integrated software suite. GRASS GIS includes tools for spatial modeling, visualization of raster and vector data, management and analysis of geospatial data, and the processing of satellite and aerial imagery. It also provides the capability to produce sophisticated presentation graphics and hardcopy maps. GRASS GIS has been translated into about twenty languages and supports a huge array of data formats. It can be used either as a stand-alone application or as backend for other software packages such as QGIS and R geostatistics. It is distributed freely under the terms of the GNU General Public License (GPL). GRASS GIS is a founding member of the Open Source Geospatial Foundation (OSGeo).

The post New stable release of GRASS GIS 7.0.0! appeared first on GFOSS Blog | GRASS GIS Courses.

Plugin Builder 2.8

The Update

Plugin Builder 2.8 is now available. This is a minor update that adds:

  • Suggestion for setting up an issue tracker and creating a code repository
  • Suggestion for a home page
  • Tag selection from a list of current tags
  • Documentation update, including information about using pb_tool to compile, deploy, and package your plugin
  • New URLs for Plugin Builder’s home page and bug tracking

Optional is now Recommended

In previous versions the following items were “Optional” when creating a new plugin:

  • Bug tracker
  • Home page
  • Repository
  • Tags

We’ve changed those from “Optional” to “Recommended” because they are important for the success and longevity of your plugin(s). Setting up a code repository on GitHub automatically gives you issue tracking and the ability for others to collaborate with fixes and enhancements through pull requests.

Using GitHub also gives you the ability to setup a home page right from your repository using GitHub pages.

Adding one or more tags to your plugin helps people find them easier when browsing the QGIS Plugins website.

Getting It

You can install Plugin Builder 2.8 from the Plugins -> Manage and Install Plugins… menu. Version 2.8 works on QGIS versions 2.0 and up.

Towering QGIS 2.8 Release

The new QGIS 2.8 release (codename: Wien) is out tomorrow!

Lutra’s very own QGIS core developer Martin Dobiaš has been working hard with others on bringing you new stuff. So, what exciting new features are provided by this jauntily-angled new release? There are plenty of eagerly-anticipated additions - both big new features, and under-the-hood improvements - as well as bugfixes.

Multiple Stylings

Have you ever found yourself duplicating layers just so you could display the same data but with additional styles? Those days are now over.

You can now define multiple styles for a single layer, and easily switch between them in the layer view or layer properties dialog.
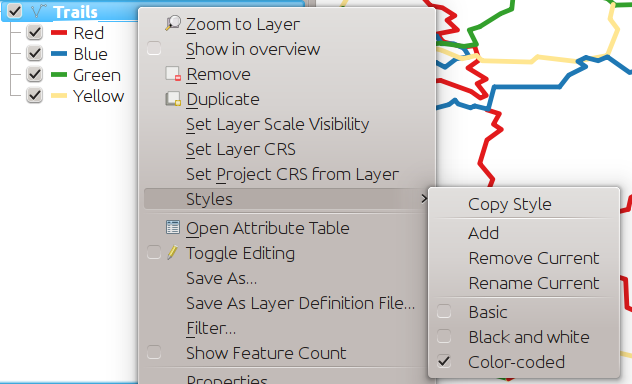
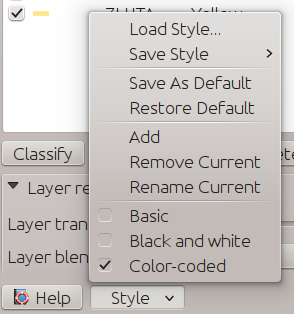
Multiple styles in the legend

Multiple styles in the layer dialog

Just so our webmapping colleagues don’t feel left out this new behaviour is extended to the WMS server too. The available multiple styles are advertised in GetCapabilities and can be used in other requests, such as GetMap.

And of course it all works in the map composer too - which means more maps with the same layers displayed in different styles.
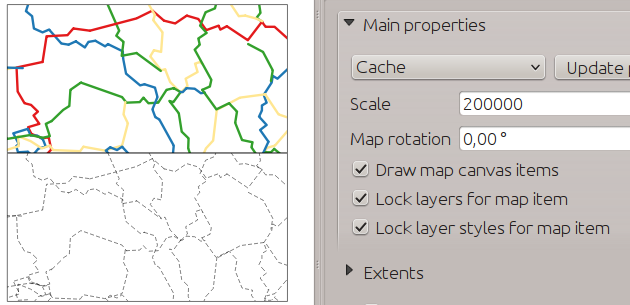
Multiple styles in the map composer

Work carried out in cooperation with Gis3W for Regione Toscana.

Making It Snappy

Snapping is made simpler with the addition of new modes for snapping, so you can now:

  • Snap to current layer
  • Snap to all layers
  • Perform advanced per-layer snapping (previously the only mode)
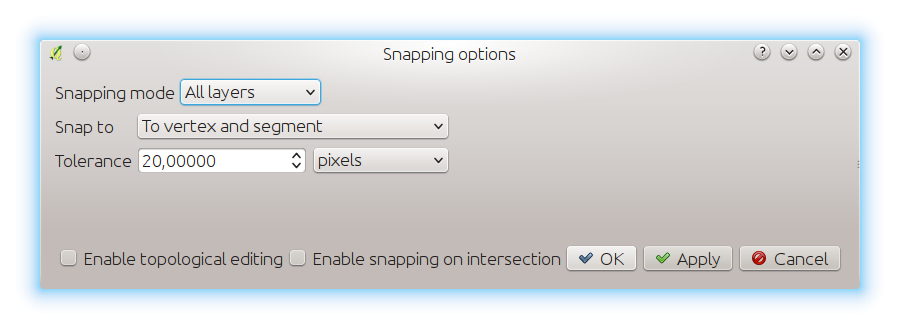
New snapping modes

There’s also less confusion with snapping tolerances being to map units or layer units, so those anticipated 1 metre tolerances don’t become 1 degree tolerances without you knowing.

Snapping is not only more straightforward - it’s now much faster too thanks to using an index of geometries built when first needed. Because everybody loves faster, right?

For our developer colleagues there is an easy to use API which - amongst other things - adds fast point in polygon queries.

Funded by Ville de Vevey, SITNyon and QGIS Usergroup Switzerland.

More info here.

Simplify Simplified

QGIS has had a simplify tool for a while, but now it’s been significantly improved with lots of tasty new ingredients.
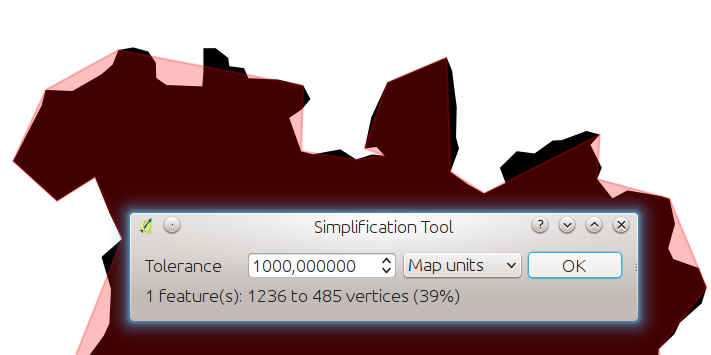
Improved simplify tool

Simplify tool tolerances used to be different for every feature - but not any more, and users can specify exact tolerances - which can be in map units or layer units.

Also new is on-the-fly reprojection support, tolerance settings are now persistent between sessions, dragging a rectangle instead of just clicking to simplify multiple features, support for multi-part features, and statistics about reduction of the number of vertices - because if you’re simplifying, it’s nice to know by how much! Oh yes, and faster too!

Work carried out in cooperation with Kartoza.

One Legend To Rule Them All

The display of rules in the legend for rule-based rendering has continued its evolution in features from QGIS 2.4:

QGIS 2.4: Good - a flat list of rules, but you can’t see the nesting.
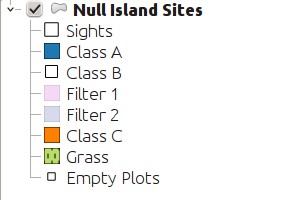
Rules in 2.4

QGIS 2.6: Better - shown as a pseudo-tree with checkboxes.
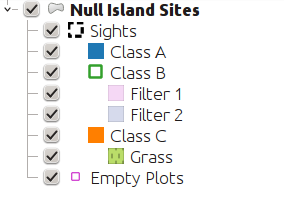
Rules in 2.6

QGIS 2.8: Best - great for power-users who use complex styling rules to give their maps that extra zing.
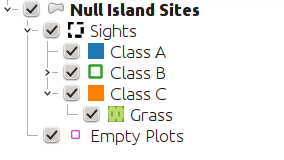
Rules in 2.8

Funded by SIGE.

Long-Term Love

QGIS is also the first Long-Term Release (LTR) version - starting with 2.8 every third release is a long-term-release - maintained until the next long-term-release occurs.

Even if you’re a new-feature-junkie, you’ll appreciate the commitment by the project to both innovation and stability, and this of course underlines the burgeoning success of QGIS in enterprise environments.

So, start your engines, and get ready to download!

Making It Happen

While you’re still reeling from finding out about some of the new goodies that QGIS 2.8 brings (and check the official QGIS changelog for more!), I’ll remind you that all this cool stuff somehow needed to be paid for.

Thanks go to the organisations and individuals that sponsor or contribute to the QGIS project, and those that fund development of specific features. They make the software better for everyone, and you or your organisation could become one of them!

We at Lutra Consulting are Bronze level sponsors of the QGIS project, and use our development experience to contribute code and develop plugins for QGIS.

We tackle this in several ways, including direct approaches from clients to fund custom development, and crowdfunding campaigns. So, if you’re interested in some functionality that isn’t yet there - get in touch!

You may also like...

Mergin Maps, a field data collection app based on QGIS. Mergin Maps makes field work easy with its simple interface and cloud-based sync. Available on Android, iOS and Windows. Screenshots of the Mergin Maps mobile app for Field Data Collection
Get it on Google Play Get it on Apple store

Calculate polygon centroid’s coordinates

EN | PT

I had the need to add columns with the coordinates of polygons centroids. I came up with the following expressions to calculate X e Y, respectively:

xmin(centroid($geometry))
ymin(centroid($geometry))

The expression seems quite simple, but it toke me some time before I realize that, not having a x(geometry) and y(geometry) functions, I could use the xmin() and ymin() to get the coordinates of the polygons centroids. Since this wasn’t the first time I had to use this expressions, this post will work as a reminder for the future.

Happy 9th Birthday, OSGeo!

Press release by Jeff McKenna, OSGeo Foundation President

9 years ago today was the first ever meeting of the OSGeo foundation, in Chicago U.S.A. (initial press release). Thanks to those passionately involved back then, and the thousands contributing since, now our community has expanded and has reached many countries all over world. Congratulations to everyone for continuing to share the passion for Open Source geospatial.

Here is a glimpse at some of the exciting events happening around the world this year:

The post Happy 9th Birthday, OSGeo! appeared first on GFOSS Blog | GRASS GIS Courses.

Publishing interactive web maps using QGIS

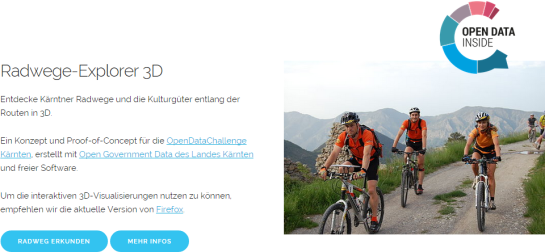
We all know that QGIS is great for designing maps but did you know that QGIS is also great for interactive web maps? It is! Just check out qgis2leaf and qgis2threejs.

To give these two plugins a test run and learn some responsive web design, I developed a small concept page presenting cycle routes in 3D.

Screenshot 2015-01-31 22.20.15

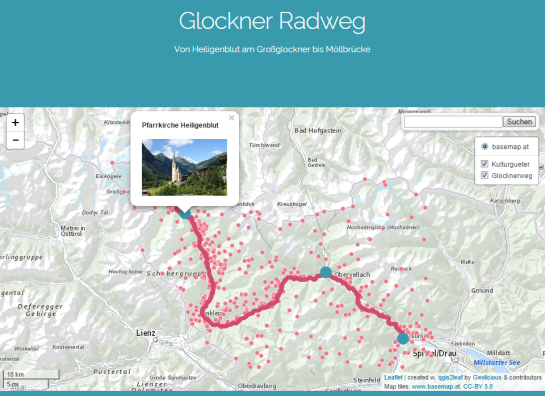
Qgis2leaf makes it possible to generate Leaflet maps from QGIS layers. It provides access to different background maps and it’s easy to replace them in the final HTML file in case you need something more exotic. I also added another layer with custom popups with images but that was done manually.

Daten CC-BY-3.0: Land Kärnten - data.ktn.gv.at

The web maps use data CC-BY-3.0: Land Kärnten – data.ktn.gv.at

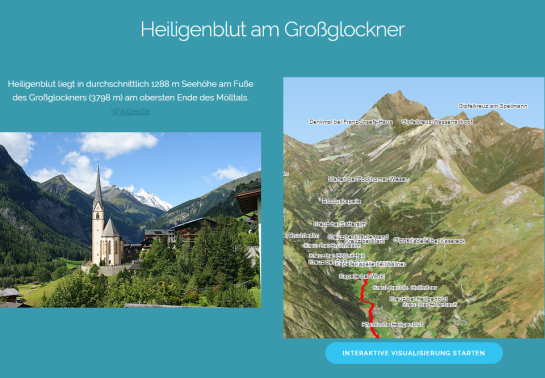
Qgis2threejs on the other hand creates 3D visualizations based on three.js which uses WebGL. (If you follow my blog you might remember a post a while back which showcased Qgis2threejs rendering OSM buildings.)

This is a great way to explore elevation data. I also think that the labeling capabilities add an interesting touch. Controlling the 3D environment takes some getting used to, but if you can handle Google Earth in your browser, this is no different.

Image of Heiligenblut by Angie (Self-photographed) (GFDL (http://www.gnu.org/copyleft/fdl.html) or CC BY 3.0 (http://creativecommons.org/licenses/by/3.0)), via Wikimedia Commons

Image of Heiligenblut by Angie (Self-photographed) (GFDL (http://www.gnu.org/copyleft/fdl.html) or CC BY 3.0 (http://creativecommons.org/licenses/by/3.0)), via Wikimedia Commons


  • <<
  • Page 70 of 142 ( 2821 posts )
  • >>

Back to Top

Sustaining Members