Related Plugins and Tags

QGIS Planet

GRASS GIS 7.2.2 released

GRASS GIS 7.2.2 in action

What’s new in a nutshell

After three months of development the new update release GRASS GIS 7.2.2 is available. It provides more than 120 stability fixes and manual improvements compared to release version 7.2.1. An overview of new features in the 7.2 release series is available at New Features in GRASS GIS 7.2.

About GRASS GIS 7: Its graphical user interface supports the user to make complex GIS operations as simple as possible. The updated Python interface to the C library permits users to create new GRASS GIS-Python modules in a simple way while yet obtaining powerful and fast modules. Furthermore, the libraries were again significantly improved for speed and efficiency, along with support for huge files. A lot of effort has been invested to standardize parameter and flag names. Finally, GRASS GIS 7 comes with a series of new modules to analyse raster and vector data, along with a full temporal framework. For a detailed overview, see the list of new features. As a stable release series, 7.2.x enjoys long-term support.

Binaries/Installer download:

Source code download:

More details:

See also our detailed announcement:

First time users may explore the first steps tutorial after installation.

About GRASS GIS

The Geographic Resources Analysis Support System (https://grass.osgeo.org/), commonly referred to as GRASS GIS, is an Open Source Geographic Information System providing powerful raster, vector and geospatial processing capabilities in a single integrated software suite. GRASS GIS includes tools for spatial modeling, visualization of raster and vector data, management and analysis of geospatial data, and the processing of satellite and aerial imagery. It also provides the capability to produce sophisticated presentation graphics and hardcopy maps. GRASS GIS has been translated into about twenty languages and supports a huge array of data formats. It can be used either as a stand-alone application or as backend for other software packages such as QGIS and R geostatistics. It is distributed freely under the terms of the GNU General Public License (GPL). GRASS GIS is a founding member of the Open Source Geospatial Foundation (OSGeo).

The GRASS Development Team, Sep 2017

The post GRASS GIS 7.2.2 released appeared first on GFOSS Blog | GRASS GIS Courses.

QGIS Server Python Plugins Ubuntu Setup

Prerequisites

I assume that you are working on a fresh install with Apache and FCGI module installed with:

$ sudo apt-get install apache2 libapache2-mod-fcgid
$ # Enable FCGI daemon apache module
$ sudo a2enmod fcgid

Package installation

First step is to add debian gis repository, add the following repository:

$ cat /etc/apt/sources.list.d/debian-gis.list
deb http://qgis.org/debian trusty main
deb-src http://qgis.org/debian trusty main

$ # Add keys
$ sudo gpg --recv-key DD45F6C3
$ sudo gpg --export --armor DD45F6C3 | sudo apt-key add -

$ # Update package list
$ sudo apt-get update && sudo apt-get upgrade

Now install qgis server:

$ sudo apt-get install qgis-server python-qgis

Install the HelloWorld example plugin

This is an example plugin and should not be used in production!
Create a directory to hold server plugins, you can choose whatever path you want, it will be specified in the virtual host configuration and passed on to the server through an environment variable:

$ sudo mkdir -p /opt/qgis-server/plugins
$ cd /opt/qgis-server/plugins
$ sudo wget https://github.com/elpaso/qgis-helloserver/archive/master.zip
$ # In case unzip was not installed before:
$ sudo apt-get install unzip
$ sudo unzip master.zip 
$ sudo mv qgis-helloserver-master HelloServer

Apache virtual host configuration

We are installing the server in a separate virtual host listening on port 81.
Rewrite module can be optionally enabled to pass HTTP BASIC auth headers (only needed by the HelloServer example plugin).

$ sudo a2enmod rewrite

Let Apache listen to port 81:

$ cat /etc/apache2/conf-available/qgis-server-port.conf
Listen 81
$ sudo a2enconf qgis-server-port

The virtual host configuration, stored in /etc/apache2/sites-available/001-qgis-server.conf:

<VirtualHost *:81>
    ServerAdmin webmaster@localhost
    DocumentRoot /var/www/html

    ErrorLog ${APACHE_LOG_DIR}/qgis-server-error.log
    CustomLog ${APACHE_LOG_DIR}/qgis-server-access.log combined

    # Longer timeout for WPS... default = 40
    FcgidIOTimeout 120 
    FcgidInitialEnv LC_ALL "en_US.UTF-8"
    FcgidInitialEnv PYTHONIOENCODING UTF-8
    FcgidInitialEnv LANG "en_US.UTF-8"
    FcgidInitialEnv QGIS_DEBUG 1
    FcgidInitialEnv QGIS_SERVER_LOG_FILE /tmp/qgis-000.log
    FcgidInitialEnv QGIS_SERVER_LOG_LEVEL 0
    FcgidInitialEnv QGIS_PLUGINPATH "/opt/qgis-server/plugins"

    # ABP: needed for QGIS HelloServer plugin HTTP BASIC auth
    <IfModule mod_fcgid.c>
        RewriteEngine on
        RewriteCond %{HTTP:Authorization} .
        RewriteRule .* - [E=HTTP_AUTHORIZATION:%{HTTP:Authorization}]
    </IfModule>

    ScriptAlias /cgi-bin/ /usr/lib/cgi-bin/
    <Directory "/usr/lib/cgi-bin">
        AllowOverride All
        Options +ExecCGI -MultiViews +FollowSymLinks
        Require all granted
        #Allow from all
  </Directory>
</VirtualHost>

Enable the virtual host and restart Apache:

$ sudo a2ensite 001-qgis-server
$ sudo service apache2 restart

Test:

$ wget -q -O - "http://localhost:81/cgi-bin/qgis_mapserv.fcgi?SERVICE=HELLO"
HelloServer!

See all QGIS Server related posts

Python SIP C++ bindings tutorial

Since QGIS uses QT libraries, SIP is the natural choice for creating the bindings.

Here are some random notes about this journey into SIP and Python bindings, I hope you’ll find them useful!
We will create a sample C++ library, a simple C++ program to test it and finally, the SIP configuration file and the python module plus a short program to test it.

Create the example library

FIrst we need a C++ library, following  the tutorial on the official SIP website  I created a simple library named hellosip:


$ mkdir hellosip
$ cd hellosip
$ touch hellosip.h hellosip.cpp Makefile.lib

This is the content of the header file hellosip.h:

#include <string>

using namespace std;

class HelloSip {
    const string the_word;
public:
    // ctor
    HelloSip(const string w);
    string reverse() const;
};

This is the implementation in file hellosip.cpp , the library just reverse a string, nothing really useful.

#include "hellosip.h"
#include <string>

HelloSip::HelloSip(const string w): the_word(w)
{
}

string HelloSip::reverse() const
{
    string tmp;
    for (string::const_reverse_iterator rit=the_word.rbegin(); rit!=the_word.rend(); ++rit)
        tmp += *rit;
    return tmp;
}


Compiling and linking the shared library

Now, its time to compile the library, g++ must be invoked with -fPIC option in order to generate Position Independent Code, -g tells the compiler to generate debug symbols and it is not strictly necessary if you don’t need to debug the library:

g++ -c -g -fPIC hellosip.cpp -o hellosip.o

The linker needs a few options to create a dynamically linked Shared Object (.so) library, first -shared which tells gcc to create a shared library, then the -soname which is the library version name, last -export_dynamic that is also not strictly necessary but can be useful for debugging in case the library is dynamically opened (with dlopen) :

g++ -shared -Wl,-soname,libhellosip.so.1  -g -export-dynamic -o libhellosip.so.1  hellosip.o

At the end of this process, we should have a brand new libhellosip.so.1 sitting in the current directory.

For more informations on shared libraries under linux you can read TLDP chapter on this topic.


Using the library with C++

Before starting the binding creation with SIP, we want to test the new library with a simple C++ program stored in a new cpp file: hellosiptest.cpp:

#include "hellosip.h"
#include <string>
using namespace std;
// Prints True if the string is correctly reversed
int main(int argc, char* argv[]) {
  HelloSip hs("ciao");
  cout << ("oaic" == hs.reverse() ? "True" : "False") << endl;
  return 0;
}

To compile the program we use the simple command:

g++ hellosiptest.cpp -g -L.  -lhellosip -o hellosiptest

which fails with the following error:

/usr/bin/ld: cannot find -lhellosip
collect2: error: ld returned 1 exit status

For this tutorial, we are skipping the installation part, that would have created proper links from the base soname, we are doing it now with:

ln -s libhellosip.so.1 libhellosip.so

The compiler should now be happy and produce an hellosiptest executable, that can be tested with:

$ ./hellosiptest
True

If we launch the program we might see a new error:

./hellosiptest: error while loading shared libraries: libhellosip.so.1: cannot open shared object file: No such file or directory

This is due to the fact that we have not installed our test library system-wide and the operating system is not able to locate and dynamically load the library, we can fix it in the current shell by adding the current path to the LD_LIBRARY_PATH environment variable which tells the operating system which directories have to be searched for shared libraries. The following commands will do just that:

export LD_LIBRARY_PATH=`pwd`

Note that this environment variable setting is “temporary” and will be lost when you exit the current shell.


SIP bindings

Now that we know that the library works we can start with the bindings, SIP needs an interface header file with the instructions to create the bindings, its syntax resembles that of a standard C header file with the addition of a few directives, it contains (among other bits) the name of the module and the classes and methods to export.

The SIP header file hellosip.sip contains two blocks of instructions: the class definition that ends around line 15 and an additional %MappedType block that specifies how the std::string type can be translated from/to Python objects, this block is not normally necessary until you stick standard C types. You will notice that the class definition part is quite similar to the C++ header file hellosip.h:

// Define the SIP wrapper to the hellosip library.

%Module hellosip

class HelloSip {

%TypeHeaderCode
#include <hellosip.h>
%End

public:
    HelloSip(const std::string w);
    std::string reverse() const;
};

// Creates the mapping for std::string
// From: http://www.riverbankcomputing.com/pipermail/pyqt/2009-July/023533.html

%MappedType std::string
{
%TypeHeaderCode
#include 
%End

%ConvertFromTypeCode
    // convert an std::string to a Python (unicode) string
    PyObject* newstring;
    newstring = PyUnicode_DecodeUTF8(sipCpp->c_str(), sipCpp->length(), NULL);
    if(newstring == NULL) {
        PyErr_Clear();
        newstring = PyString_FromString(sipCpp->c_str());
    }
    return newstring;
%End

%ConvertToTypeCode
    // Allow a Python string (or a unicode string) whenever a string is
    // expected.
    // If argument is a Unicode string, just decode it to UTF-8
    // If argument is a Python string, assume it's UTF-8
    if (sipIsErr == NULL)
        return (PyString_Check(sipPy) || PyUnicode_Check(sipPy));
    if (sipPy == Py_None) {
        *sipCppPtr = new std::string;
        return 1;
    }
    if (PyUnicode_Check(sipPy)) {
        PyObject* s = PyUnicode_AsEncodedString(sipPy, "UTF-8", "");
        *sipCppPtr = new std::string(PyString_AS_STRING(s));
        Py_DECREF(s);
        return 1;
    }
    if (PyString_Check(sipPy)) {
        *sipCppPtr = new std::string(PyString_AS_STRING(sipPy));
        return 1;
    }
    return 0;
%End
};

At this point we could have run the sip command by hand but the documentation suggests to use the python module sipconfig that, given a few of configuration variables, automatically creates the Makefile for us, the file is by convention named configure.py:

import os
import sipconfig

basename = "hellosip"

# The name of the SIP build file generated by SIP and used by the build
# system.
build_file = basename + ".sbf"

# Get the SIP configuration information.
config = sipconfig.Configuration()

# Run SIP to generate the code.
os.system(" ".join([config.sip_bin, "-c", ".", "-b", build_file, basename + ".sip"]))

# Create the Makefile.
makefile = sipconfig.SIPModuleMakefile(config, build_file)

# Add the library we are wrapping.  The name doesn't include any platform
# specific prefixes or extensions (e.g. the "lib" prefix on UNIX, or the
# ".dll" extension on Windows).
makefile.extra_libs = [basename]

# Search libraries in current directory
makefile.extra_lflags= ['-L.']

# Generate the Makefile itself.
makefile.generate()

We now have a Makefile ready to build the bindings, just run make to build the library. If everything goes right you will find a new hellosip.so library which is the python module. To test it, we can use the following simple program (always make sure that LD_LIBRARY_PATH contains the directory where libhellosip.so is found).

import hellosip
print hellosip.HelloSip('ciao').reverse() == 'oaic'

Download

The full source code of this tutorial can be downloaded from this link.

Fun with docker and GRASS GIS software

GRASS GIS and dockerSometimes, we developers get reports via mailing list that this & that would not work on whatever operating system. Now what? Should we be so kind and install the operating system in question in order to reproduce the problem? Too much work… but nowadays it has become much easier to perform such tests without having the need to install a full virtual machine – thanks to docker.

Disclaimer: I don’t know much about docker yet, so take the code below with a grain of salt!

In my case I usually work on Fedora or Scientific Linux based systems. In order to quickly (i.e. roughly 10 min of automated installation on my slow laptop) try out issues of GRASS GIS 7 on e.g., Ubuntu, I can run all my tests in docker installed on my Fedora box:

# we need to run stuff as root user
su
# Fedora 21: install docker 
yum -y docker-io

# Fedora 22: install docker
dnf -y install docker

# enable service
systemctl start docker
systemctl enable docker

Now we have a running docker environment. Since we want to exchange data (e.g. GIS data) with the docker container later, we prepare a shared directory beforehand:

# we'll later map /home/neteler/data/docker_tmp to /tmp within the docker container
mkdir /home/neteler/data/docker_tmp

Now we can start to install a Ubuntu docker image (may be “any” image, here we use “Ubuntu trusty” in our example). We will share the X11 display in order to be able to use the GUI as well:

# enable X11 forwarding
xhost +local:docker

# search for available docker images
docker search trusty

# fetch docker image from internet, establish shared directory and display redirect
# and launch the container along with a shell
docker run -v /data/docker_tmp:/tmp:rw -v /tmp/.X11-unix:/tmp/.X11-unix \
       -e uid=$(id -u) -e gid=$(id -g) -e DISPLAY=unix$DISPLAY \
       --name grass70trusty -i -t corbinu/docker-trusty /bin/bash

In almost no time we reach the command line of this minimalistic Ubuntu container which will carry the name “grass70trusty” in our case (btw: read more about Working with Docker Images):

root@8e0f233c3d68:/# 
# now we register the Ubuntu-GIS repos and get GRASS GIS 7.0
add-apt-repository ppa:ubuntugis/ubuntugis-unstable
add-apt-repository ppa:grass/grass-stable
apt-get update
apt-get install grass7

This will take a while (the remaining 9 minutes or so of the overall 10 minutes).

Since I like cursor support on the command line, I launch (again?) the bash in the container session:

root@8e0f233c3d68:/# bash
# yes, we are in Ubuntu here
root@8e0f233c3d68:/# cat /etc/issue

Now we can start to use GRASS GIS 7, even with its graphical user interface from inside the docker container:

# create a directory for our data, it is mapped to /home/neteler/data/docker_tmp/
# on the host machine 
root@8e0f233c3d68:/# mkdir /tmp/grassdata
# create a new LatLong location from EPSG code
# (or copy a location into /home/neteler/data/docker_tmp/)
root@8e0f233c3d68:/# grass70 -c epsg:4326 ~/grassdata/latlong_wgs84
# generate some data to play with
root@8e0f233c3d68:/# v.random n=30 output=random30
# start the GUI manually (since we didn't start GRASS GIS right away with it before)
root@8e0f233c3d68:/# g.gui

Indeed, the GUI comes up as expected!

GRASS GIS 7 GUI in docker container

GRASS GIS 7 GUI in docker container

You may now perform all tests, bugfixes, whatever you like and leave the GRASS GIS session as usual.
To get out of the docker session:

root@8e0f233c3d68:/# exit    # leave the extra bash shell
root@8e0f233c3d68:/# exit    # leave docker session

# disable docker connections to the X server
[root@oboe neteler]# xhost -local:docker

To restart this session later again, you will call it with the name which we have earlier assigned:

[root@oboe neteler]# docker ps -a
# ... you should see "grass70trusty" in the output in the right column

# we are lazy and automate the start a bit
[root@oboe neteler]# GRASSDOCKER_ID=`docker ps -a | grep grass70trusty | cut -d' ' -f1`
[root@oboe neteler]# echo $GRASSDOCKER_ID 
[root@oboe neteler]# xhost +local:docker
[root@oboe neteler]# docker start -a -i $GRASSDOCKER_ID

### ... and so on as described above.

Enjoy.

The post Fun with docker and GRASS GIS software appeared first on GFOSS Blog | GRASS GIS Courses.

Compiling OTB Orfeo ToolBox software on Centos/Scientific Linux

The Orfeo ToolBox (OTB), an open-source C++ library for remote sensing images processing, is offering a wealth of algorithms to perform Image manipulation, Data pre-processing, Features extraction, Image Segmentation and Classification, Change detection, Hyperspectral processing, and SAR processing.

Since there is no (fresh) RPM package available for Centos or Scientific Linux, here some quick hints (no full tutorial, though) how to get OTB easily locally compiled. We are following the Installation Chapter.

Importantly, you need to have some libraries installed including GDAL. Be sure that it has been compiled with the “–with-rename-internal-libtiff-symbols” and ” –with-rename-internal-libgeotiff-symbols” flags to avoid namespace collision a.k.a segmentation fault of OTB as per “2.2.4 Building your own qualified Gdal“. We’ll configure and build with the GDAL-internal Tiff and Geotiff libraries that supports BigTiff files

# configure GDAL
./configure \
 --without-libtool \
 --with-geotiff=internal --with-libtiff=internal \
 --with-rename-internal-libtiff-symbols=yes \
 --with-rename-internal-libgeotiff-symbols=yes \
...
make
make install

The compilation of the OTB source code requires “cmake” and some other requirements which you can install via “yum install …”. Be sure to have the following structure for compiling OTB, i.e. store the source code in a subdirectory. The binaries will then be compiled in a “build” directory parallel to the OTB-SRC directory:

OTB-4.4.0/
|-- build/
`-- OTB-SRC/
    |-- Applications/
    |-- CMake/
    |-- CMakeFiles/
    |-- Code/
    |-- Copyright/
    |-- Examples/
    |-- Testing/
    `-- Utilities/

Now it is time to configure everything for OTB. Since I didn’t want to bother with “ccmake”, below the magic lines to compile and install OTB into its own subdirectory within /usr/local/. We’ll use as many internal libraries as possible according to the table in the installation guide. The best way is to save the following lines as a text script “cmake_otb.sh” for easier (re-)use, then run it:

#!/bin/sh

OTBVER=4.4.0
(
mkdir -p build
cd build

cmake -DCMAKE_INSTALL_PREFIX:PATH=/usr/local/otb-$OTBVER \
      -DOTB_USE_EXTERNAL_ITK=OFF -DOTB_USE_EXTERNAL_OSSIM=OFF \
      -DOTB_USE_EXTERNAL_EXPAT=OFF -DOTB_USE_EXTERNAL_BOOST=OFF \
      -DOTB_USE_EXTERNAL_TINYXML=OFF -DOTB_USE_EXTERNAL_LIBKML=OFF \
      -DOTB_USE_EXTERNAL_MUPARSER=OFF \
       ../OTB-SRC/

make -j4
# note: we assume to have write permission in /usr/local/otb-$OTBVER
make install
)

That’s it!

In order to use the freshly compiled OTB, be sure to add the new directories for the binaries and the libraries to your PATH and LD_LIBRARY_PATH variables, e.g. in $HOME/.bashrc:

export PATH=$PATH:/usr/local/bin:/usr/local/otb-4.4.0/bin
export LD_LIBRARY_PATH=/usr/local/lib:/usr/local/lib64/:/usr/local/otb-4.4.0/lib/otb/

Enjoy OTB! And thanks to the OTB developers for making it available.

The post Compiling OTB Orfeo ToolBox software on Centos/Scientific Linux appeared first on GFOSS Blog | GRASS GIS Courses.

Instalar duas versões de QGIS em Linux

QGIS24_QGISmaster

Em altura de testes à versão em desenvolvimento do QGIS (versão master), dá jeito  ter também instalada a última versão estável do QGIS. Em windows isso não representa um problema, uma vez que se podem instalar várias versões do QGIS em paralelo (tanto via Osgeo4w como standalone). Em linux, o processo não é tão directo pelo facto da instalação se realizar por obtenção de diversos pacotes disponíveis nos repositórios, não sendo por isso possível instalar mais do que uma versão sem que se originem quebras de dependências. Assim, instalando a versão estável através dos repositórios, as alternativas para instalação da versão em desenvolvimento são:

  • Compilar o QGIS master do código fonte;
  • Instalar o QGIS master num docker;
  • Instalar o QGIS master numa máquina virtual;

Neste artigo vou mostrar como compilar o código fonte em Ubuntu 14.04. Afinal não é tão difícil quanto parece. Meia dúzia de comandos e um pouco de paciência e vai-se lá. Usei como base as indicações do ficheiro INSTALL.TXT disponível no código fonte com umas pequenas alterações.

Instalar todas as dependências necessárias

Num terminal correr o seguinte comando para instalar todas as dependências e ferramentas necessárias à compilação do QGIS. (adicionei o ccmake e o git ao comando original)

sudo apt-get install bison cmake doxygen flex git graphviz grass-dev libexpat1-dev libfcgi-dev libgdal-dev libgeos-dev libgsl0-dev libopenscenegraph-dev libosgearth-dev libpq-dev libproj-dev libqscintilla2-dev libqt4-dev libqt4-opengl-dev libqtwebkit-dev libqwt5-qt4-dev libspatialindex-dev libspatialite-dev libsqlite3-dev lighttpd pkg-config poppler-utils pyqt4-dev-tools python-all python-all-dev python-qt4 python-qt4-dev python-sip python-sip-dev spawn-fcgi txt2tags xauth xfonts-100dpi xfonts-75dpi xfonts-base xfonts-scalable xvfb cmake-curses-gui

Configurar o ccache

Este passo permite optimizar a compilação e tornar a compilação mais rápida nas próximas vezes que se fizer:

cd /usr/local/bin
sudo ln -s /usr/bin/ccache gcc
sudo ln -s /usr/bin/ccache g++

 Obter o código fonte do Github

O código fonte pode ser colocado numa pasta à escolha de cada um. Seguindo a sugestão do ficheiro de instruções acabei por colocar tudo na minha pasta home/alexandre/dev/cpp.

mkdir -p ${HOME}/dev/cpp
cd ${HOME}/dev/cpp

Já dentro da pasta home/alexandre/dev/cpp, podemos obter o código do qgis executando o seguinte comando git:

git clone git://github.com/qgis/QGIS.git

Nota: Se pretendesse fazer alterações ao código e experimentar se funcionava, então deveria fazer o clone do fork do qgis do meu próprio repositório, ou seja:

git clone https://github.com/SrNetoChan/Quantum-GIS

Preparar directorias de compilação e instalação

O código fonte tem de ser compilado e instalado em locais próprios para evitar conflitos com outras versões do QGIS. Por isso, há que criar uma pasta para efectuar a instalação:

mkdir -p ${HOME}/apps

E outra onde será feita a compilação:

cd QGIS
mkdir build-master
cd build-master

Configuração

Já na pasta build-master damos início ao processo de compilação. O primeiro passo é a configuração, onde vamos dizer onde queremos instalar o QGIS master. Para isso executamos o seguinte comando (não esquecer os dois pontos):

ccmake ..

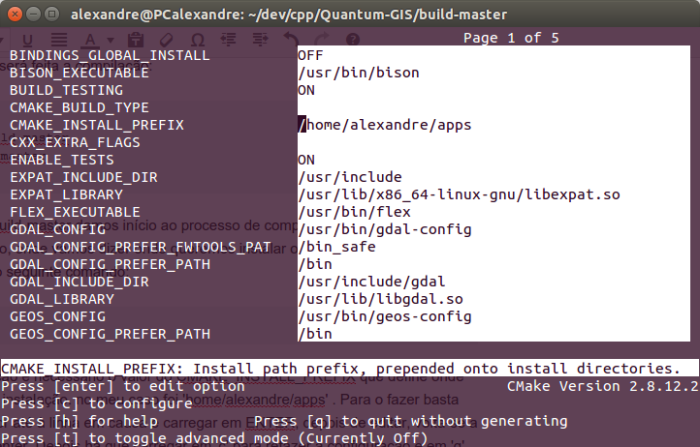
Na configuração é necessário alterar o valor do CMAKE_INSTALL_PREFIX que define onde vai ser feita a instalação, no meu caso usei a pasta já criada ‘home/alexandre/apps’ . Para editar o valor há que mover o cursor até à linha em causa e carregar em [enter], depois de editar, volta-se a carregar em [enter]. Depois há que carregar em [c] para refazer a configuração e depois em ‘g’ para gerar a configuração.

Screenshot from 2014-10-08 23:33:39

 Compilação e instalação

Já com tudo configurado resta compilar o código e depois instalá-lo:

make
sudo make install

Nota: Estes dois passos podem demorar um bocadinho, principalmente na primeira vez que o código for compilado.

Depois de instalado podemos correr o QGIS master a partir da pasta de instalação:

cd ${HOME}/apps/bin/
export LD_LIBRARY_PATH=/home/alexandre/apps/lib
export QGIS_PREFIX_PATH=/home/alexandre/apps
${HOME}/apps/bin/qgis

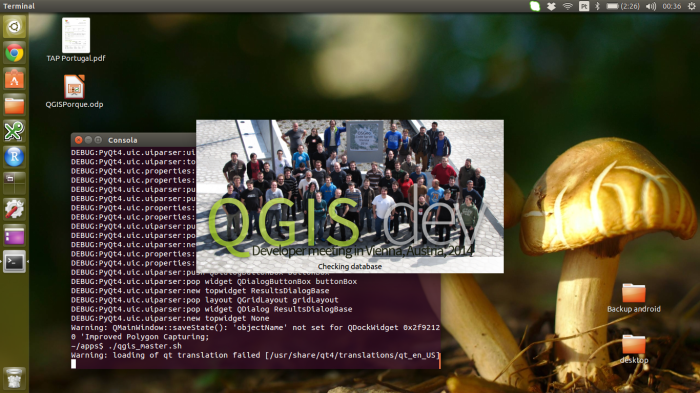
Para se tornar mais cómodo, podemos colocar os últimos 3 comandos num ficheiro .sh e gravá-lo num local acessível (desktop ou home) para executarmos o qgis sempre que necessário.

Screenshot from 2014-10-09 00:36:52

UPDATE: Actualizar a versão master

Como já foi referido num comentário, a versão em desenvolvimento está constantemente a ser alterada, por isso para testar se determinados bugs foram entretanto corrigidos há que a actualizar. Trata-se de um processo bastante simples. O primeiro passo é actualizar o código fonte:

cd ${HOME}/dev/cpp/qgis
git pull origin master

E depois é voltar a correr a compilação (que desta feita será mais rápida):

cd build-master
ccmake ..
make
sudo make install

Compiling QGIS 2.0.1 for Fedora 19 in a few steps

Thanks to Volker Fröhlich’s efforts, a source code RPM package (SRPM) of QGIS 2.0.1 is now available for Fedora. If you are not yet F20 user (like me), you can just take the F20 package and compile it for F19 (or even F18) since there will be no backport of QGIS 2 to F19 (it comes with QGIS 1.8). But: we do want QGIS 2 on Fedora19!

Solution: compile it yourself.

1. 1. Preparations

The best way is  to use “mock” which is used to recompile SRPMS in a separate local environment (“chroot”) without cluttering the system with extra packages needed for the compilation (run as “root”):

su
yum install mock

2. 2. Get the source code

Next download the SRPM package from the Koji  server:
QGIS:  http://koji.fedoraproject.org/koji/buildinfo?buildID=467757 (–> src – download) or check here for more recent versions.

3. 3. Compile it locally as RPM package

The general compilation command (“mock”) would be:

mock -r my_fedora_version_config --rebuild my_source_rpm.src.rpm

So, check for Fedora version config name which is suitable for your system (“my_fedora_version_config“)

ls /etc/mock/

In my case of a 64bit machine, it is “fedora-19-x86_64″. Hence we can compile QGIS 2.0.1 directly from the SRPM file:

mock -r fedora-19-x86_64 --rebuild qgis-2.0.1-2.fc20.src.rpm

Note: the compilation takes 40min on my tiny core i3 laptop (ASUS X202). Use the time to donate some coins to the QGIS project :-)

4. 4. Install and enjoy

Once the compilation job is done, i.e. the binary RPM files are available for installation. To install the freshly compiled QGIS 2.0.1 RPMs, run:

cd /var/lib/mock/fedora-19-x86_64/result/

# an existing QGIS1.8 installation will be replaced: 
yum localinstall qgis-2.0.1-2.fc19.x86_64.rpm \
qgis-grass-2.0.1-2.fc19.x86_64.rpm qgis-python-2.0.1-2.fc19.x86_64.rpm

# consider to cleanup (or keep it for the next update, it is about 1.5GB):
rm -rf /var/lib/mock/fedora-19-x86_64/
# leave the "root" shell
exit

Now we can happily use QGIS 2.0.1 on Fedora 19!

qgis

qgis201_on_fedora19

Howto shrink a remote root ext3 filesystem on Debian wheezy

This howto describes how to resize a root ext3 filesystem on a remote Debian wheezy server.

This howto is not an original work but only an update of an older howto by Stefan @ https://thunked.org/. This version is specifically adapted to a server running Debian wheezy.

DISCLAIMER:

THERE IS A DECENT CHANCE THAT IF YOU FUCK THIS UP YOUR
REMOTE SYSTEM SIMPLY WONT BOOT AT ALL.  I URGE YOU TO TEST
THIS LOCALLY BEFORE USING THIS METHOD ON A PRODUCTION
SYSTEM. ESPECIALLY IF YOUR SYSTEM IS NOT DEBIAN WHEEZY,
SINCE THAT'S THE ONLY ONE I HAVE TESTED.

THE QUICK WAY:

If you don't want to read the whole thing you can only
execute the commands I run and probably skip the
explanations.

I’ve only done this on Debian Wheezy. If you’re using another distro the initrd layout and init scripts may be a bit different. However, I suspect it looks very similar on almost every distro out there. On Debian my root partition is an ext3 partition.

The general idea is pretty simple: you can’t shrink a mounted partition and it’s impossible to unmount or replace your root partition in a live system, so we have to resize the partition before it is mounted. What we’ll do to accomplish this is change the initrd image to make the init scripts resize the root partition before mounting it. This is by far the most flexible and easy method to resize your root partition I could think of. Most suggestions I found on google required you to create separate OS on a new root partition and boot into that, but I did not have any space to create a new root partition on my remote machine.

Unpacking the initrd image is fairly straight forward:

$ mkdir ~/initrd; cd ~/initrd
$ gunzip -c /boot/initrd.img-3.2.0-3-amd64 | cpio -i --make-directories
62631 blocks
$ ls -l
total 40
drwxr-xr-x 2 root root 4096 Sep 11 20:23 bin
drwxr-xr-x 3 root root 4096 Sep 11 20:23 conf
drwxr-xr-x 6 root root 4096 Sep 11 20:23 etc
-rwxr-xr-x 1 root root 6797 Sep 11 20:23 init
drwxr-xr-x 7 root root 4096 Sep 11 20:23 lib
drwxr-xr-x 2 root root 4096 Sep 11 20:23 lib64
drwxr-xr-x 2 root root 4096 Sep 11 20:23 run
drwxr-xr-x 2 root root 4096 Sep 11 20:23 sbin
drwxr-xr-x 6 root root 4096 Sep 11 20:23 scripts

First, we have to copy all the programs we need to resize our partition onto the initial ram disk. For my ext3 file system I need e2fsck and resize2fs. The programs are depending on a few libraries, so you’ll need to copy those to the new initrd image too. Libraries can also depend on other libraries, make sure you recursively check dependencies until you don’t have any missing dependencies anymore.

$ ldd /sbin/e2fsck
    linux-vdso.so.1 =>  (0x00007fff3594c000)
    libext2fs.so.2 => /lib/x86_64-linux-gnu/libext2fs.so.2 (0x00007f7cdddd5000)
    libcom_err.so.2 => /lib/x86_64-linux-gnu/libcom_err.so.2 (0x00007f7cddbd1000)
    libblkid.so.1 => /lib/x86_64-linux-gnu/libblkid.so.1 (0x00007f7cdd9a9000)
    libuuid.so.1 => /lib/x86_64-linux-gnu/libuuid.so.1 (0x00007f7cdd7a4000)
    libe2p.so.2 => /lib/x86_64-linux-gnu/libe2p.so.2 (0x00007f7cdd59c000)
    libc.so.6 => /lib/x86_64-linux-gnu/libc.so.6 (0x00007f7cdd214000)
    libpthread.so.0 => /lib/x86_64-linux-gnu/libpthread.so.0 (0x00007f7cdcff8000)
    /lib64/ld-linux-x86-64.so.2 (0x00007f7cde01e000)
$ ldd /sbin/resize2fs
    linux-vdso.so.1 =>  (0x00007fffa216a000)
    libe2p.so.2 => /lib/x86_64-linux-gnu/libe2p.so.2 (0x00007fa01f7a2000)
    libext2fs.so.2 => /lib/x86_64-linux-gnu/libext2fs.so.2 (0x00007fa01f55f000)
    libcom_err.so.2 => /lib/x86_64-linux-gnu/libcom_err.so.2 (0x00007fa01f35a000)
    libc.so.6 => /lib/x86_64-linux-gnu/libc.so.6 (0x00007fa01efd3000)
    libpthread.so.0 => /lib/x86_64-linux-gnu/libpthread.so.0 (0x00007fa01edb7000)
    /lib64/ld-linux-x86-64.so.2 (0x00007fa01f9b0000)

We only copy the libraries that are not yet present in the initramfs. Fortunately in our case there are no recursive dependencies of those libraries.

$ for i in libext2fs.so.2.4 libcom_err.so.2.1 libe2p.so.2.3; do \
     cp -i /lib/x86_64-linux-gnu/$i lib/x86_64-linux-gnu/; \
  done
$ cd lib/x86_64-linux-gnu/
$ ln -s libcom_err.so.2.1 libcom_err.so.2
$ ln -s libext2fs.so.2.4 libext2fs.so.2
$ ln -s libe2p.so.2.3 libe2p.so.2
$ cd ~/initrd/

$ cp /sbin/e2fsck ~/initrd/bin/
$ cp /sbin/resize2fs ~/initrd/bin/

Next, we need to edit the init script. Debian uses busybox in its initrd image so the init script will be interpreted by a bourne shell. If you look through the init script file you’ll find the moment where the script mounts the root file system:

$ cat scripts/local
...
    # FIXME This has no error checking
    # Mount root
    if [ "${FSTYPE}" != "unknown" ]; then
            mount ${roflag} -t ${FSTYPE} ${ROOTFLAGS} ${ROOT} ${rootmnt}
    else
            mount ${roflag} ${ROOTFLAGS} ${ROOT} ${rootmnt}
    fi
...

Simply add in the commands to resize the file system right before the the file system is mounted. Resize2fs in Debian does not want to resize the file system before it is forcefully checked. It may be wise to add the -p or -y flag to e2fsck. -y will answer yes to all questions, this could prevent a hung system but may cause more damage to your files or filesystem. The -p flag will only automatically answer yes to safe operations. resize2fs takes two parameters, the first is the block device that has the ext2 or ext3 file system and the second is the new size you want to give it. By default the size is in blocks, but you can append a unit to change that. ‘K’ for kilobytes, ‘M’ for megabytes, ‘G’ for gigabytes and ‘T’ for terabytes. If you don’t specify a size, it will enlarge the file system to the total size of the partition or logical volume. After adding the commands the init script will look something like this:

    #RESIZEROOTFS MODIFIED!!! DONT RUN MORE THAN ONCE
    _log_msg "Starting e2fsck"
    /bin/e2fsck -p -f -C 0 /dev/sda4 || true
    _log_msg "Starting resize2fs"
    /bin/resize2fs /dev/sda4 100G || true

    # FIXME This has no error checking
    # Mount root
    if [ "${FSTYPE}" != "unknown" ]; then
            mount ${roflag} -t ${FSTYPE} ${ROOTFLAGS} ${ROOT} ${rootmnt}
    else
            mount ${roflag} ${ROOTFLAGS} ${ROOT} ${rootmnt}
    fi

If you have access to the system’s console, you might want to add a “-C 0” to e2fsck’s parameters. That will show you the progress of the fscheck.

There’s one last thing we have to do before re-packing the initrd image. e2fsck and resize2fs will fail if there is no /etc/mtab file available so we’ll have to make sure /etc/mtab exists.

$ touch ~/initrd/etc/mtab
$ cd ~/initrd/
$ find ./ | cpio -H newc -o > /tmp/initrd.cpio
64097 blocks
$ gzip -c /tmp/initrd.cpio > /boot/initrd-resize.img

And lastly, we need to add a new default boot option in grub. In Debian grub’s configuration file is constructed from various bits under /etc/grub.d. The resulting total configuration file is put under /boot/grub/grub.cfg. Open up the grub.cfg file in your favorite text editor and look for the default entry. It’s usually the first one, but may vary. Add a copy of the original entry to /etc/grub.d/40_custom and change the initrd image to the one we just created.

$ cat /etc/grub.d/40_custom
#!/bin/sh
exec tail -n +3 $0
# This file provides an easy way to add custom menu entries.  Simply type the
# menu entries you want to add after this comment.  Be careful not to change
# the 'exec tail' line above.

menuentry 'resize' --class debian --class gnu-linux --class gnu --class os {
        insmod gzio
        insmod part_gpt
        insmod ext2
        set root='(hd0,gpt1)'
        search --no-floppy --fs-uuid --set=root 0aa8bc27-17e3-4ae2-a9cf-497ab444970b
        echo    'Loading Linux 3.2.0-3-amd64 ...'
        linux   /vmlinuz-3.2.0-3-amd64 root=UUID=660f79dc-c152-4e15-ad61-7075b42de609 ro  quiet
        echo    'Loading initial ramdisk ...'
        initrd  /initrd-resize.img
}

Now make sure that it’s this entry that will be booted into by default. Set GRUB_DEFAULT in /etc/default/grub to the name of the entry you’ve just created:

$ cat /etc/default/grub
# If you change this file, run 'update-grub' afterwards to update
# /boot/grub/grub.cfg.
# For full documentation of the options in this file, see:
# info -f grub -n 'Simple configuration'

#GRUB_DEFAULT=0
GRUB_DEFAULT="resize"
GRUB_TIMEOUT=5
GRUB_DISTRIBUTOR=`lsb_release -i -s 2> /dev/null || echo Debian`
GRUB_CMDLINE_LINUX_DEFAULT="quiet"
GRUB_CMDLINE_LINUX=""
...

Finally, you can reboot the system. When it comes back online (if it comes back grin) your file system will be resized. Be aware that e2fsck and resizefs take a long time on big disks. On my system the two took 2 hours for a 1.5T filesystem. Thus don’t prematurely reboot your system if it doesn’t come up again quickly.

Don’t forget to remove the new grub entry, so your file system doesn’t get resized every time you boot.

Original howto at https://thunked.org/general/howto-shrink-a-remote-root-ext3-filesystem-t96.html

Original howto Written by Stefan @ https://thunked.org/

This version for Debian wheezy by Tomáš Pospíšek

Celebrating 20 years of Linux!

Celebrating 20 years of Linux!

Celebrating 20 years of Linux!

Celebrating 20 years of Linux!

Visually sorting images under Linux

to visually sort images under Linux doesn’t seem to be a trivial task. I duckduckgo‘ed for a long time and had a look at various image and file managing applications before finding gthumb. And even there, you first need to create a “catalog” and within the catalog a “library” which will finally allow you to manually sort your images. All of which is not documented.

Once you’ve sorted your images, you’d possibly want to export the sorting? Again, no trace of any help or documentation: gthumb catalogs are saved under $HOME/.local/share/gthumb/catalogs/foobar.catalog.

Tomáš Pospíšek

A workflow for creating beautiful relief shaded dems using GDAL

Sometimes I create hillshades using the QGIS hillshade plugin and then overlay the original DEM over it. I set the DEM to have a false colour pallette and set it to be semi-transparent to produce something like this:

Typical usage of a hillshade with false colour overlay

That is all well and good but a bit impractical. It would be much nice to have the colour pallette permanetly assigned to the hillshade. Also I want to be able to clip and mask the resulting raster to the boundary specified in a shapefile. Fortunately, GDAL provides all the tools you need to make this happen. There are already some nice articles (like this one) that describe parts of this workflow but I am writing this because I wanted to note the additional steps that I took to make this work well for me.

Before you begin

Before you begin you should have:

  1. a raster containing digital elevation data (DEM) - in my case its called 'alt.tif'
  2. a vector layer (typically a shapefile) containing the area of interest for your final product - in my case its called 'tanzania.shp'

Create the hillshade image

The first thing we need to do is generate a hillshade. There is a nice python plugin for doing this in QGIS, you can do it in GRASS using the QGIS-GRASS plugin. But in this article I'm going for an all-GDAL approach so we will be using the handy **gdaldem** command line application.  I won't be explaining the parameters I have used here as they are well explained in the gdaldem manual pages.

So to create our hillshade we do something like this:

::
gdaldem hillshade alt.tif shade.tif -z 5 -s 111120 -az 90

Which will produce something like this: colorbrewer would be a good place to start if you want to learn more.  Another favourite site of mine is colourlovers.com and for this tutorial I decided to use a pallette from there to see how it would turn out.

Once you have selected a suitable colour pallette (around 5 or 6 colour classes should do it), the next thing you need to do is get some information about the range of values contained in your DEM. Once again you can easily point and click your way to this in QGIS, but here is the way to get it in gdal from the command line:

::
gdalinfo -mm alt.tif

The resulting output includes the computed min/max for Band 1 - which is what we are after:

::
Band 1 Block=1334x3 Type=UInt16, ColorInterp=Gray
Computed Min/Max=1.000,5768.000 NoData Value=65535

Ok so our minimum height is 1m and maximum is 5768m - Tanzania is the home of Kilimanjaro after all! So lets split that range up into 5 classes to match the 'Landcarpet Europe' colourlover pallette I selected. I set nearly white as an additional colour for the highest altitude range.

::
65535 255 255 255 5800 254 254 254 3000 121 117 10 1500 151 106 47 800 127 166 122 500 213 213 149 1 218 179 122

The value in the first column is the base of the scale range. The subsequent values are RGB triplets for that range. I saved this as a text file called 'ramp.txt' in the same directory as my 'alt.tiff' dataset. You will notice that I made the value ranges closer together at lower altitudes and wider appart at higher altitudes. You may want to experiment a little to get pleasing results - especially if you have a relatively small number of high lying terrain pixels and the rest confined to lower lying areas.

Also note that I assigned the highest terrain 'nearly white' so that I could reserve white (RGB: 255 255 255) for the nodata value (65535) in this dataset. We will use the fact that white is only used for nodata to our advantage when we do a clip further on in these instructions.

Ok now we can use gdaldem to generate the terrain map:

::
gdaldem color-relief alt.tif ramp.txt relief.tif

This is what my relief map looked like:

The terrain colour map I produced

Don't worry about the fact that it does not resemble the colour pallette you have chosen - it will do in the next step!

Merging the two rasters

The next step is to combine the two products. I used Frank Warmerdam's handy hsv_merge.py script for this purpose.

::
./hsv_merge.py relief.tif shade.tif colour_shade.tif

Which produced this:

The result of merging my hillshade and my terrain colour map

You may have noticed that it is only at this point that the colours of our product resemble the original pallette we used.

One little gotcha with the hsv_merge.py script is that it throws away our nodata values, so what was sea before (and nodata in my original alt.tif dataset) is now white (RGB: 255 255 255).

Clipping and masking

You may have everything you need from the above steps. Alternatively you can also clip and mask the dataset using a shapefile.

::
gdalwarp -co compress=deflate -dstnodata 255 -cutline Tanzania.shp
colour_shade.tif colour_shade_clipped.tif

My final image is now a compressed tif with nodata outside of the country of Tanzania and looks like this:

Final result: A false coloured elevation map for Tanzania

A final note

One of the things I love about the command line is the repeatable and reusable workflows it allows for. I can distill everything in this blog post into a sequence of commands and replay them any time. If you are still stuck doing things in a GUI only way, give BASH a try - you can really do powerful geospatial data processing with it!

  • Page 1 of 1 ( 16 posts )
  • linux

Back to Top

Sustaining Members