Related Plugins and Tags

QGIS Planet

qgis2img - A QGIS render benchmarking tool and image renderer

qgis2img is a new tool that I created, in a bit of friendly competition with the boss, which I lost but we will not speak of that again, for benchmarking QGIS layer rendering. The goal is simple. Take a project file(s), or QLR file(s), render the output, time the results, and dump a summary. Simples. The tool does 3 passes by default to get the average but can do more. It's nothing fancy. Written in Python so it can be evolved quickly.

qgis2img will render each image by itself to give single timings then it will render the whole project as you see in QGIS.

It uses QGIS 2.4 (qgis-dev) in order to use the new rendering methods. I don't have any plans to port it to work with QGIS 2.2, however feel free to send a pull request.

The usage is pretty simple:

usage: qgis2img [-h] [--size SIZE] [--passes PASSES] [--types TYPES] file

Benchmark QGIS project file and layer loading times

positional arguments:
  file             Project file to load into QGIS

optional arguments:
  -h, --help       show this help message and exit
  --size SIZE      Image output size
  --passes PASSES  Number of render passes per layer
  --types TYPES    What to render. Options are layer|project, layer, or project.
                   layer|project will render all layers as the if the project
                   is open in QGIS.

with the results:

$ python.exe qgis2img parcels.qgs --passes 5
Project Loaded with: [u'PARCEL_region - Shp', u'PARCEL_region - Spatialite']
Rendering images with 5 passes
Layer: PARCEL_region - Shp      4.907 sec
Layer: PARCEL_region - Spatialite       3.66 sec
Layer: Project     5.3378 sec

Easy.

It will generate an image for each layer and the project:

Alt Text

You can find the project at https://github.com/DMS-Aus/qgis2img

Pull requests and ideas welcome

qgisbench

There is a tool called qgisbench in the QGIS source tree that does this kind of thing too, however:

  • It's in C++
  • We don't ship it
  • It's in C++
  • <3 Python
  • These things are good examples for others
  • Using the Python API in this ways lets me see gaps

qgis2img - A QGIS render benchmarking tool and image renderer

qgis2img is a new tool that I created, in a bit of friendly competition with the boss, which I lost but we will not speak of that again, for benchmarking QGIS layer rendering. The goal is simple. Take a project file(s), or QLR file(s), render the output, time the results, and dump a summary. Simples. The tool does 3 passes by default to get the average but can do more. It's nothing fancy. Written in Python so it can be evolved quickly.

qgis2img will render each image by itself to give single timings then it will render the whole project as you see in QGIS.

It uses QGIS 2.4 (qgis-dev) in order to use the new rendering methods. I don't have any plans to port it to work with QGIS 2.2, however feel free to send a pull request.

The usage is pretty simple:

usage: qgis2img [-h] [--size SIZE] [--passes PASSES] [--types TYPES] file

Benchmark QGIS project file and layer loading times

positional arguments:
  file             Project file to load into QGIS

optional arguments:
  -h, --help       show this help message and exit
  --size SIZE      Image output size
  --passes PASSES  Number of render passes per layer
  --types TYPES    What to render. Options are layer|project, layer, or project.
                   layer|project will render all layers as the if the project
                   is open in QGIS.

with the results:

$ python.exe qgis2img parcels.qgs --passes 5
Project Loaded with: [u'PARCEL_region - Shp', u'PARCEL_region - Spatialite']
Rendering images with 5 passes
Layer: PARCEL_region - Shp      4.907 sec
Layer: PARCEL_region - Spatialite       3.66 sec
Layer: Project     5.3378 sec

Easy.

It will generate an image for each layer and the project:

qgis2img.png

You can find the project at https://github.com/DMS-Aus/qgis2img

Pull requests and ideas welcome

qgisbench

There is a tool called qgisbench in the QGIS source tree that does this kind of thing too, however:

  • It's in C++
  • We don't ship it
  • It's in C++
  • <3 Python
  • These things are good examples for others
  • Using the Python API in this ways lets me see gaps

qgis2img - A QGIS render benchmarking tool and image renderer

qgis2img is a new tool that I created, in a bit of friendly competition with the boss, which I lost but we will not speak of that again, for benchmarking QGIS layer rendering. The goal is simple. Take a project file(s), or QLR file(s), render the output, time the results, and dump a summary. Simples. The tool does 3 passes by default to get the average but can do more. It's nothing fancy. Written in Python so it can be evolved quickly.

qgis2img will render each image by itself to give single timings then it will render the whole project as you see in QGIS.

It uses QGIS 2.4 (qgis-dev) in order to use the new rendering methods. I don't have any plans to port it to work with QGIS 2.2, however feel free to send a pull request.

The usage is pretty simple:

usage: qgis2img [-h] [--size SIZE] [--passes PASSES] [--types TYPES] file

Benchmark QGIS project file and layer loading times

positional arguments:
  file             Project file to load into QGIS

optional arguments:
  -h, --help       show this help message and exit
  --size SIZE      Image output size
  --passes PASSES  Number of render passes per layer
  --types TYPES    What to render. Options are layer|project, layer, or project.
                   layer|project will render all layers as the if the project
                   is open in QGIS.

with the results:

$ python.exe qgis2img parcels.qgs --passes 5
Project Loaded with: [u'PARCEL_region - Shp', u'PARCEL_region - Spatialite']
Rendering images with 5 passes
Layer: PARCEL_region - Shp      4.907 sec
Layer: PARCEL_region - Spatialite       3.66 sec
Layer: Project     5.3378 sec

Easy.

It will generate an image for each layer and the project:

Alt Text

You can find the project at https://github.com/DMS-Aus/qgis2img

Pull requests and ideas welcome

qgisbench

There is a tool called qgisbench in the QGIS source tree that does this kind of thing too, however:

  • It's in C++
  • We don't ship it
  • It's in C++
  • <3 Python
  • These things are good examples for others
  • Using the Python API in this ways lets me see gaps

PDOK-servicesplugin 0.7 released

This post is about a new release of the dutch pdokservices-plugin which can be used to easily add WMS, WFS can WCS service layers from our national data-agency PDOK. Read the dutch version here.

A guide to GoogleMaps-like maps with OSM in QGIS

Using OSM data in QGIS is a hot topic but so far, no best practices for downloading, preprocessing and styling the data have been established. There are many potential solutions with all their advantages and disadvantages. To give you a place to start, I thought I’d share a workflow which works for me to create maps like the following one from nothing but OSM:

osm_google_100k

Getting the data

Raw OSM files can be quite huge. That’s why it’s definitely preferable to download the compressed binary .pbf format instead of the XML .osm format.

As a download source, I’d recommend Geofabrik. The area in the example used in this post is part of the region Pays de la Loire, France.

Preparing the data for QGIS

In the preprocessing step, we will extract our area of interest and convert the .pbf into a spatialite database which can be used directly in QGIS.

This can be done in one step using ogr2ogr:

C:\Users\anita_000\Geodata\OSM_Noirmoutier>ogr2ogr -f "SQLite" -dsco SPATIALITE=YES -spat 2.59 46.58 -1.44 47.07 noirmoutier.db noirmoutier.pbf

where the -spat option controls the area of interest to be extracted.

When I first published this post, I suggested a two step approach. You can find it here for future reference:

For the first step: extracting the area of interest, we need Osmosis. (For Windows, you can get osmosis from openstreetmap.org. Unpack to use. Requires Java.)

When you have Osmosis ready, we can extract the area of interest to the .osm format:

C:\Users\anita_000\Geodata\OSM_Noirmoutier>..\bin\osmosis.bat --read-pbf pays-de-la-loire-latest.osm.pbf --bounding-box left=-2.59 bottom=46.58 right=-1.44 top=47.07 --write-xml noirmoutier.osm

While QGIS can also load .osm files, I found that performance and access to attributes is much improved if the .osm file is converted to spatialite. Luckily, that’s easy using ogr2ogr:

C:\Users\anita_000\Geodata\OSM_Noirmoutier>ogr2ogr -f "SQLite" -dsco SPATIALITE=YES noirmoutier.db noirmoutier.osm

Finishing preprocessing in QGIS

In QGIS, we’ll want to load the points, lines, and multipolygons using Add SpatiaLite Layer:

Screenshot 2014-05-31 11.39.40

When we load the spatialite tables, there are a lot of features and some issues:

  • There is no land polygon. Instead, there are “coastline” line features.
  • Most river polygons are missing. Instead there are “riverbank” line features.

Screenshot 2014-05-31 11.59.58

Luckily, creating the missing river polygons is not a big deal:

  1. First, we need to select all the lines where waterway=riverbank.
    Screenshot 2014-05-31 13.14.00
  2. Then, we can use the Polygonize tool from the processing toolbox to automatically create polygons from the areas enclosed by the selected riverbank lines. (Note that Processing by default operates only on the selected features but this setting can be changed in the Processing settings.)
    Screenshot 2014-05-31 13.40.16

Creating the land polygon (or sea polygon if you prefer that for some reason) is a little more involved since most of the time the coastline will not be closed for the simple reason that we are often cutting a piece of land out of the main continent. Therefore, before we can use the Polygonize tools, we have to close the area. To do that, I suggest to first select the coastline using "other_tags" LIKE '%"natural"=>"coastline"%' and create a new layer from this selection (save selection as …) and edit it (don’t forget to enable snapping!) to add lines to close the area. Then polygonize.

Screenshot 2014-05-31 14.38.48

Styling the data

Now that all preprocessing is done, we can focus on the styling.

You can get the styles used in the map from my Github QGIS-resources repository:

  • osm_spatialite_googlemaps_multipolygon.qml … rule-based renderer incl. rules for: water, natural, residential areas and airports
  • osm_spatialite_googlemaps_lines.qml … rule-based renderer incl. rules for roads, rails, and rivers, as well as rules for labels
  • osm_spatialite_googlemaps_roadshields.qml … special label style for road shields
  • osm_spatialite_googlemaps_places.qml … label style for populated places such as cities and towns

qgis_osm_google_100k


Combining skills – Mapping Election Results

I would like to show you how to use QGIS to combine different skills to

  • Import data from Excel or other spreadsheets
  • Analyse the data
  • Present the results as a thematic map
  • Use a feature subset to hide superfluous data

There is a year to go to the next general election. Under the British electoral system, the country is divided into 660 constituencies. The MP for each constituency is elected using the First Past the Post system, where the candidate with the most votes is chosen as MP for that constituency. The party that has the most MPs elected wins the election, and the right to form the nest government.

Parties concentrate their resources on the constituencies that they are most likely to win or lose. These are usually the ones where majority in the previous election was closest.

This project will use QGIS to join fields between OS Boundary line data and the 2010 election results to identify and map these constituencies.

I downloaded the following data sets:-

OS Boundaryline:  https://www.ordnancesurvey.co.uk/opendatadownload/products.html

Election results: http://www.electoralcommission.org.uk/__data/assets/excel_doc/0020/105725/GE2010-constituency-results-website.xls

Step 1 – Examine and prepare the data

I need both data sets to use exactly the same name and formatting in order to In order to add the 2010 election results to the OS Boundary line polygons.

  1. Start QGIS and set the map projection to OSGB.
  2. Use the Add Vector Layer button to add the file westminster_const_region.shp from the OS Boundary line data
  3. Open the attribute table to check the data structure and contents:-
Image

Constituency attribute table

Now to check the GE2010-constituency-results-website.xls


Image

Election results Excel screenshot

Unfortunately the two datasets don’t use exactly the same constituency names! It is fairly easy, but time consuming to match the record from the Election Results dataset to the OS Boundary Line record using Excel or Libre Office.

To export the OS Boundary line polygon names to Excel:-

  1. Right click on the westminster_const_region.shp in the Layers Panel
  2. Select Save As

I prefer to use the .dbf format when exchanging data between GIS and Excel as it is quicker to import than using .csv format.


Image

Both name fields are needed. The first, constituency _name will be used to link to the constituency polygons once the table is imported into QGIS. The second, Results_Table_Name is used by the VLOOKUP query that adds the five columns from the results data.

Image

Excel screenshot showing the cleansed election results matched to constituency names

Save the data as a .csv file when this stage is complete.


The QGIS Field calculator is dead. Long live the Field calculator bar

Ahhh the good old field calculator, it's in a better place now. OK not really, it's still there if you need it, but we can do a little better in 2.4. Introducing the field calculator bar:

Alt Text

oooo fancy.

The field calculator has always bugged me, I think it was just the combination of a few things:

  • It's modal so it blocks you from doing anything else - this alone is motivation enough in my mind.
  • You have to do the Open - Run - Close - Open - Run - Close dance which isn't great - annoying to say the least.
  • Did I mention it's modal - AAAAAAAHHHHHHHHHHH
  • Defaults to creating a new field - which is the edge case
  • You only have All or Selection, which is a bit limiting

Anyway, enough with that. Last night I was having a chat to Nyall about something unrelated, and while looking at Excel I thought about that little bar at the top and how handy that is. You don't see a field calculator dialog in Excel - well there is one but not for the common case - you just wack in your expression and it does its thing. Why couldn't we have this for QGIS? I think I said to Nyall "you know this would be pretty cool, I might give it a go". Couple of hours later and this is it.

Alt Text

I have expressed in the past, and above, my hate for modal dialogs, so that was the main motivation and the results are much nicer then before.

What do we gain:

  • Not modal - WIN!
  • Don't have to close anything to see your results
  • See the results as soon as you run Update (All|Filtered)
  • Works on the features in table (All|Filtered)
  • Does one job

The other improvment to the old dialog is what features the bar works on. The bar will update what it sees in the dialog. If you need to update just the selection, simply select Show Selected and run the update. Need to search for something to update? Run a filter and press update. The method has changed from All and Selected to All and Filtered. Just remember if you see it in the attribute table it will be updated.

Alt Text

The last point is important too, if you need a new field you use the New Field button, then run the update, there is no need to mix the two function into one tool. SRP.

This feature will be in 2.4. If you find any bugs assign them to me at hub.qgis.org and I will try to address them before 2.4 is out.

RIP Field calculator dialog

The QGIS Field calculator is dead. Long live the Field calculator bar

Ahhh the good old field calculator, it's in a better place now. OK not really, it's still there if you need it, but we can do a little better in 2.4. Introducing the field calculator bar:

fieldcalc1.png

oooo fancy.

The field calculator has always bugged me, I think it was just the combination of a few things:

  • It's modal so it blocks you from doing anything else - this alone is motivation enough in my mind.
  • You have to do the Open - Run - Close - Open - Run - Close dance which isn't great - annoying to say the least.
  • Did I mention it's modal - AAAAAAAHHHHHHHHHHH
  • Defaults to creating a new field - which is the edge case
  • You only have All or Selection, which is a bit limiting

Anyway, enough with that. Last night I was having a chat to Nyall about something unrelated, and while looking at Excel I thought about that little bar at the top and how handy that is. You don't see a field calculator dialog in Excel - well there is one but not for the common case - you just wack in your expression and it does its thing. Why couldn't we have this for QGIS? I think I said to Nyall "you know this would be pretty cool, I might give it a go". Couple of hours later and this is it.

fieldcalc.png

I have expressed in the past, and above, my hate for modal dialogs, so that was the main motivation and the results are much nicer then before.

What do we gain:

  • Not modal - WIN!
  • Don't have to close anything to see your results
  • See the results as soon as you run Update (All|Filtered)
  • Works on the features in table (All|Filtered)
  • Does one job

The other improvment to the old dialog is what features the bar works on. The bar will update what it sees in the dialog. If you need to update just the selection, simply select Show Selected and run the update. Need to search for something to update? Run a filter and press update. The method has changed from All and Selected to All and Filtered. Just remember if you see it in the attribute table it will be updated.

fieldcalc-filter.png

The last point is important too, if you need a new field you use the New Field button, then run the update, there is no need to mix the two function into one tool. SRP.

This feature will be in 2.4. If you find any bugs assign them to me at hub.qgis.org and I will try to address them before 2.4 is out.

RIP Field calculator dialog

Colour shortcuts in QGIS 2.4

Quick poll… what’s the most frustrating thing about GIS? Fighting with colour plotters? Trying to remember GDAL command line syntax? MapInfo’s new ribbon interface* [1]? All of the above?

Wrong!

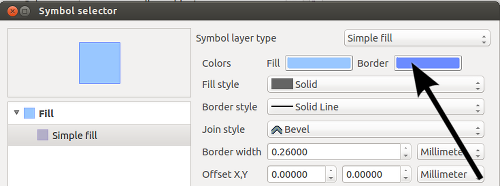
It’s getting a colour from here:

colour1

…all the way over to here:

colour2

Since the dawn of GIS humanity has struggled with this simple task* [2]. We’ve come up with multiple techniques for solving this problem, ranging from the RSI inducing “select and copy red value, alt-tab, paste, alt-tab, select and copy green value, alt-tab, paste, etc….” method, through to chanting “70, 145, 160… 70, 145, 160… 70, 145, 150… 70, 145, 150” to ourselves as we frantically try and rearrange dialogs to find the destination colour picker, all the while avoiding strange looks from co-workers.

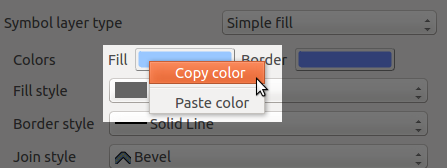
Fortunately, QGIS 2.4 is coming to the rescue! Now, you can right click on any of QGIS’ colour picker buttons for a handy copy/paste colour shortcut menu. Pasting colours works from a whole range of formats, including hex codes, color names, and css-style “rgb” and “rgba” strings.

Fixed!

Problem solved!

Even better, you can just drag colours from one colour button to another:

Fixed again...

… and solved again…

Or, drag a colour from GIMP and drop it onto a QGIS colour button:

x

… and yet again!

Or even drag a colour from a QGIS button directly onto a shape in Inkscape! All this win is coming your way in QGIS 2.4, due June 2014.

[1] Pre-empting the inevitable flood of complaints when this new interface is rolled out
[2] I assume

And now… colour preview modes in QGIS’ map canvas

As a quick follow-up to my last post on colour preview modes for the print composer in QGIS 2.4, this feature has also been added to the main map canvas window! Now it’s even easier to adjust your symbol colours and immediately see how they’d appear under a range of different circumstances:

Colour previews modes for the map canvas

Colour previews modes for the map canvas


Packaging PostGIS dev releases with Docker

Packaging PostGIS dev releases with Docker

We recently added support for GML curves to PostGIS, which enables TinyOWS to deliver WFS requests with curve geometries. More on this in a later post. This enhancement is in the current PostGIS developement version (SVN master) and not released yet. To enable our customer testing this functionality, we had to build packages for their server environment which is Ubuntu Precise with UbuntuGIS repositories. After working with Linux LXC containers and it's predecessor VServer for years, Docker was a logical choice for a clean reproducible build environment.

Rebuilding a Debian package is usually quite easy:

apt-get build-dep <package>
cd <packagedir>
#Make your changes
dch -i
dpkg-buildpackage

But getting build dependencies for PostGIS currently fails with libssl-dev conflicts, maybe because the dev packages got out of sync after the recent Heartblead updates. So the Dockerfile uses equivs to build a dummy package which satisfies the dependencies.

The command

docker run -v /tmp:/pkg sourcepole/postgis-svn-build-env sh -c 'cp /root/*postgis*.deb /pkg'

loads the Docker image with packages built from the latest SVN version of PostGIS in /root and copies the deb files from the containter into /tmp.

Now we're ready to install these packages on the Ubuntu server:

sudo dpkg -i /tmp/*postgis*.deb

Thats it. Feedback welcome!

@PirminKalberer

P.S.

If you happen to be a developer, then you may prefer running a cutting-edge version of PostGIS in a Docker container instead of building packages. Our colleagues from Oslandia just published how to do this.

Installing PostGIS on Fedora 20

In order to explore all the new interfaces to PostGIS (from QGIS, GDAL, GRASS GIS 7 and others) I decided to install PostGIS 2.1 on my Fedora 20 Linux box. Eventually it is an easy job but I had to visit a series of blogs to refresh my dark memories from past PostGIS installations done some years ago… So, here the few steps:

# become root
su -
# grab the PostgreSQL 9.3 server and PostGIS 2.1
yum install postgresql-server postgresql-contrib postgis

Now the server is installed but yet inactive and not configured. The next step is to initialize, configure and start the PostgreSQL server:

# initialize DB:
postgresql-setup initdb
# start at boot time:
chkconfig postgresql on
# fire up the daemon:
service postgresql start

A test connection will show that we need to configure TCP/IP connections:

# this will fail
psql -l
psql: could not connect to server: No such file or directory
    Is the server running locally and accepting
    connections on Unix domain socket "/var/run/postgresql/.s.PGSQL.5432"?

So we enable TCP/IP connections listening on port 5432:

# edit "postgresql.conf" with editor of choice (nano, vim, ...),
# add line "listen_addresses = '*'":
vim /var/lib/pgsql/data/postgresql.conf
...
listen_addresses = '*'
#listen_addresses = 'localhost'         # what IP address(es) to listen on;
...

Now restart the PostgreSQL daemon:

# restart to re-read configuration
service postgresql restart

Check if the server is now listening on TCP/IP:

# check network connections:
netstat -l | grep postgres
tcp        0      0 0.0.0.0:postgres        0.0.0.0:*               LISTEN     
tcp6       0      0 [::]:postgres           [::]:*                  LISTEN     
unix  2      [ ACC ]     STREAM     LISTENING     2236495  /var/run/postgresql/.s.PGSQL.543

So far so nice. Still PostGIS is not yet active, and we need a database user “gisuser” with password:

# switch from root user to postgres user:
su - postgres
# create new DB user with password (will prompt you for it, choose a strong one):
createuser --pwprompt --encrypted gisuser

Finally we create a first database “gis”:

# create new DB
createdb --encoding=UTF8 --owner=gisuser gis

We enable it for PostGIS 2.1:

# insert PostGIS SQL magic (it should finish with a "COMMIT"):
psql -d gis -f /usr/share/pgsql/contrib/postgis-64.sql

That’s it! Now exit from the “postgres” user account a the “root” account:

# exit from PG user account (back to "root" account level):
exit

In case you want to reach the PostgreSQL/PostGIS server from outside your machine (i.e. from the network), you need to enable PostgreSQL for that:

# enable the network in pg_hba.conf (replace host line; perhaps comment IP6 line):
vim /var/lib/pgsql/data/pg_hba.conf

...
host    all             all             all                     md5
...

# save and restart the daemon:
service postgresql restart

Time for another connection test:

# we try our new DB user account on the new database (hostname is the 
# name of the server in the network):
psql --user gisuser -h hostname -l
Password for user gisuser: xxxxxx

Wonderful, we are connected!

# exit from root account:
exit
[neteler@oboe ] $

Now have our PostGIS database ready!

What’s left? Get some spatial data in as a normal user:

# nice tool
shp2pgsql-gui
shp2pgsql-gui

Using the shp2pgsql-gui

Next pick a SHAPE file and upload it to PostGIS with “Import”.

Now connect to your PostGIS database with QGIS or GRASS GIS and enjoy!

See also: https://fedoraproject.org/wiki/PostgreSQL

The post Installing PostGIS on Fedora 20 appeared first on GFOSS Blog | GRASS GIS Courses.

Colour blindness and grayscale previews in QGIS 2.4

Since QGIS 2.4 is nearing feature freeze it seems like a good time to start exploring some of the great new features in this release. So, let’s get started with my most recent addition to QGIS’ print composer… preview modes!

As every first year cartography text book will tell you, it’s important to know your target media and audience when creating a usable map. Some important considerations are whether or not your map will be photocopied or printed in black and white, and whether you need to consider colour blind map readers in your audience. In the past, designing maps with these considerations has been a time consuming, tedious process. You’d have to export your map, open it in another graphics editing program, apply some colour transform, work out what issues there are, flip back to QGIS, make your changes and repeat. If you’re working with a tight deadline it can be difficult to justify the time this all takes.

QGIS 2.4 will help to make this whole process a lot simpler. In the print composer there’s now an option to enable a number of different live “preview modes“. These include grayscale, monochrome, and two colour blindness simulations (Protanope and Deuteranope).

Composer preview modes in QGIS 2.4

Composer preview modes in QGIS 2.4

These preview modes are live, so you can continue to edit and tweak the colours in your composition while a preview mode is active! For a quick demonstration, let’s start with this creatively coloured thematic map:

bad_colored_map

While it might not be the most aesthetically pleasing map, at least the thematic colours can be easily matched to their corresponding values in the legend. Let’s see what would happen if we photocopied this map. This is as easy as activating the “Simulate photocopy (grayscale)” preview mode:

greyscalepreview

Hmm… not so usable now. The five thematic colours have been reduced to just three discernible colours. Oh well, at least we haven’t had to export our map to find this out, and it’s nice and easy to adjust the colours and composition to work for photocopies without having to leave QGIS to test the results!

Let’s see how this map would look to someone with colour blindness, by activating the “Simulate colour blindness (Protanope)” mode:

color_blindness

In this case, our map isn’t too bad. The different classes are still discernible and the map can be interpreted by someone with protanopia.

So there we have it – now it’s easy to determine how our map outputs will look under different circumstances and adjust them to suit! Composer preview modes will be a part of the upcoming 2.4 release of QGIS, which is due out at the end of June 2014.

Update:

This feature has also been added to the main map canvas.

Setting up PyCharm for PyQGIS and Qt

I have been asked a few times how to setup PyCharm so you are able to do PyQGIS development, or even PyQt because that is just as great. Rather then tell each person one at a time I thought I would throw it out as a blog post so everyone gets the benift.

The first thing we need to do is create a batch file that will load PyCharm and setup all the paths correctly. We have to do this on Windows as Qt and QGIS are not on PATH. QGIS also ships with it's own version of copy of Python so we need to tell PyCharm about it.

The batch file is as simple as this:

SET OSGEO4W_ROOT=C:\OSGeo4W
SET QGISNAME=qgis
SET QGIS=%OSGEO4W_ROOT%\apps\%QGISNAME%
SET QGIS_PREFIX_PATH=%QGIS%
SET PYCHARM="C:\Program Files (x86)\JetBrains\PyCharm 3.0\bin\pycharm.exe"

CALL %OSGEO4W_ROOT%\bin\o4w_env.bat

SET PATH=%PATH%;%QGIS%\bin
SET PYTHONPATH=%QGIS%\python;%PYTHONPATH%

start "PyCharm aware of QGIS" /B %PYCHARM% %*

Save this somewhere called pycharm-pyqgis.bat and run it.

This is a pretty basic batch file. It just sets the variables that we need for the QGIS and Qt libs, and also sets the PYTHONHOME to the QGIS version. The magic sause here is the set PATH, set PYTHONHOM, and set PYTHONPATH variables. You can just update the OSGeo4W_ROOT, and PYCHARM variables for your setup.

After running the batch we need to setup a Python interpreter in PyCharm. Click Configure -> Settings on the load page (or settings in the File menu). Search for Python Interpreters, and press the green add button and select local. Here we need to add the Python interpreter that we setup in our batch file. In the one I posted above it will be found at C:\OSGeo4W\bin\python.exe. Press Ok and PyCharm will find all the python paths it needs for the setup.

Alt Text

Leave the settings dialog and create a new project.

Alt Text

Remember to select the interpreter that we setup for the installed version of QGIS.

That is pretty much it. We can now create a pyqgis and pyqt app in PyCharm.

Lets give it a go

from qgis.core import QgsApplication
from PyQt4.QtGui import QDialog

GUIEnabled=True
app = QgsApplication([], GUIEnabled)

dlg = QDialog()
dlg.exec_()

app.exit(app.exec_())

Run it in PyCharm with Alt+Shift+F10. Good to go!

Setting up PyCharm for PyQGIS and Qt

I have been asked a few times how to setup PyCharm so you are able to do PyQGIS development, or even PyQt because that is just as great. Rather then tell each person one at a time I thought I would throw it out as a blog post so everyone gets the benift.

The first thing we need to do is create a batch file that will load PyCharm and setup all the paths correctly. We have to do this on Windows as Qt and QGIS are not on PATH. QGIS also ships with it's own version of copy of Python so we need to tell PyCharm about it.

The batch file is as simple as this:

SET OSGEO4W_ROOT=C:\OSGeo4W
SET QGISNAME=qgis
SET QGIS=%OSGEO4W_ROOT%\apps\%QGISNAME%
SET QGIS_PREFIX_PATH=%QGIS%
SET PYCHARM="C:\Program Files (x86)\JetBrains\PyCharm 3.0\bin\pycharm.exe"

CALL %OSGEO4W_ROOT%\bin\o4w_env.bat

SET PATH=%PATH%;%QGIS%\bin
SET PYTHONPATH=%QGIS%\python;%PYTHONPATH%

start "PyCharm aware of QGIS" /B %PYCHARM% %*

Save this somewhere called pycharm-pyqgis.bat and run it.

This is a pretty basic batch file. It just sets the variables that we need for the QGIS and Qt libs, and also sets the PYTHONHOME to the QGIS version. The magic sause here is the set PATH, set PYTHONHOM, and set PYTHONPATH variables. You can just update the OSGeo4W_ROOT, and PYCHARM variables for your setup.

After running the batch we need to setup a Python interpreter in PyCharm. Click Configure -> Settings on the load page (or settings in the File menu). Search for Python Interpreters, and press the green add button and select local. Here we need to add the Python interpreter that we setup in our batch file. In the one I posted above it will be found at C:\OSGeo4W\bin\python.exe. Press Ok and PyCharm will find all the python paths it needs for the setup.

pycharm_python.png

Leave the settings dialog and create a new project.

pycharm_newproject.png

Remember to select the interpreter that we setup for the installed version of QGIS.

That is pretty much it. We can now create a pyqgis and pyqt app in PyCharm.

Lets give it a go

from qgis.core import QgsApplication
from PyQt4.QtGui import QDialog

GUIEnabled=True
app = QgsApplication([], GUIEnabled)

dlg = QDialog()
dlg.exec_()

app.exit(app.exec_())

Run it in PyCharm with Alt+Shift+F10. Good to go!

Setting up PyCharm for PyQGIS and Qt

I have been asked a few times how to setup PyCharm so you are able to do PyQGIS development, or even PyQt because that is just as great. Rather then tell each person one at a time I thought I would throw it out as a blog post so everyone gets the benift.

The first thing we need to do is create a batch file that will load PyCharm and setup all the paths correctly. We have to do this on Windows as Qt and QGIS are not on PATH. QGIS also ships with it's own version of copy of Python so we need to tell PyCharm about it.

The batch file is as simple as this:

SET OSGEO4W_ROOT=C:\OSGeo4W
SET QGISNAME=qgis
SET QGIS=%OSGEO4W_ROOT%\apps\%QGISNAME%
SET QGIS_PREFIX_PATH=%QGIS%
SET PYCHARM="C:\Program Files (x86)\JetBrains\PyCharm 3.0\bin\pycharm.exe"

CALL %OSGEO4W_ROOT%\bin\o4w_env.bat

SET PATH=%PATH%;%QGIS%\bin
SET PYTHONPATH=%QGIS%\python;%PYTHONPATH%

start "PyCharm aware of QGIS" /B %PYCHARM% %*

Save this somewhere called pycharm-pyqgis.bat and run it.

This is a pretty basic batch file. It just sets the variables that we need for the QGIS and Qt libs, and also sets the PYTHONHOME to the QGIS version. The magic sause here is the set PATH, set PYTHONHOM, and set PYTHONPATH variables. You can just update the OSGeo4W_ROOT, and PYCHARM variables for your setup.

After running the batch we need to setup a Python interpreter in PyCharm. Click Configure -> Settings on the load page (or settings in the File menu). Search for Python Interpreters, and press the green add button and select local. Here we need to add the Python interpreter that we setup in our batch file. In the one I posted above it will be found at C:\OSGeo4W\bin\python.exe. Press Ok and PyCharm will find all the python paths it needs for the setup.

Alt Text

Leave the settings dialog and create a new project.

Alt Text

Remember to select the interpreter that we setup for the installed version of QGIS.

That is pretty much it. We can now create a pyqgis and pyqt app in PyCharm.

Lets give it a go

from qgis.core import QgsApplication
from PyQt4.QtGui import QDialog

GUIEnabled=True
app = QgsApplication([], GUIEnabled)

dlg = QDialog()
dlg.exec_()

app.exit(app.exec_())

Run it in PyCharm with Alt+Shift+F10. Good to go!

GDAL/OGR 1.11.0 released

The new version 1.11.0  of GDAL/OGR (http://www.gdal.org/) which offers major new features has been released. GDAL/OGR is a C++ geospatial data access library for raster and vector file formats, databases and web services.  It includes bindings for several languages, and a variety of command line tools.

Highlights:

More complete information on the new features and fixes in the 1.11.0 release can be found at http://trac.osgeo.org/gdal/wiki/Release/1.11.0-News

The new release can be downloaded from:

The post GDAL/OGR 1.11.0 released appeared first on GFOSS Blog | GRASS GIS Courses.

Composition styling in QGIS 2.2

Here’s a quick run-down on some new feature in QGIS 2.2 which I never got around to writing about before the release. I feel like I’ve got to give these features their due publicity before moving on to all the exciting new stuff which is being added for 2.4. So, without further ado, let’s take a dive into print composer shape and page styling in QGIS 2.2…

Shape styling

It’s no secret that QGIS has pretty impressive capabilities when it comes to cartographic styling of polygon features. Everything from line and point pattern fills, SVG image fills, gradients and even buffered gradients (new in 2.4 — more on that in a later post) can be used to shade polygons. That’s all in addition to the whole range of line styles which can be used to outline the edges of polygons. In QGIS 2.2 all these fill effects are now available for styling shapes in the print composer. What exactly does this mean?

Well, now you can draw a frame onto your print layout and style it with a gradient fill…

Gradient shape fill in composer

…or a line pattern fill….

Line pattern fill in composer

…or some crazy combination of everything…

Advanced fill in composer

It’s totally up to you how far you take this! Here’s a nice example of a map created in QGIS 2.2’s print composer using these new styling options.

Page styling for compositions

Why is this cool? Well, for a start, if we take a quick look at the QGIS map showcase on Flickr very few of the maps shown there have a white background. In previous versions of QGIS achieving a non-white background would require drawing a giant coloured rectangle over your whole composition, banishing it to the back of the stack, and then continually being annoyed by it getting in the way while you tried to work on the rest of the composition. Now, just like the shape styling described above, you can style the page background using any of the available options in QGIS for polygon fills!

Creating a composition with a black page background

Creating a composition with a black page background

It doesn’t end there though. Since the page background can now be styled like this, it’s also possible to have transparent or semi-transparent page backgrounds. I’ll show the result opened here in GIMP so that you can see the full transparency effect over GIMP’s checkerboard background pattern:

A composition exported with a transparent background

A QGIS 2.2 composition exported with a transparent background

Using a transparent composition background like this also allows for transparency effects in map layers to show through – so, for instance, if your map layer is set to 50% transparent then the resultant export from the composer will also be 50% transparent.

And now for the final stinger…

Have I mentioned yet that you can also use data defined symbology for both shape and page styling? No? Well, this was actually my main motivator in adding styling support to these elements. For a long time I’ve been wanting to create atlases which vary the page background based on attributes in the atlas coverage layer. Think flip-book style maps, where the page border is colour-coded to highlight areas that need attention. For example, areas with high rates showing with red borders, average rates with yellow, and low rates with green borders. Using a combination of page and shape styling, data defined symbology, and QGIS’ atlas features, this is now possible!

…And that (belatedly) wraps up my exploration of new features in QGIS 2.2. Next up I’ll start showcasing all the sweet new features which have landed for 2.4…

Getting started writing QGIS 2.x plugins

This post shows how to quickly and easily create a small QGIS plugin for counting the number of features within a vector layer.

To get started, you will need QGIS and Qt Designer (to design the user interface) installed. If you are on Windows, I suggest WinPython which provides Qt Designer and Spyder (a Python IDE).

The great thing about creating plugins for QGIS: There is a plugin for that! It’s called Plugin Builder. And while you are at it, also install Plugin Reloader. Reloader is very useful for plugin developers because it lets you quickly reload your plugin without having to restart QGIS every time you make changes to the code.

installPluginBuilder

Plugin Builder will create all the files we need for our plugin. Just start it and select a name for your plugin class (one word in CamelCase), as well as a name for the plugin itself and the plugin menu entry (can be multiple words). Once you press Ok, you’re asked to select a folder to store the plugin. You can save directly to the QGIS plugin folder ~\.qgis2\python\plugins.

pluginBuilder

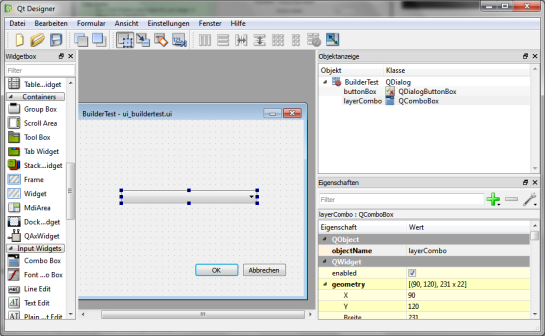
Next, open the newly created folder (in my case ~\.qgis2\python\plugins\BuilderTest). Amongst other files, it contains the user interface file ui_buildertest.ui. Our plugin will count the number of features in a vector layer. Therefore, it needs a combobox which allows the user to select a layer. Open the .ui file in Qt Designer and add a combobox to the dialog. Change the object name of the combobox to layerCombo. We’ll later use this name in the plugin code to add items to the combobox. Save the dialog and close Qt Designer.

qtDesigner

Now, we need to compile the .ui and the resources.qrc file to turn the dialog and the icon into usable Python code. This is done on the command line. On Windows, I suggest using the OSGeo4W Shell. Navigate to the plugin folder and run:

pyuic4 -o ui_buildertest.py ui_buildertest.ui
pyrcc4 -o resources_rc.py resources.qrc

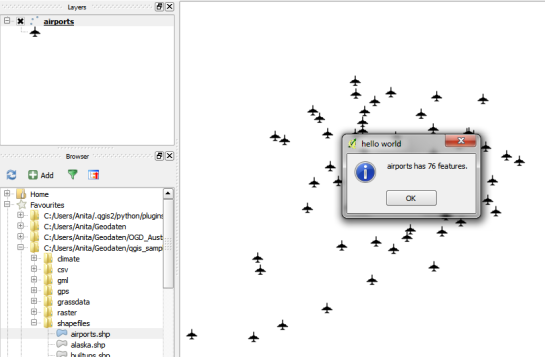
If you enable and run the plugin now, you will already see the dialog but the combobox will be empty. To populate the combobox, we need to write a few lines of code in buildertest.py. First, we’ll fetch all loaded layers and add all vector layers to the combobox. Then, we’ll add code to compute and display the number of features in the selected layer. To achieve this, we expand the run() method:

def run(self):        
    # show the dialog
    self.dlg.show()

    layers = QgsMapLayerRegistry.instance().mapLayers().values()
    for layer in layers:
        if layer.type() == QgsMapLayer.VectorLayer:
            self.dlg.layerCombo.addItem( layer.name(), layer ) 
         
    # Run the dialog event loop
    result = self.dlg.exec_()
    # See if OK was pressed
    if result == 1:
        # do something useful 
        index = self.dlg.layerCombo.currentIndex()
        layer = self.dlg.layerCombo.itemData(index)
        QMessageBox.information(self.iface.mainWindow(),"hello world","%s has %d features." %(layer.name(),layer.featureCount()))

When you are done with the code, you can use Plugin Reloader to load the new version. When you start the plugin now, the combobox will be populated with the names of the vector layers in your current project. And on pressing Ok, the plugin will compute and display the number of features.

builderTEst

builderTestResult

For more information on PyQGIS and more code samples I warmly recommend the PyQGIS Cookbook. Have fun!


  • <<
  • Page 77 of 142 ( 2821 posts )
  • >>

Back to Top

Sustaining Members