Related Plugins and Tags

QGIS Planet

Recent labelling improvements in QGIS master

If you’re not like me and don’t keep a constant eye over at QGIS development change log (be careful – it’s addictive!), then you’re probably not aware of a bunch of labelling improvements which recently landed in QGIS master version. I’ve been working recently on a large project which involves a lot (>300) of atlas map outputs, and due to the size of this project it’s not feasible to manually tweak placements of labels. So, I’ve been totally at the mercy of QGIS’ labelling engine for automatic label placements. Generally it’s quite good but there were a few things missing which would help this project. Fortunately, due to the open-source nature of QGIS, I’ve been able to dig in and enhance the label engine to handle these requirements (insert rhetoric about beauty of open source here!). Let’s take a look at them one-by-one:

Data defined quadrant in “Around Point” placement mode

First up, it’s now possible to specify a data defined quadrant when a point label is set to the Around Point placement mode. In the past, you had a choice of either Around Point mode, in which QGIS automatically places labels around point features in order to maximise the number of labels shown, or the Offset from Point mode, in which all labels are placed at a specified position relative to the points (eg top-left). In Offset from Point mode you could use data defined properties to force labels for a feature to be placed at a specific relative position by binding the quadrant to a field in your data. This allowed you to manually tweak the placement for individual labels, but at the cost of every other label being forced to the same relative position. Now, you’ve also got the option to data define the relative position when in Around Point mode, so that the rest of the labels will fall back to being automatically placed. Here’s a quick example – I’ll start with a layer with labels in Around Point mode:

Around Point placement mode

You can see that some labels are sitting to the top right of the points, others to the bottom right, and some in the top middle, in order to fit all the labels for these points. With this new option, I can setup a data defined quadrant for the labels, and then force the ‘Tottenham’ label (top left of the map) to display below and to the left of the point:

Setting a data-defined quadrant

Here’s what the result looks like:

Manually setting the quadrant for the Tottenham label

The majority of the labels are still auto-placed, but Tottenham is now force to the lower left corner.

Data defined label priority

Another often-requested feature which landed recently is the ability to set the priority for individual labels. QGIS has long had the ability to set the priority for an entire labelling layer, but you couldn’t control the priority of features within a layer. That would lead to situations like that shown below, where the most important central station (the green point) hasn’t been labelled:

What... no label for the largest station in Melbourne?
What… no label for the largest station in Melbourne?

By setting a data defined priority for labels, I can set the priority either via values manually entered in a field or by taking advantage of an existing “number of passengers” field present in my data. End result is that this central station is now prioritised over any others:

Much better! (in case you're wondering... I've manually forced some other non-optimal placement settings for illustrative purposes!)
Much better! (in case you’re wondering… I’ve manually forced some other non-optimal placement settings for illustrative purposes!)

Obstacle only layers

The third new labelling feature is the option for “Obstacle only” layers. What this option does is allow a non-labelled layer to act as an obstacle for the labels in other layers, so they will be discouraged from drawing labels over the features in the obstacle layer. Again, it’s best demonstrated with an example. Here’s my stations layer with labels placed automatically – you can see that some labels are placed right over the features in the rail lines layer:
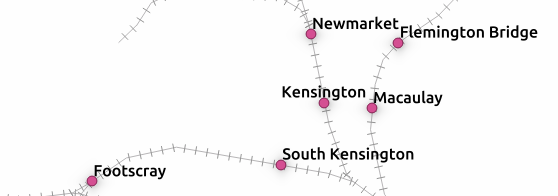
Labels over rail lines...
Labels over rail lines…

Now, let’s set the rail lines layer to act as an obstacle for other labels:

... setting the layer as an obstacle...
… setting the layer as an obstacle…

The result is that labels will be placed so that they don’t cover the rail lines anymore! (Unless there’s no other choice). Much nicer.

No more clashing labels!

Control over how polygons act as obstacles for labels

This change is something I’m really pleased about. It’s only applicable for certain situations, but when it works the improvements are dramatic.

Let’s start with my labelled stations map, this time with an administrative boundary layer in the background:

Stations with administrative boundaries

Notice anything wrong with this map? If you’re like me, you won’t be able to look past those labels which cross over the admin borders. Yuck. What’s happening here is that although my administrative regions layer is set to discourage labels being placed over features, there’s actually nowhere that labels can possibly be placed which will avoid this. The admin layer covers the entire map, so regardless of where the labels are placed they will always cover an administrative polygon feature. This is where the new option to control how polygon layers act as obstacles comes to the rescue:

...change a quick setting...
…change a quick setting…

Now, I can set the administrative layer to only avoid placing labels over feature’s boundaries! I don’t care that they’ll still be placed inside the features (since we have no choice!), but I don’t want them sitting on top of these boundaries. The result is a big improvement:

Much better!
Much better!

Now, QGIS has avoided placing labels over the boundaries between regions. Better auto-placement of labels like this means much less time required manually tweaking their positioning, and that’s always a good thing!

Draw only labels which fit inside a polygon

The last change is fairly self explanatory, so no nice screenshots here. QGIS now has the ability to prevent drawing labels which are too large to fit inside their corresponding polygon features. Again, in certain circumstances this can make a huge cartographic improvement to your map.

So there you go. Lots of new labelling goodies to look forward to when QGIS 2.12 rolls around.


Exploring variables in QGIS pt 3: layer level variables

In part 3 of my exploration of variables in QGIS 2.12, I’m going to dig into how variables are scoped in QGIS and what layer level variables are available (you can read parts 1 and 2 for a general introduction to variables).

Some background

Before we get to the good stuff, a bit of background in how variables work behind-the-scenes is important. Whenever an expression is evaluated in QGIS the context of the expression is considered. The context is built up from a set of scopes, which are all stacked on top of each other in order from least-specific to most-specific. It’s easier to explain with an example. Let’s take an expression used to set the source of a picture in a map composer. When this expression is evaluated, the context will consist of:

  1. The global scope, consisting of variables set in the QGIS options dialog, and other installation-wide properties
  2. The project scope, which includes variables set in the Project Properties dialog and the auto-generated project variables like @project_path, @project_title (you can read more about this in part 2)
  3. composer scope, with any variables set for the current composer, plus variables for @layout_pagewidth, @layout_pageheight, @layout_numpages, etc.
  4. composer item scope for the picture, with item-specific variables including @item_id

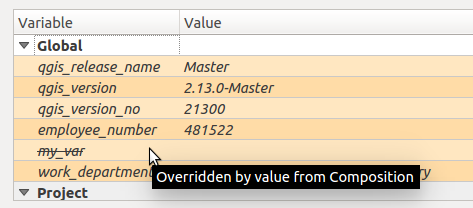
The more specific scopes will override any existing clashing variables from less specific scopes. So a global @my_var variable will be overridden by an @my_var variable set for the composer:

overridden

Another example. Let’s consider now an expression set for a data-defined label size. When this expression is evaluated the context will depend on where the map is being rendered. If it’s in the main map canvas then the context will be:

  1. The global scope
  2. The project scope
  3. map settings scope, with variables relating to how the map is being rendered. Eg @map_rotation, @map_scale, etc
  4. layer scope. More on this later, but the layer scope includes layer-level variables plus preset variables for @layer_name and @layer_id

If instead the map is being rendered inside a map item in a map composer, the context will be:

  1. The global scope
  2. The project scope
  3. The composer scope
  4. An atlas scope, if atlas is enabled. This contains variables like @atlas_pagename, @atlas_feature, @atlas_totalfeatures.
  5. composer item scope for the map item
  6. map settings scope (with scale and rotation determined by the map item’s settings)
  7. The layer scope

Using layer level variables

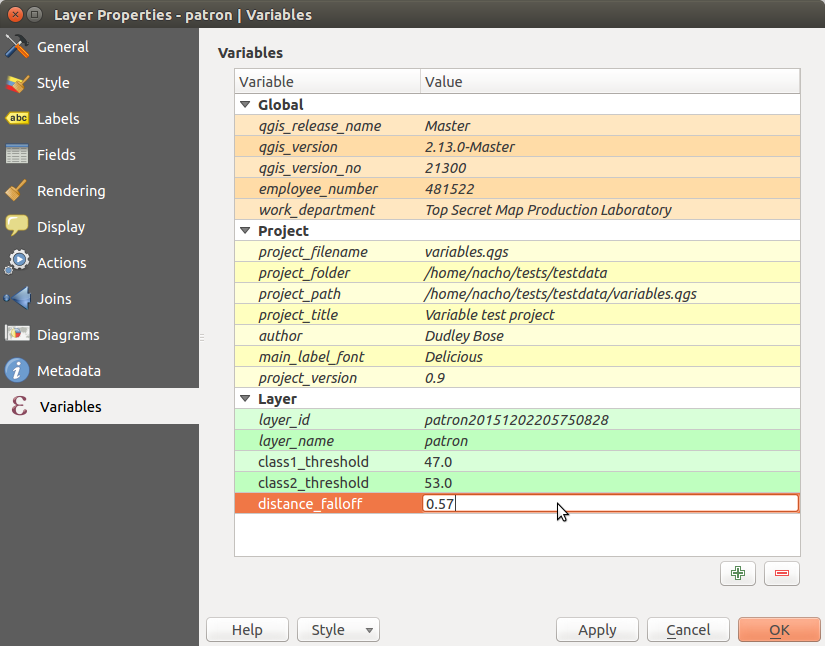
Ok, enough with the details. The reason I’ve explained all this is to help explain when layer level variables come into play. Basically, they’ll be available whenever an expression is evaluated inside of a particular layer. This includes data defined symbology and labeling, field calculator, and diagrams. You can’t use a layer-level variable inside a composer label, because there’s no layer scope used when evaluating this. Make sense? Great! To set a layer level variable, you use the Variables section in the Layer Properties dialog:

Setting a layer variablee
Setting a layer variable

Any layer level variables you set will be saved inside your current project, i.e. layer variables are per-layer and per-project. You can also see in the above screenshot that as well as the layer level variables QGIS also lists the existing variables from the Project and Global scopes. This helps show exactly what variables are accessible by the layer and whether they’ve been overridden by any scopes. You can also see that there’s two automatic variables, @layer_id and @layer_name, which contain the unique layer ID and user-set layer name too.

Potential use cases for layer-level variables

In the screenshot above I’ve set two variables, @class1_threshold and @class2_threshold. I’m going to use these to sync up some manual class breaks between rule based symbology and rule based labeling. Here’s how I’ve set up the rule-based symbols for the layer:

Rule based symbology using layer level variables

In a similar way, I’ve also created matching rule-based labeling (another new feature in QGIS 2.12):

Matching rule-based labels

Here’s what my map looks like now, with label and symbol colors matched:

*Map for illustrative purposes only... not for cartographic/visual design excellence!
*Map for illustrative purposes only… not for cartographic/visual design excellence!

If I’d hard-coded the manual class breaks, it would be a pain to keep the labeling and symbology in sync. I’d have to make sure that the breaks are updated everywhere I’ve used them in both the symbology and labeling settings. Aside from being boring, tedious work, this would also prevent immediate before/after comparisons. Using variables instead means that I can update the break value in a single place (the variables panel) and have all my labeling and symbols immediately reflect this change when I hit apply!

Another recent use case I had was teaming layer-level variables along with Time Manager. I wanted my points to falloff in both transparency and size with age, and this involved data defined symbol settings scattered all throughout my layer symbology. By storing the decay fall-off rate in a variable, I could again tweak this falloff by changing the value in a single place and immediately see the result. It also helps with readability of the data defined expressions. Instead of trying to decipher a random, hard-coded value, it’s instead immediately obvious that this value relates to a decay fall-off rate. Much nicer!

I’m sure there’s going to be hundreds of novel uses of layer-level variables which I never planned for when adding this feature. I’d love to hear about them though – leave a comment if you’d like to share your ideas!

One last thing – the new “layer_property” function

This isn’t strictly related to variables, but another new feature which was introduced in QGIS 2.12 was a new “layer_property” expression function. This function allows you to retrieve any one of a bunch of properties relating to a specific map layer, including the layer CRS, metadata, source path, etc.

This function can be used anywhere in QGIS. For instance, it allows you to insert dynamic metadata about layers into a print composer layout. In the screenshot below I’ve used expressions like layer_property(‘patron’,’crs’) and layer_property(‘patron’,’source’) to insert the CRS and source path of the “patron” layer into the label. If either the CRS or the file path ever changes, this label will be automatically updated to reflect the new values.

Inserting dynamic layer properties into a composer label


So there you go – layer level variables and the layer_property function – here in QGIS 2.12 and making your workflow in QGIS easier. In the final part of this series, we’ll explore the magical @value variable. Trust me, I’ve saved the best for last!

Exploring variables in QGIS pt 2: project management

Following on from part 1 in which I introduced how variables can be used in map composers, I’d like to now explore how using variables can make it easier to manage your QGIS projects. As a quick refresher, variables are a new feature in QGIS 2.12 which allow you to create preset values for use anywhere you can use an expression in QGIS.

Let’s imagine a typical map project. You load up QGIS, throw a bunch of layers on your map, and then get stuck into styling and labelling them ‘just right’. Over time the project gets more and more complex, with a stack of layers all styled using different rendering and labelling rules. You keep tweaking settings until you’re almost happy with the result, but eventually realise that you made the wrong choice of font for the labelling and now need to go through all your layers and labelling rules and update each in turn to the new typeface. Ouch.

Variables to the rescue! As you may recall from part 1, you can reuse variables anywhere in QGIS where you can enter an expression. This includes using them for data defined overrides in symbology and labelling. So, lets imagine that way back at the beginning of our project we created a project level variable called @main_label_font:

Creating a variable for label font

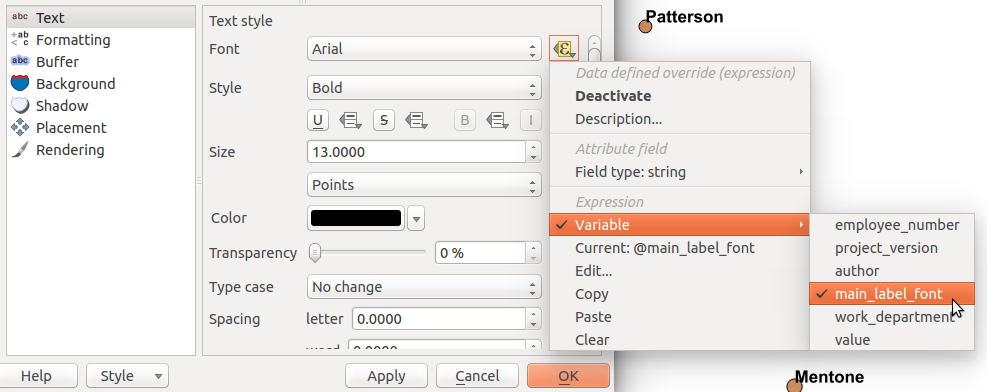
Now, we can re-use that variable in a data defined override for the label font setting. In fact, QGIS makes this even easier for you by showing a “variables” sub-menu allowing easy access to all the currently defined variables accessible to the layer:

Binding the label font to the @main_label_font variable


When we hit Apply all our labels will be updated to use the font face defined by the @main_label_font variable, so in this case ‘Courier New’:

courier_new

In a similar way we can bind all the other layer’s label fonts to the same variable, so @main_label_font will be reused by all the layers in the project. Then, when we later realise that Courier New was a horrible choice for labelling the map, it’s just a matter of opening up the Project Properties dialog and updating the value of the @main_label_font variable:

delicious

And now when we hit Apply the font for all our labelled layers will be updated all at once:

new_labels

It’s not only a huge time saver, it also makes changes like this easier because you can try out different font faces by updating the variable and hitting apply and seeing the effect that the changes have all at once. Updating multiple layers manually tends to have the consequence that you forget what the map looked like before you started making the change, making direct comparisons harder.

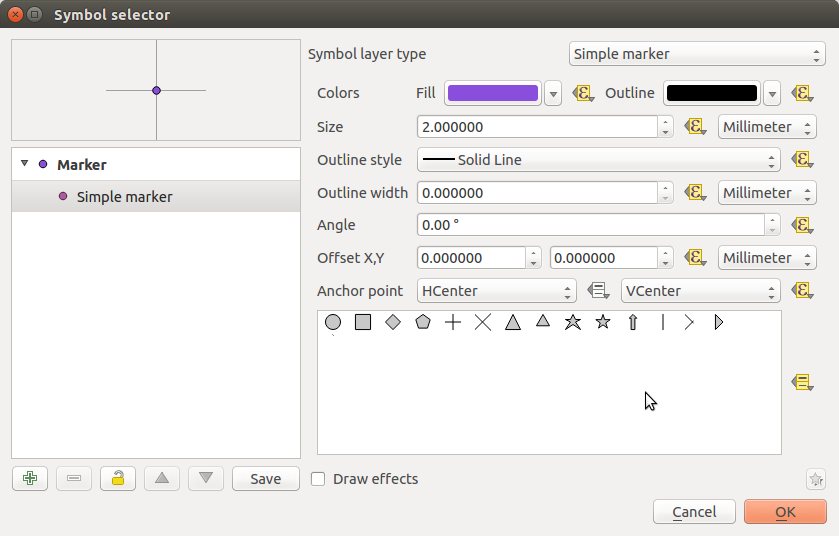
Of course, you could have multiple variables for other fonts used by your project too, eg @secondary_label_font and @highlighted_feature_font. Plus, this approach isn’t limited to just setting the label font. You could utilise project level variables for consolidating font sizes, symbol line thickness, marker rotation, in fact, ANYTHING that has one of those handy little data defined override buttons next to it:

See all those nice little yellow buttons? All those controls can be bound to variables...
See all those nice little yellow buttons? All those controls can be bound to variables…

One last thing before I wrap up part 2 of this series. The same underlying changes which introduced variables to QGIS also allows us to begin introducing a whole stack of new, useful functions to the expression engine. One of these which also helps with project management is the new project_color function. Just like how we can use project level variables throughout a project, project_color lets you reuse a color throughout your project. First, you need to create a named colour in the Default Styles group under the Project Properties dialog:

Define a colour in the project's colour scheme...
Define a colour in the project’s colour scheme…

Then, you can set a data defined override for a symbol or label colour to the expression “project_color(‘red alert!’)“:

bind_color

When you go back and change the corresponding colour in the Project Properties dialog, every symbol bound to this colour will also be updated!

blue_alert

So, there you have it. With a little bit of forward planning and by taking advantage of the power of expression variables in QGIS 2.12 you can help make your mapping projects much easier to manage and update!

That’s all for now, but we’re still only just getting started with variables. Part 3, coming soon!.. (Update: Part 3 is available now)


Exploring variables in QGIS 2.12, part 1

It’s been quite some time since I last had a chance to blog and a lot has happened since then. Not least of which is that QGIS 2.12 has now been released with a ton of new features that I’ve neglected to write about! To try and get things moving along here again I’m planning on writing a short series exploring how variables work in QGIS 2.12 and the exciting possibilities they unlock. First, let’s look into how variables can be used with QGIS map composer…

So, let’s get started! A new concept introduced in QGIS 2.12 is the ability to set custom variables for use in QGIS’ expression engine. The easiest way to do this is through the “Project Properties” dialog, under the “Variables” section:

Default project variables

You’ll see in the screenshot above that a blank project includes a number of read-only preset variables, such as @project_path and @project_title. (All variables in QGIS are prefixed with an @ character to differentiate them from fields or functions). You can add your own variables to this list by clicking the + button, as shown below:

Adding new variables to a project

Here I’ve added some new variables, @project_version and @author. Now, any of these variables can be used anywhere that you can use expressions in QGIS, including the field calculator, data defined symbology, labelling, map composer text, etc. So, you could make a map composer template with a label that includes the @author, @project_version and @project_path variables:

Variables in a composer label

Sure, you *could* also manually enter all these details directly into the label for the same result. But what happens when you have multiple composers in your project, and need to update the version number in all of them? Or you move your project to a new folder and need to make sure the path is updated accordingly? Manually updating multiple composers is a pain – make QGIS do the work for you and instead use variables! This would especially be helpful if you’re saving map composer templates for use across multiple projects or users. Using variables will ensure that the template is automatically updated with the right details for the current project.

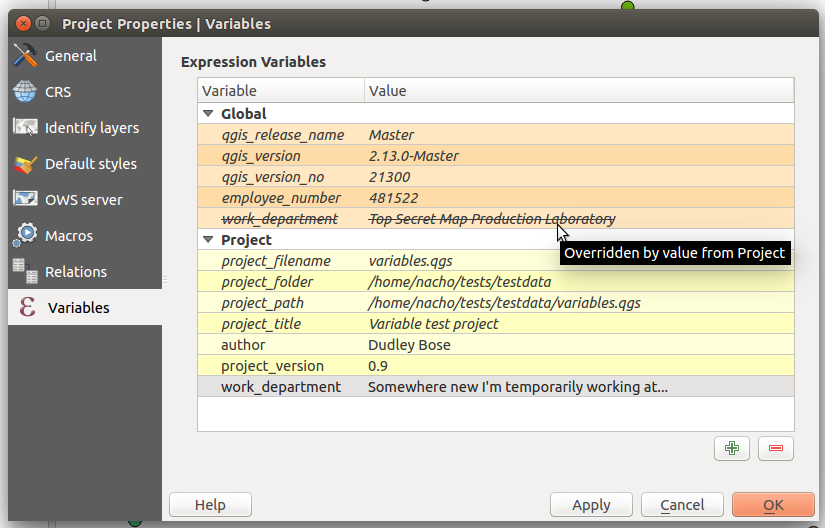
Another neat thing about QGIS variables is that they can be inherited and overridden, just like CSS rules. Opening the options dialog will also show a Variables group for setting “Global” variables. These variables are always available for your QGIS installation, regardless of what project you’re working on at the time. If your workplace tends to reorganise a lot and constantly shuffle your department around, you could add a global variable for @work_department, so that changing the global variable value in one place will automatically filter through to any existing and future projects you have.

Global variables
Global variables

And like I mentioned earlier, these variables are inherited through various “contexts” within QGIS. If I reopen the Project Properties dialog, you’ll see that a project has access to all the global variables plus the variables set within that specific project. In addition, by adding a variable with the same name to the Project variables the value of the Global variable will be overridden:

Overridden variables

There’s also a variable editor within each individual composer’s properties tab, so variables can also be set and overridden on a composer-by-composer basis within a project. It’s a really flexible and powerful approach which both simplifies workflows and also opens up lots of new possibilities.

Stay tuned for more on this topic – this topic has only just scratched the surface of how expression variables have changed QGIS! (You can also read part 2 and part 3)

Exploring variables in QGIS pt 3: layer level variables

In part 3 of my exploration of variables in QGIS 2.12, I’m going to dig into how variables are scoped in QGIS and what layer level variables are available (you can read parts 1 and 2 for a general introduction to variables).

Some background

Before we get to the good stuff, a bit of background in how variables work behind-the-scenes is important. Whenever an expression is evaluated in QGIS the context of the expression is considered. The context is built up from a set of scopes, which are all stacked on top of each other in order from least-specific to most-specific. It’s easier to explain with an example. Let’s take an expression used to set the source of a picture in a map composer. When this expression is evaluated, the context will consist of:

  1. The global scope, consisting of variables set in the QGIS options dialog, and other installation-wide properties
  2. The project scope, which includes variables set in the Project Properties dialog and the auto-generated project variables like @project_path, @project_title (you can read more about this in part 2)
  3. composer scope, with any variables set for the current composer, plus variables for @layout_pagewidth, @layout_pageheight, @layout_numpages, etc.
  4. composer item scope for the picture, with item-specific variables including @item_id

The more specific scopes will override any existing clashing variables from less specific scopes. So a global @my_var variable will be overridden by an @my_var variable set for the composer:

overridden

Another example. Let’s consider now an expression set for a data-defined label size. When this expression is evaluated the context will depend on where the map is being rendered. If it’s in the main map canvas then the context will be:

  1. The global scope
  2. The project scope
  3. map settings scope, with variables relating to how the map is being rendered. Eg @map_rotation, @map_scale, etc
  4. layer scope. More on this later, but the layer scope includes layer-level variables plus preset variables for @layer_name and @layer_id

If instead the map is being rendered inside a map item in a map composer, the context will be:

  1. The global scope
  2. The project scope
  3. The composer scope
  4. An atlas scope, if atlas is enabled. This contains variables like @atlas_pagename, @atlas_feature, @atlas_totalfeatures.
  5. composer item scope for the map item
  6. map settings scope (with scale and rotation determined by the map item’s settings)
  7. The layer scope

Using layer level variables

Ok, enough with the details. The reason I’ve explained all this is to help explain when layer level variables come into play. Basically, they’ll be available whenever an expression is evaluated inside of a particular layer. This includes data defined symbology and labeling, field calculator, and diagrams. You can’t use a layer-level variable inside a composer label, because there’s no layer scope used when evaluating this. Make sense? Great! To set a layer level variable, you use the Variables section in the Layer Properties dialog:

Setting a layer variablee

Setting a layer variable

Any layer level variables you set will be saved inside your current project, i.e. layer variables are per-layer and per-project. You can also see in the above screenshot that as well as the layer level variables QGIS also lists the existing variables from the Project and Global scopes. This helps show exactly what variables are accessible by the layer and whether they’ve been overridden by any scopes. You can also see that there’s two automatic variables, @layer_id and @layer_name, which contain the unique layer ID and user-set layer name too.

Potential use cases for layer-level variables

In the screenshot above I’ve set two variables, @class1_threshold and @class2_threshold. I’m going to use these to sync up some manual class breaks between rule based symbology and rule based labeling. Here’s how I’ve set up the rule-based symbols for the layer:

Rule based symbology using layer level variables

Rule based symbology using layer level variables

In a similar way, I’ve also created matching rule-based labeling (another new feature in QGIS 2.12):

Matching rule-based labels

Matching rule-based labels

Here’s what my map looks like now, with label and symbol colors matched:

*Map for illustrative purposes only... not for cartographic/visual design excellence!

*Map for illustrative purposes only… not for cartographic/visual design excellence!

If I’d hard-coded the manual class breaks, it would be a pain to keep the labeling and symbology in sync. I’d have to make sure that the breaks are updated everywhere I’ve used them in both the symbology and labeling settings. Aside from being boring, tedious work, this would also prevent immediate before/after comparisons. Using variables instead means that I can update the break value in a single place (the variables panel) and have all my labeling and symbols immediately reflect this change when I hit apply!

Another recent use case I had was teaming layer-level variables along with Time Manager. I wanted my points to falloff in both transparency and size with age, and this involved data defined symbol settings scattered all throughout my layer symbology. By storing the decay fall-off rate in a variable, I could again tweak this falloff by changing the value in a single place and immediately see the result. It also helps with readability of the data defined expressions. Instead of trying to decipher a random, hard-coded value, it’s instead immediately obvious that this value relates to a decay fall-off rate. Much nicer!

I’m sure there’s going to be hundreds of novel uses of layer-level variables which I never planned for when adding this feature. I’d love to hear about them though – leave a comment if you’d like to share your ideas!

One last thing – the new “layer_property” function

This isn’t strictly related to variables, but another new feature which was introduced in QGIS 2.12 was a new “layer_property” expression function. This function allows you to retrieve any one of a bunch of properties relating to a specific map layer, including the layer CRS, metadata, source path, etc.

This function can be used anywhere in QGIS. For instance, it allows you to insert dynamic metadata about layers into a print composer layout. In the screenshot below I’ve used expressions like layer_property(‘patron’,’crs’) and layer_property(‘patron’,’source’) to insert the CRS and source path of the “patron” layer into the label. If either the CRS or the file path ever changes, this label will be automatically updated to reflect the new values.

Inserting dynamic layer properties into a composer label

Inserting dynamic layer properties into a composer label


So there you go – layer level variables and the layer_property function – here in QGIS 2.12 and making your workflow in QGIS easier. In the final part of this series, we’ll explore the magical @value variable. Trust me, I’ve saved the best for last!

Exploring variables in QGIS pt 2: project management

Following on from part 1 in which I introduced how variables can be used in map composers, I’d like to now explore how using variables can make it easier to manage your QGIS projects. As a quick refresher, variables are a new feature in QGIS 2.12 which allow you to create preset values for use anywhere you can use an expression in QGIS.

Let’s imagine a typical map project. You load up QGIS, throw a bunch of layers on your map, and then get stuck into styling and labelling them ‘just right’. Over time the project gets more and more complex, with a stack of layers all styled using different rendering and labelling rules. You keep tweaking settings until you’re almost happy with the result, but eventually realise that you made the wrong choice of font for the labelling and now need to go through all your layers and labelling rules and update each in turn to the new typeface. Ouch.

Variables to the rescue! As you may recall from part 1, you can reuse variables anywhere in QGIS where you can enter an expression. This includes using them for data defined overrides in symbology and labelling. So, lets imagine that way back at the beginning of our project we created a project level variable called @main_label_font:

Creating a variable for label font

Creating a variable for label font

Now, we can re-use that variable in a data defined override for the label font setting. In fact, QGIS makes this even easier for you by showing a “variables” sub-menu allowing easy access to all the currently defined variables accessible to the layer:

Binding the label font to the @main_label_font variable

Binding the label font to the @main_label_font variable


When we hit Apply all our labels will be updated to use the font face defined by the @main_label_font variable, so in this case ‘Courier New’:

courier_new

In a similar way we can bind all the other layer’s label fonts to the same variable, so @main_label_font will be reused by all the layers in the project. Then, when we later realise that Courier New was a horrible choice for labelling the map, it’s just a matter of opening up the Project Properties dialog and updating the value of the @main_label_font variable:

delicious

And now when we hit Apply the font for all our labelled layers will be updated all at once:

new_labels

It’s not only a huge time saver, it also makes changes like this easier because you can try out different font faces by updating the variable and hitting apply and seeing the effect that the changes have all at once. Updating multiple layers manually tends to have the consequence that you forget what the map looked like before you started making the change, making direct comparisons harder.

Of course, you could have multiple variables for other fonts used by your project too, eg @secondary_label_font and @highlighted_feature_font. Plus, this approach isn’t limited to just setting the label font. You could utilise project level variables for consolidating font sizes, symbol line thickness, marker rotation, in fact, ANYTHING that has one of those handy little data defined override buttons next to it:

See all those nice little yellow buttons? All those controls can be bound to variables...

See all those nice little yellow buttons? All those controls can be bound to variables…

One last thing before I wrap up part 2 of this series. The same underlying changes which introduced variables to QGIS also allows us to begin introducing a whole stack of new, useful functions to the expression engine. One of these which also helps with project management is the new project_color function. Just like how we can use project level variables throughout a project, project_color lets you reuse a color throughout your project. First, you need to create a named colour in the Default Styles group under the Project Properties dialog:

Define a colour in the project's colour scheme...

Define a colour in the project’s colour scheme…

Then, you can set a data defined override for a symbol or label colour to the expression “project_color(‘red alert!’)“:

bind_color

When you go back and change the corresponding colour in the Project Properties dialog, every symbol bound to this colour will also be updated!

blue_alert

So, there you have it. With a little bit of forward planning and by taking advantage of the power of expression variables in QGIS 2.12 you can help make your mapping projects much easier to manage and update!

That’s all for now, but we’re still only just getting started with variables. Part 3, coming soon!.. (Update: Part 3 is available now)


Exploring variables in QGIS 2.12, part 1

It’s been quite some time since I last had a chance to blog and a lot has happened since then. Not least of which is that QGIS 2.12 has now been released with a ton of new features that I’ve neglected to write about! To try and get things moving along here again I’m planning on writing a short series exploring how variables work in QGIS 2.12 and the exciting possibilities they unlock. First, let’s look into how variables can be used with QGIS map composer…

So, let’s get started! A new concept introduced in QGIS 2.12 is the ability to set custom variables for use in QGIS’ expression engine. The easiest way to do this is through the “Project Properties” dialog, under the “Variables” section:

Default project variables

Default project variables

You’ll see in the screenshot above that a blank project includes a number of read-only preset variables, such as @project_path and @project_title. (All variables in QGIS are prefixed with an @ character to differentiate them from fields or functions). You can add your own variables to this list by clicking the + button, as shown below:

Adding new variables to a project

Adding new variables to a project

Here I’ve added some new variables, @project_version and @author. Now, any of these variables can be used anywhere that you can use expressions in QGIS, including the field calculator, data defined symbology, labelling, map composer text, etc. So, you could make a map composer template with a label that includes the @author, @project_version and @project_path variables:

Variables in a composer label

Variables in a composer label

Sure, you *could* also manually enter all these details directly into the label for the same result. But what happens when you have multiple composers in your project, and need to update the version number in all of them? Or you move your project to a new folder and need to make sure the path is updated accordingly? Manually updating multiple composers is a pain – make QGIS do the work for you and instead use variables! This would especially be helpful if you’re saving map composer templates for use across multiple projects or users. Using variables will ensure that the template is automatically updated with the right details for the current project.

Another neat thing about QGIS variables is that they can be inherited and overridden, just like CSS rules. Opening the options dialog will also show a Variables group for setting “Global” variables. These variables are always available for your QGIS installation, regardless of what project you’re working on at the time. If your workplace tends to reorganise a lot and constantly shuffle your department around, you could add a global variable for @work_department, so that changing the global variable value in one place will automatically filter through to any existing and future projects you have.

Global variables

Global variables

And like I mentioned earlier, these variables are inherited through various “contexts” within QGIS. If I reopen the Project Properties dialog, you’ll see that a project has access to all the global variables plus the variables set within that specific project. In addition, by adding a variable with the same name to the Project variables the value of the Global variable will be overridden:

Overridden variables

Overridden variables

There’s also a variable editor within each individual composer’s properties tab, so variables can also be set and overridden on a composer-by-composer basis within a project. It’s a really flexible and powerful approach which both simplifies workflows and also opens up lots of new possibilities.

Stay tuned for more on this topic – this topic has only just scratched the surface of how expression variables have changed QGIS! (You can also read part 2 and part 3)

Recent labelling improvements in QGIS master

If you’re not like me and don’t keep a constant eye over at QGIS development change log (be careful – it’s addictive!), then you’re probably not aware of a bunch of labelling improvements which recently landed in QGIS master version. I’ve been working recently on a large project which involves a lot (>300) of atlas map outputs, and due to the size of this project it’s not feasible to manually tweak placements of labels. So, I’ve been totally at the mercy of QGIS’ labelling engine for automatic label placements. Generally it’s quite good but there were a few things missing which would help this project. Fortunately, due to the open-source nature of QGIS, I’ve been able to dig in and enhance the label engine to handle these requirements (insert rhetoric about beauty of open source here!). Let’s take a look at them one-by-one:

Data defined quadrant in “Around Point” placement mode

First up, it’s now possible to specify a data defined quadrant when a point label is set to the Around Point placement mode. In the past, you had a choice of either Around Point mode, in which QGIS automatically places labels around point features in order to maximise the number of labels shown, or the Offset from Point mode, in which all labels are placed at a specified position relative to the points (eg top-left). In Offset from Point mode you could use data defined properties to force labels for a feature to be placed at a specific relative position by binding the quadrant to a field in your data. This allowed you to manually tweak the placement for individual labels, but at the cost of every other label being forced to the same relative position. Now, you’ve also got the option to data define the relative position when in Around Point mode, so that the rest of the labels will fall back to being automatically placed. Here’s a quick example – I’ll start with a layer with labels in Around Point mode:

Around Point placement mode

Around Point placement mode

You can see that some labels are sitting to the top right of the points, others to the bottom right, and some in the top middle, in order to fit all the labels for these points. With this new option, I can setup a data defined quadrant for the labels, and then force the ‘Tottenham’ label (top left of the map) to display below and to the left of the point:

Setting a data-defined quadrant

Setting a data-defined quadrant

Here’s what the result looks like:

Manually setting the quadrant for the Tottenham label

Manually setting the quadrant for the Tottenham label

The majority of the labels are still auto-placed, but Tottenham is now force to the lower left corner.

Data defined label priority

Another often-requested feature which landed recently is the ability to set the priority for individual labels. QGIS has long had the ability to set the priority for an entire labelling layer, but you couldn’t control the priority of features within a layer. That would lead to situations like that shown below, where the most important central station (the green point) hasn’t been labelled:

What... no label for the largest station in Melbourne?

What… no label for the largest station in Melbourne?

By setting a data defined priority for labels, I can set the priority either via values manually entered in a field or by taking advantage of an existing “number of passengers” field present in my data. End result is that this central station is now prioritised over any others:

Much better! (in case you're wondering... I've manually forced some other non-optimal placement settings for illustrative purposes!)

Much better! (in case you’re wondering… I’ve manually forced some other non-optimal placement settings for illustrative purposes!)

Obstacle only layers

The third new labelling feature is the option for “Obstacle only” layers. What this option does is allow a non-labelled layer to act as an obstacle for the labels in other layers, so they will be discouraged from drawing labels over the features in the obstacle layer. Again, it’s best demonstrated with an example. Here’s my stations layer with labels placed automatically – you can see that some labels are placed right over the features in the rail lines layer:

Labels over rail lines...

Labels over rail lines…

Now, let’s set the rail lines layer to act as an obstacle for other labels:

... setting the layer as an obstacle...

… setting the layer as an obstacle…

The result is that labels will be placed so that they don’t cover the rail lines anymore! (Unless there’s no other choice). Much nicer.

No more clashing labels!

No more clashing labels!

Control over how polygons act as obstacles for labels

This change is something I’m really pleased about. It’s only applicable for certain situations, but when it works the improvements are dramatic.

Let’s start with my labelled stations map, this time with an administrative boundary layer in the background:

Stations with administrative boundaries

Stations with administrative boundaries

Notice anything wrong with this map? If you’re like me, you won’t be able to look past those labels which cross over the admin borders. Yuck. What’s happening here is that although my administrative regions layer is set to discourage labels being placed over features, there’s actually nowhere that labels can possibly be placed which will avoid this. The admin layer covers the entire map, so regardless of where the labels are placed they will always cover an administrative polygon feature. This is where the new option to control how polygon layers act as obstacles comes to the rescue:

...change a quick setting...

…change a quick setting…

Now, I can set the administrative layer to only avoid placing labels over feature’s boundaries! I don’t care that they’ll still be placed inside the features (since we have no choice!), but I don’t want them sitting on top of these boundaries. The result is a big improvement:

Much better!

Much better!

Now, QGIS has avoided placing labels over the boundaries between regions. Better auto-placement of labels like this means much less time required manually tweaking their positioning, and that’s always a good thing!

Draw only labels which fit inside a polygon

The last change is fairly self explanatory, so no nice screenshots here. QGIS now has the ability to prevent drawing labels which are too large to fit inside their corresponding polygon features. Again, in certain circumstances this can make a huge cartographic improvement to your map.

So there you go. Lots of new labelling goodies to look forward to when QGIS 2.12 rolls around.


  • Page 1 of 1 ( 8 posts )
  • 2.12

Back to Top

Sustaining Members