Related Plugins and Tags

QGIS Planet

A interactive command bar for QGIS

Something that has been on my mind for a long time is a interactive command interface for QGIS.  Something that you can easily open, run simple commands, and is interactive to ask for arguments when they are needed.

After using the command interface in Emacs for a little bit over the weekend – you can almost hear the Boos! from heavy Vim users :) – I thought this is something I must have in QGIS as well.  I’m sure it can’t be that hard to add.

So here it is.  A interactive command interface for QGIS.

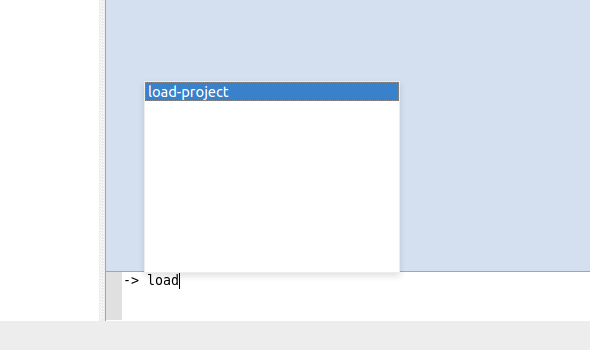
commandbar

commandbar2

The command bar plugin (find it in the plugin installer) adds a simple interactive command bar to QGIS. Commands are defined as Python code and may take arguments.

Here is an example function:

@command.command("Name")
def load_project(name):
    """
    Load a project from the set project paths
    """
    _name = name
    name += ".qgs"
    for path in project_paths:
        for root, dirs, files in os.walk(path):
            if name in files:
                path = os.path.join(root, name)
                iface.addProject(path)
                return
    iface.addProject(_name)

All functions are interactive and if not all arguments are given when called it will prompt for each one.

Here is an example of calling the point-at function with no args. It will ask for the x and then the y

pointat

Here is calling point-at with all the args

pointatfunc

Functions can be called in the command bar like so:

my-function arg1 arg2 arg2

The command bar will split the line based on space and the first argument is always the function name, the rest are arguments passed to the function. You will also note that it will convert _ to - which is easier to type and looks nicer.

The command bar also has auto complete for defined functions – and tooltips once I get that to work correctly.

You can use CTRL + ; (CTRL + Semicolon), or CTRL + ,, to open and close the command bar.

What is a command interface without auto complete

autocomplete

Use Enter to select the item in the list.

How about a function to hide all the dock panels. Sure why not.

@command.command()
def hide_docks():
    docks = iface.mainWindow().findChildren(QDockWidget)
    for dock in docks:
        dock.setVisible(False)

alias command

You can also alias a function by calling the alias function in the command bar.

The alias command format is alias {name} {function} {args}

Here is an example of predefining the x for point-at as mypoint

-> alias mypoint point-at 100

point-at is a built in function that creates a point at x y however we can alias it so that it will be pre-called with the x argument set. Now when we call mypoint we only have to pass the y each time.

-> mypoint
(point-at) What is the Y?: 200

You can even alias the alias command – because why the heck not :)

-> alias a alias
a mypoint 100

a is now the shortcut hand for alias

WHY U NO USE PYTHON CONSOLE

The Python console is fine and dandy but we are not going for a full programming language here, that isn’t the point. The point is easy to use commands.

You could have a function called point_at in Python that would be

point_at(123,1331)

Handling incomplete functions is a lot harder because of the Python parser. In the end it’s easier and better IMO to just make a simple DSL for this and get all the power of a DSL then try and fit into Python.

It should also be noted that the commands defined in the plugin can still be called like normal Python functions because there is no magic there. The command bar is just a DSL wrapper around them.

Notes

This is still a bit of an experiment for me so things might change or things might not work as full expected just yet.

Check out the projects readme for more info on things that need to be done, open to suggestions and pull requests.

Also see the docs page for more in depth information


Filed under: Open Source, python, qgis Tagged: plugin, pyqgis, qgis

The PyQGIS Programmer's Guide

The PyQGIS Programmer's Guide is now available in both paperback and PDF. A sample chapter is also available for download.

The book is fully compatible with the QGIS 2.x series of releases.

QGIS Development with Plugin Builder and pb_tool

The Plugin Builder is a great tool for generating a working plugin project that you can customize.

One of the main tasks in the development cycle is deploying the plugin to the QGIS plugin directory for testing. Plugin Builder comes with a Makefile that can be used on Linux and OS X to aid in development. Depending on your configuration, the Makefile may work on Windows.

To help in managing development of your projects, we've come up with another option---a Python tool called pb_tool, which works anywhere QGIS runs.

Here's what it provides:

Usage: pb_tool [OPTIONS] COMMAND [ARGS]...

  Simple Python tool to compile and deploy a QGIS plugin. For help on a
  command use --help after the command: pb_tool deploy --help.

  pb_tool requires a configuration file (default: pb_tool.cfg) that declares
  the files and resources used in your plugin. Plugin Builder 2.6.0 creates
  a config file when you generate a new plugin template.

  See http://g-sherman.github.io/plugin_build_tool for for an example config
  file. You can also use the create command to generate a best-guess config
  file for an existing project, then tweak as needed.

Options:
  --help  Show this message and exit.

Commands:
  clean       Remove compiled resource and ui files
  clean_docs  Remove the built HTML help files from the...
  compile     Compile the resource and ui files
  create      Create a config file based on source files in...
  dclean      Remove the deployed plugin from the...
  deploy      Deploy the plugin to QGIS plugin directory...
  doc         Build HTML version of the help files using...
  list        List the contents of the configuration file
  translate   Build translations using lrelease.
  validate    Check the pb_tool.cfg file for mandatory...
  version     Return the version of pb_tool and exit
  zip         Package the plugin into a zip file suitable...

In the command summary, a description ending in ... means there is more to see using the help switch:

 pb_tool zip --help
Usage: pb_tool zip [OPTIONS]

  Package the plugin into a zip file suitable for uploading to the QGIS
  plugin repository

Options:
  --config TEXT  Name of the config file to use if other than pb_tool.cfg
  --help         Show this message and exit.

The Configuration File

pb_tool relies on a configuration file to do its work. Here's a sample pb_tool.cfg file:

# Configuration file for plugin builder tool
# Sane defaults for your plugin generated by the Plugin Builder are
# already set below.
#
[plugin]
# Name of the plugin. This is the name of the directory that will
# be created in .qgis2/python/plugins
name: TestPlugin

[files]
# Python  files that should be deployed with the plugin
python_files: __init__.py test_plugin.py test_plugin_dialog.py

# The main dialog file that is loaded (not compiled)
main_dialog: test_plugin_dialog_base.ui

# Other ui files for dialogs you create (these will be compiled)
compiled_ui_files: foo.ui

# Resource file(s) that will be compiled
resource_files: resources.qrc

# Other files required for the plugin
extras: icon.png metadata.txt

# Other directories to be deployed with the plugin.
# These must be subdirectories under the plugin directory
extra_dirs:

# ISO code(s) for any locales (translations), separated by spaces.
# Corresponding .ts files must exist in the i18n directory
locales: af

[help]
# the built help directory that should be deployed with the plugin
dir: help/build/html
# the name of the directory to target in the deployed plugin
target: help

The configuration file is pretty much self-explanatory and represents that generated by Plugin Builder 2.6 for a new plugin. As you develop your code, you simply add the file names to the appropriate sections.

Plugin Builder 2.6 will be available the week of the QGIS 2.6 release. In the meantime, you can use pb_tool create to create a config file. See the pb_tool website for more information.

Deploying

Here's what a deployment looks like with pb_tool:

$ pb_tool deploy
Deploying will:
            * Remove your currently deployed version
            * Compile the ui and resource files
            * Build the help docs
            * Copy everything to your .qgis2/python/plugins directory

Proceed? [y/N]: y
Removing plugin from /Users/gsherman/.qgis2/python/plugins/TestPlugin
Deploying to /Users/gsherman/.qgis2/python/plugins/TestPlugin
Compiling to make sure install is clean
Skipping foo.ui (unchanged)
Compiled 0 UI files
Skipping resources.qrc (unchanged)
Compiled 0 resource files
Building the help documentation
sphinx-build -b html -d build/doctrees   source build/html
Running Sphinx v1.2b1
loading pickled environment... done
building [html]: targets for 0 source files that are out of date
updating environment: 0 added, 0 changed, 0 removed
looking for now-outdated files... none found
no targets are out of date.

Build finished. The HTML pages are in build/html.
Copying __init__.py
Copying test_plugin.py
Copying test_plugin_dialog.py
Copying test_plugin_dialog_base.ui
Copying foo.py
Copying resources_rc.py
Copying icon.png
Copying metadata.txt
Copying help/build/html to /Users/gsherman/.qgis2/python/plugins/TestPlugin/help

Getting Started

For details on installing and using pb_tool, see: http://g-sherman.github.io/pluginbuildtool

Game of Life – Raster edition

You probably remember my Game of Life posts from last year: Experiments with Conway’s Game of Life & More experiments with Game of Life where I developed a vector-based version of GoL.

Richard Wen and Claus Rinner at Ryerson University now published a raster-based version.

Here’s a screenshot of the script in action:

Screenshot 2015-03-08 20.04.07

The code is hosted on Github and I’m sure there will be many other ideas which can build on code snippets to read and write raster cell values.

For more info, please visit the GIS at Ryerson blog.


More experiments with Game of Life

As promised in my recent post “Experiments with Conway’s Game of Life”, I have been been looking into how to improve my first implementation. The new version which you can now find on Github is fully contained in one Python script which runs in the QGIS console. Additionally, the repository contains a CSV with the grid definition for a Gosper glider gun and the layer style QML.

Rather than creating a new Shapefile for each iteration like in the first implementation, this script uses memory layers to save the game status.

You can see it all in action in the following video:

(video available in HD)

Thanks a lot to Nathan Woodrow for the support in getting the animation running!

Sometimes there are still hick-ups causing steps to be skipped but overall it is running nicely now. Another approach would be to change the layer attributes rather than creating more and more layers but I like to be able to go through all the resulting layers after they have been computed.


Experiments with Conway’s Game of Life

This experiment is motivated by a discussion I had with Dr. Claus Rinner about introducing students to GIS concepts using Conway’s Game of Life. Conway’s Game of Life is a popular example to demonstrate cellular automata. Based on an input grid of “alive” and “dead” cells, new cell values are computed on each iteration based on four simple rules for the cell and its 8 neighbors:

  1. Any live cell with fewer than two live neighbours dies, as if caused by under-population.
  2. Any live cell with two or three live neighbours lives on to the next generation.
  3. Any live cell with more than three live neighbours dies, as if by overcrowding.
  4. Any dead cell with exactly three live neighbours becomes a live cell, as if by reproduction.

(Source: Wikipedia – Conway’s Game of Life)

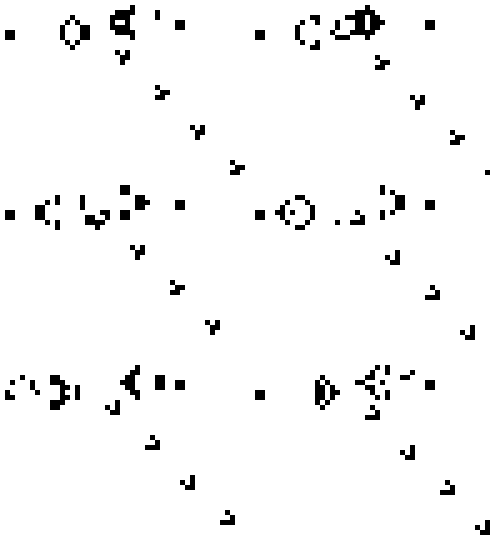
Based on these simple rules, effects like the following “glider gun” can be achieved:

Gospers glider gun.gif
Gospers glider gun” by KieffOwn work. Licensed under CC BY-SA 3.0 via Wikimedia Commons.

There are some Game of Life implementations for GIS out there, e.g. scripts for ArcGIS or a module for SAGA. Both of these examples are raster-based. Since I couldn’t find any examples of raster manipulation like this in pyQGIS, I decided to instead implement a vector version: a Processing script which receives an input grid of cells and outputs the next iteration based on the rules of Game of Life. In the following screencast, you can see the Processing script being called repeatedly by a script from the Python console:

So far, it’s a quick and dirty first implementation. To make it more smooth, I’m considering adding spatial indexing and using memory layers instead of having Processing create a bunch of Shapefiles.

It would also be interesting to see a raster version done in PyQGIS. Please leave a comment if you have any ideas how this could be achieved.


Two book recommendations

I recently finished reading two books which may be of interest to open-source GIS users – “PostGIS Cookbook” and “The PyQGIS Programmer’s Guide“, both of which I highly recommend:

PostGIS Cookbook

PostGIS CookbookI’ve been a fan of Stephen Mather’s blog for a while now, and have consistently found it to be a great source of trustworthy information and creative solutions to GIS problems. So when I first saw mention of his work on the PostGIS Cookbook I knew it would be a must-read for me. PostGIS is an essential part of my daily toolkit, and I’ll quickly devour any tutorial or guide which can lead me to better ways to put it to use. And that’s exactly what this book is! It’s full of tips and guides which has inspired me in a lot of techniques I’d never tried or even thought possible in PostGIS.

It’s important to point out that this book isn’t a training manual or beginner’s guide to PostGIS. It assumes readers are already familiar with using PostGIS and have a good understanding of GIS software in general. (If you’re looking for a book to start from scratch with PostGIS, PostGIS in Action is a better fit). I think that’s really what makes this book stand out though. There’s currently not a lot of books available covering PostGIS, and as far as I’m aware the PostGIS Cookbook is the only book available which is targeted to experienced PostGIS users.

Highlights for me are:

  • A great explanation and write up on optimised KNN filtering in PostGIS (something which often trips me up)
  • The detailed guide to topologically correct simplification of features
  • The exploration of PgRouting, which is a great introduction to PostGIS’ routing abilities
  • The “PostGIS and the web” chapter – I really wasn’t expecting this, but it’s quite eye opening (I’m going to have to do some digging into GeoDjango sometime)

The only criticism I have with this book is that it jumps around a lot between operating systems. While most of the code is provided for both Linux/OSX and Windows, there’s occasional examples which only have code for one specific operating system. It’s a little jarring and assumes the user is well versed in their particular operating system to workaround these omissions.

Overall, I strongly recommend the PostGIS Cookbook, and would consider it a must have for anyone serious about expanding their PostGIS abilities. (Also, looks like the publisher, Packt, have a two-for-one sale going at the moment, so it’s a good time to grab this title).

The PyQGIS Programmer’s Guide

The PyQGIS Programmer's GuideThe second book I’ve just finished reading is Gary Sherman’s “The PyQGIS Programmer’s Guide“. For those who are unaware, Gary was the original founder of QGIS back in 2002, so you can be confident that he knows exactly what he’s writing about. In The PyQGIS Programmer’s Guide  Gary has created an in-depth guide on how to get started with programming for QGIS using python. It takes readers all the way from simple scripts right through to developing QGIS plugins and standalone applications based on the QGIS API.

This book fills an important void in the literature available for QGIS. Previously, the PyQGIS Developer Cookbook was the only available guide for QGIS python scripting, and unfortunately it’s a little out-of-date now. PyQGIS scripting can be a steep learning curve and that’s why this book is so appreciated.

It would be valuable to have some python knowledge and experience prior to reading this book. While the “Python Basics” chapter quickly runs through an introduction to the language, the book makes no claims to be a comprehensive python tutorial. But if you’ve dabbled in the language before and have familiarity with the python way of doing things you’ll easily be able to follow along.

Highlights are:

  • The “Tips and Techniques” chapter, which is a great mini-reference for performing a range of common tasks in PyQGIS (including loading layers, changing symbol styles, editing feature attributes, etc).
  • A complete tutorial for creating a QGIS plugin
  • A guide to debugging PyQGIS code and plugins

I’d definitely recommend that anyone who wants to get started with PyQGIS start with Gary’s work – you’ll find it the perfect place to begin.

A routing script for the Processing toolbox

Did you know that there is a network analysis library in QGIS core? It’s well hidden so far, but at least it’s documented in the PyQGIS Cookbook. The code samples from the cookbook can be used in the QGIS Python console and you can play around to get a grip of what the different steps are doing.

As a first exercise, I’ve decided to write a Processing script which will use the network analysis library to create a network-based route layer from a point layer input. You can find the result on Github.

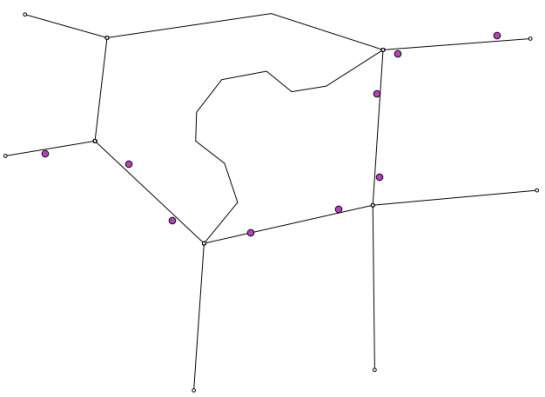
You can get a Spatialite file with testdata from Github as well. It contains a network and a routepoints1 layer:

points_to_route1

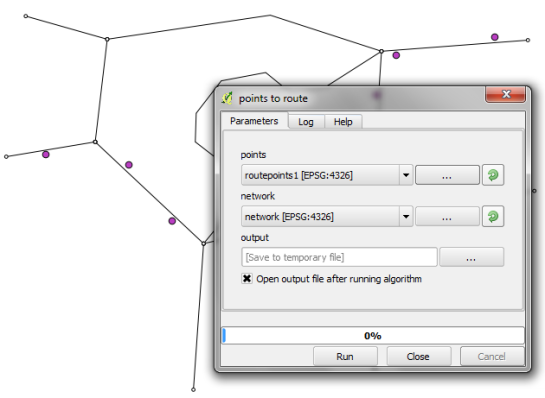
The interface of the points_to_route tool is very simple. All it needs as an input is information about which layer should be used as a network and which layer contains the route points:

points_to_route0

The input points are considered to be ordered. The tool always routes between consecutive points.

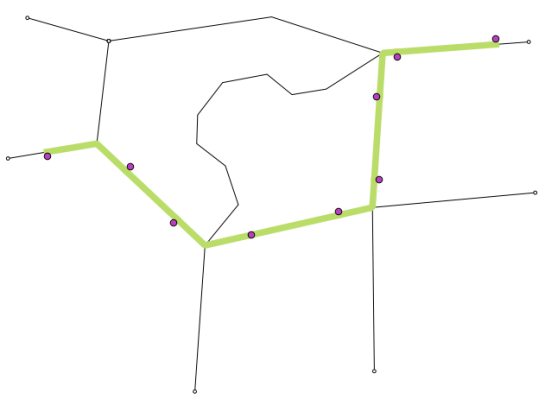
The result is a line layer with one line feature for each point pair:

points_to_route2

The network analysis library is a really great new feature and I hope we will see a lot of tools built on top of it.


Generating chainage (distance) nodes in QGIS

Something that I need to do now and then is generate points along a line at supplied distance.  I had never really looked into doing it in QGIS until this question poped up on gis.stackexchange.com.  This is a quick blog post because I thought it was a pretty handy little thing to do.

In the development version there is a new method on QgsGeometry called interpolate. This method takes a distance and returns a point along a line at that distance. Perfect! We can then just wrap this in a loop and generate a point increasing the distance as we move along

from qgis.core import (QgsFeature, QgsGeometry,
                       QgsVectorLayer, QgsMapLayerRegistry,
                       QgsField)
from PyQt4.QtCore import QVariant
from qgis.utils import iface

def createPointsAt(distance, geom):
    length = geom.length()
    currentdistance = distance
    feats = []

    while currentdistance < length:
        # Get a point along the line at the current distance
        point = geom.interpolate(currentdistance)
        # Create a new QgsFeature and assign it the new geometry
        fet = QgsFeature()
        fet.setAttributeMap( { 0 : currentdistance } )
        fet.setGeometry(point)
        feats.append(fet)
        # Increase the distance
        currentdistance = currentdistance + distance

    return feats

def pointsAlongLine(distance):
    # Create a new memory layer and add a distance attribute
    vl = QgsVectorLayer("Point", "distance nodes", "memory")
    pr = vl.dataProvider()
    pr.addAttributes( [ QgsField("distance", QVariant.Int) ] )
    layer = iface.mapCanvas().currentLayer()
    # Loop though all the selected features
    for feature in layer.selectedFeatures():
        geom = feature.geometry()
        features = createPointsAt(distance, geom)
        pr.addFeatures(features)
        vl.updateExtents()

    QgsMapLayerRegistry.instance().addMapLayer(vl)

The above code might look a bit scary at first if you have never done any Python/pyqgis but hopefully the comments will ease the pain a little. The main bit is the createPointsAt function.

Cool! If we want to use this we can just stick it in a file in the .qgis/python folder (lets call it pointtools.py) and then run import pointtools in the python console.

So lets have a go. First select some objects then run the following in the Python Console

import pointtools
pointtools.pointsAlongLine(40)

That will generate a point every 40 meters along then selected lines

Distance nodes along line in qgis-dev

To generate nodes along different lines, select the new features, then call pointtools.pointsAlongLine(40) in the Python console.

Simple as that!

(Who knows, someone (maybe me) might even add this as a core object function in QGIS in the future)


Filed under: Open Source, qgis Tagged: language python, Open Source, osgeo, pyqgis, python, qgis, qgis-tips, Quantum GIS, tips

How to Install Sphinx

This post summarizes how to install sphinx on Windows to contribute to PyQGIS Cookbook. I’m writing this as I go, so this most likely won’t be perfect.

I used my Python 2.6 stand-alone installation (not the one in OSGeo4W).

  1. Get the Sphinx egg from http://pypi.python.org/pypi/Sphinx
  2. If you don’t have it, install setuptools to get the easy_install script http://pypi.python.org/pypi/setuptools
  3. In C:\Python26\Scripts run easy_install -U sphinx
  4. Get the PyQGIS source from https://github.com/qgis/QGIS-Developer-Cookbook
  5. Create a build folder inside the QGIS-Developer-Cookbook
  6. Now you can build the Cookbook: sphinx-build "C:\Users\Anita\QGIS\QGIS-Developer-Cookbook\source" "C:\Users\Anita\QGIS\QGIS-Developer-Cookbook\build"

The build folder should now contain the Cookbook .html files.


How to Add a Legend to Your PyQGIS Application

In his post “Layer list widget for PyQGIS applications”, German Carrillo describes how to add a legend to your own PyQGIS application. You get to download the source code for the legend widget to include into your project.


  • <<
  • Page 2 of 2 ( 31 posts )
  • pyqgis

Back to Top

Sustaining Members