


Waiting for QGIS 2.2 – Gradient Fills
One of the big features I worked on for QGIS 2.2 is gradient fill symbols for polygons. In my view QGIS’ symbol support is one of its biggest strengths — the versatility of its symbol layers coupled with the powerful data defined properties support allows for so many effects which just aren’t possible in other GIS packages. Gradient fill support is a nice addition to these features and should help make QGIS even more attractive to cartographers. In this post I’m going to give a quick run through of how gradient fills work in QGIS, and some of the options available for tweaking them.
Gradient fills are enabled through the Style tab in the properties for a vector layer. The default fill for a polygon in QGIS is “Simple fill”, so to switch a layer to a gradient fill you first need to select the “Simple fill” layer, then change the “Symbol layer type” dropdown to “Gradient fill”:

As you can see, there’s a lot of options in QGIS which can be tweaked for gradient fills. I’ll run through each of them now and explain a little bit about how each one can be used.
Colour modes
QGIS supports two different types of colour modes for gradient fills. The first is a simple “Two color” gradient, where the colour smoothly blends from the first colour to the second. The second mode, “Color ramp” allows you to use any of the standard or user-defined QGIS colour ramps, which can consist of multiple colour stops:

Colour options in gradient fills
So, when would you use these options? Well, any time you need more than two colours or need to tweak the position of any of the colours in the gradient you’ll have to use a colour ramp. If instead you’re just wanting a quick-and-easy gradient then the two colour option might be more suitable.
One last important distinction is that the colours in a two colour gradient can be set using a data defined expression:

Data defined gradient colours. Please try to use them more tastefully then this!
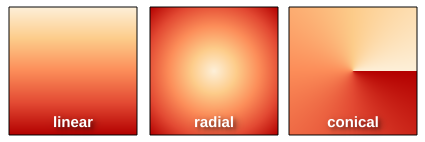
Gradient types
The next option for gradient fills is rather self-explanatory: gradient types. QGIS supports linear, radial and conical gradients:
Coordinate modes
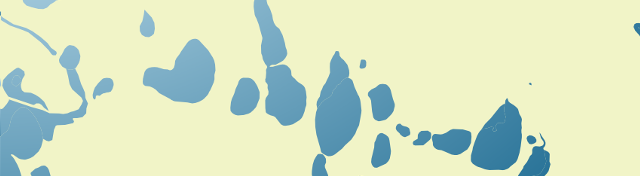
The coordinate mode option is a little trickier to explain. The default setting, “Object“, will cause the gradient to be drawn entirely within each separate feature. You can see in the example below that every lake feature is coloured with a gradient which starts with light blue in the top left and darkens to a deeper blue in the bottom right. This gradient fill is repeated for all the lake features:

The “Object” coordinate mode for gradient fills
In contrast, the “Viewport” coordinate mode causes the gradient to be drawn across the entire current view of the map. So only the lakes in the top left of the map are drawn with the light blue colour, and the lakes in the bottom right with the deeper blue:
The “Viewport” coordinate mode for gradient fills
The choice of coordinate mode will depend entirely on your cartographic desires for your map!
Reference points
QGIS gradient fills allow the setting of two “reference points“. These points control where the gradient fill begins and ends. It’s easiest to visualise how these work by imagining a square defined by the points (0, 0) in the top left and (1, 1) in the bottom right. The two reference points fall somewhere within this square. So, the default reference points of (0.5, 0) and (0.5, 1.0) represent points mid way along the top edge and and the bottom edge, respectively.
Now imagine that this square forms the bounding box for the feature being drawn (or the current map window, if in “viewport” coordinate mode). The default reference points mean that the gradient will be drawn from the middle of the top edge to middle of the bottom edge of the feature. Reference points of (0, 0) and (1, 1) would mean the gradient is drawn from the top-left to the bottom-right. Similarly, reference points of (0.5, 0.5) to (1.0, 1.0) would draw a gradient from the middle of the feature to the bottom right (good for radial gradients).
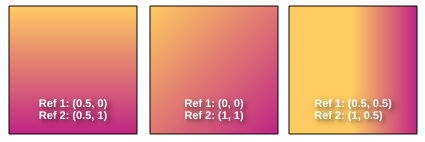
There’s also the option to set either of the reference points as the feature centroid, which again can come in handy for radial or conical gradient types.
Gradient spread
If you’ve got your head around the reference points concept, then the next setting for gradient fills affects how the gradients spread. This takes effect whenever a gradient starts or ends before the bounds of the feature. The default setting of “pad” means that the gradient will simple “pad” out any extra space with the start or end gradient colour:

“Pad” spread – notice how the darker blue is stretched across the right side of each feature
“Repeat” mode will tile the gradient across the feature:

“Repeat” spread
Finally, “reflect” mode will draw a reflected version of the gradient to fill up any extra space:

“Reflect” spread
Angle
Last of all, there’s a simple “angle” parameter, which allows you to rotate the entire gradient fill. This option is included mostly for use with data defined symbols, since a similar effect can be achieved by changing the gradient reference points. Amongst other effects, this is useful for achieving a “sun glint” on water, where each gradient is drawn in a random direction (more on this in a later blog post):

Random data defined gradient angles
This leads me into my final note… all of these properties can be data defined! So you could have a column in your data controlling whether each feature is drawn with a radial or linear gradient, or whether the gradient in a given feature should be drawn at a specific angle, or that the gradient in a feature should start at the centroid and end at the top right of the feature!
I’m excited to see what the QGIS user community is able to create using this new gradient fill feature when 2.2 is released. If you’ve already had a chance to play with the dev version of 2.2 and have something to show off, make sure you submit your map to the Flickr QGIS Map Showcase!
