Related Plugins and Tags

QGIS Planet

Quick webmaps with qgis2web

In Publishing interactive web maps using QGIS, I presented two plugins for exporting web maps from QGIS. Today, I want to add an new member to this family: the qgis2web plugin is the successor of qgis-ol3 and combines exports to both OpenLayers3 as well as Leaflet.

The plugin is under active development and currently not all features are supported for both OpenLayers3 and Leaflet, but it’s a very convenient way to kick-off a quick webmapping project.

Here’s an example of an OpenLayers3 preview with enabled popups:

OpenLayers3 preview

OpenLayers3 preview

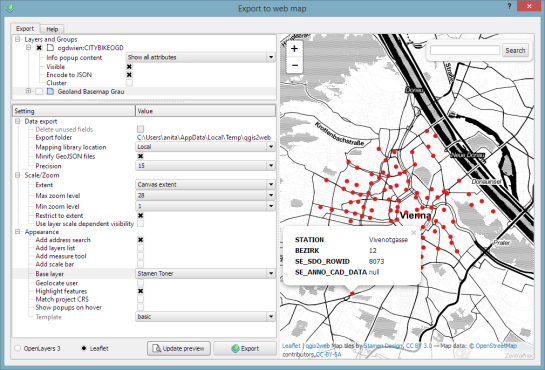
And here is the same map in Leaflet with the added bonus of a nice address search bar which can be added automatically as well:

Leaflet preview

Leaflet preview

The workflow is really straight forward: select the desired layers and popup settings, pick some appearance extras, and then don’t forget to hit the Update preview button otherwise you might be wondering why nothing happens ;)

I’ll continue testing these plugins and am looking forward to seeing what features the future will bring.


QGIS Server on Ubuntu Step-by-step

This post summarizes my notes about installing QGIS Server on Ubuntu, adding a QGIS project file to the server and using the WMS in an OpenLayers application.

Installation

First, it’s useful to figure out the Ubuntu version:

lsb_release -a

Since my server runs “lucid”, I add the following package sources to /etc/apt/sources.list (as described in the QGIS installation documentation)

deb http://qgis.org/debian lucid main
deb-src http://qgis.org/debian lucid main

Before we can install anything, we need to add the key and update the package list

gpg --keyserver keyserver.ubuntu.com --recv 1F9ADD375CA44993
gpg --export --armor 1F9ADD375CA44993 | sudo apt-key add -
sudo apt-get update

Now we can install QGIS Server and the necessary Apache package

sudo apt-get install qgis-mapserver libapache2-mod-fcgid

It never hurts to restart Apache :)

sudo /etc/init.d/apache2 restart

Let’s test the installation before we proceed. The GetCapabilities request should already work

http://10.101.21.28/cgi-bin/qgis_mapserv.fcgi?SERVICE=WMS&VERSION=1.3.0&REQUEST=GetCapabilities

Adding a QGIS project file

It’s time to add a QGIS project to our server. To do that, we move to the QGIS Server folder

cd /usr/lib/cgi-bin

where you should find qgis_mapserv.fcgi and wms_metadata.xml.
I’ve decided to have one folder for each project file. My first project is “vienna”.

sudo mkdir vienna
cd vienna

qgis_mapserv.fcgi and wms_metadata.xml can now be linked into this new folder

sudo ln -s ../qgis_mapserv.fcgi .
sudo ln -s ../wms_metadata.xml .

The only thing that’s missing anymore is a QGIS project file. It can be copied or linked into the folder. After restarting Apache, we should be good to go.

Let’s test the setup using “Add WMS Layer” in QGIS by adding the service URL such as

http://10.101.21.28/cgi-bin/vienna/qgis_mapserv.fcgi

and ticking “Ignore GetMap URI …” and “Ignore GetFeature URI …”.

After clicking “Connect”, all layers from the project file we added should get listed and we can select and load them.

QGIS Server can serve as many project files as you want. There a different ways to organize your server but I would simply add a new folder (like the “vienna” folder in this example) and link in the executable and project file.

Using QGIS Server WMS in OpenLayers

Of course QGIS Server doesn’t just talk to QGIS Desktop but to any other WMS client that conforms to the standard. One classic use case is to add the WMS layers to an OpenLayers application. This is rather simple but I’ll add it here for the sake of completeness:

I used to have a Geoserver WMS base layer in my application. The only lines of code that needed to be changed to migrate to QGIS Server were the service URL and the layer names.

    wms = new OpenLayers.Layer.WMS(
        'roads', "http://10.101.21.28/cgi-bin/vienna/qgis_mapserv.fcgi",
        {
            layers: 'roads', 
            format: 'image/png';
            bgcolor: '#fafafa'
        }, 
        {
            buffer: 1, 
            isBaseLayer: true, 
            graphicZIndex: 0, 
        }
    );

Standardized services are great!


Custom styles for Google Maps in OpenLayers

Recently, @simo has posted an elegant solution for defining custom styles for Google Maps layers in OpenLayers on gis.stackexchange. An example with source can be found at http://www.empreinte-urbaine.eu/mapping/styled_gmap.html. The idea seems to be to use a StyledMapType:

The StyledMapType allows you to customize the presentation of the standard Google base maps, changing the visual display of such elements as roads, parks, and built-up areas to reflect a different style than that used in the default map type.

How great would it be if it was possible to define such styles in QGIS OpenLayers plugin too!


Picking a Feature’s Attribute Value From a WMS Layer With OpenLayers

There are many nice examples out there of how to use a getFeatureInfo request in OpenLayers to display a feature’s attribute table. In some applications it can be useful though not to display the full attribute table but to only select one attribute value from it and output it somewhere, e.g. in a text field.

This post describes how to pick the road id from a road wms layer and write the id value into a text input field.

OpenLayers offers a convenient class to achieve this: OpenLayers.Control.WMSGetFeatureInfo.

Let’s create an object of this class, register and activate it:

roadidPicker = new OpenLayers.Control.WMSGetFeatureInfo({
                url: 'http://localhost:8080/geoserver/wms',
                title: 'identify features on click',
                layers: [wms],
                queryVisible: true
            });
roadidPicker.infoFormat = 'application/vnd.ogc.gml';
roadidPicker.events.register("getfeatureinfo", this, pickRoadid);
map.addControl(roadidPicker);
roadidPicker.activate();

Now, every time the user clicks onto the map, a getFeatureInfo request is issued and the function pickRoadid() is called. In pickRoadid(), we’ll define which value we want to pick from the feature. The ‘id’ of the feature will be written into a text input field called ‘roadId’:

function pickRoadid(e) {
  if (e.features && e.features.length) {
     var val = e.features[0].attributes.id;
     document.getElementById('roadId').value = val;
  }
}

You might have noticed the ‘[0]‘. That’s because the click event comes with a list of features within the reach of the mouse click. For my application, I can only use one value and the first feature in this list is as good as any.


Back to Top

Sustaining Members