Related Plugins and Tags

QGIS Planet

Accessing composer item properties via custom expressions in QGIS

So here is a neat trick. Lets say you wanted to access the scale of a composer map to make it part of a label. The scale bar can already be set to numeric to show the number value but what if it needs to be part of an existing label with other text. Not to fear, expression functions are here.

  • Create a new composer. Add the map frame and a label.
  • Set the item ID of the map frame to something you can remember, lets just use themap
  • Select the label and add some text
  • Click Insert Expression

Now for the cool part

  • Select Function Editor
  • Click New File. Give the file a new name and hit save. I called it composer functions.

In the code editor paste this code:

from qgis.utils import iface
from qgis.core import *
from qgis.gui import *

@qgsfunction(args="auto", group='Composer')
def composeritemattr(composername, mapname, attrname, feature, parent):
    composers = iface.activeComposers()
    # Find the composer with the given name
    comp = [composer.composition() for composer in composers 
                if composer.composerWindow().windowTitle() == composername][0]
    # Find the item
    item = comp.getComposerItemById(mapname)
    # Get the attr by name and call 
    return getattr(item, attrname)()
  • Click Run Script

run

Now in your label use this text:

Scale: [% composeritemattr('Composer 1', 'themap', 'scale')%]

Update the Composer 1 to match your composer name, and the themap to match your item ID.

and like magic here is the scale from the map item in a label:

2015-05-21 22_00_09-Composer 1

Check the expression error section if the label doesn’t render

error


Filed under: Open Source, qgis Tagged: composer, python, qgis

PSA: Please use new style Qt signals and slots not the old style

Don’t do this:

self.connect(self.widget, 
             SIGNAL("valueChanged(int)"), 
             self.valuechanged)

It’s the old way, the crappy way. It’s prone to error and typing mistakes. And who really wants to be typing strings as functions and arg names in it. Gross.

Do this:

self.widget.valueChanged.connect(self.valuechanged)
self.widget.valueChanged[str].connect(self.valuechanged)

Much nicer. Cleaner. Looks and feels like Python not some mash up between C++ and Python. The int argument is the default so it will use that. If you to pick the signal type you can use [type].

Don’t do this:

self.emit(SIGNAL("changed()", value1, value2))

Do this

class MyType(QObject):
   changed = pyqtSignal(str, int)

   def stuff(self):
       self.changed.emit(value1, value2)

pyqtSignal is a type you can use to define you signal. It will come with type checking, if you don’t want type checking just do pyqtSignal(object).

Please think of the poor kittens before using the old style in your code.


Filed under: pyqt, python, qgis Tagged: pyqt, qgis, qt

A interactive command bar for QGIS

Something that has been on my mind for a long time is a interactive command interface for QGIS.  Something that you can easily open, run simple commands, and is interactive to ask for arguments when they are needed.

After using the command interface in Emacs for a little bit over the weekend – you can almost hear the Boos! from heavy Vim users :) – I thought this is something I must have in QGIS as well.  I’m sure it can’t be that hard to add.

So here it is.  A interactive command interface for QGIS.

commandbar

commandbar2

The command bar plugin (find it in the plugin installer) adds a simple interactive command bar to QGIS. Commands are defined as Python code and may take arguments.

Here is an example function:

@command.command("Name")
def load_project(name):
    """
    Load a project from the set project paths
    """
    _name = name
    name += ".qgs"
    for path in project_paths:
        for root, dirs, files in os.walk(path):
            if name in files:
                path = os.path.join(root, name)
                iface.addProject(path)
                return
    iface.addProject(_name)

All functions are interactive and if not all arguments are given when called it will prompt for each one.

Here is an example of calling the point-at function with no args. It will ask for the x and then the y

pointat

Here is calling point-at with all the args

pointatfunc

Functions can be called in the command bar like so:

my-function arg1 arg2 arg2

The command bar will split the line based on space and the first argument is always the function name, the rest are arguments passed to the function. You will also note that it will convert _ to - which is easier to type and looks nicer.

The command bar also has auto complete for defined functions – and tooltips once I get that to work correctly.

You can use CTRL + ; (CTRL + Semicolon), or CTRL + ,, to open and close the command bar.

What is a command interface without auto complete
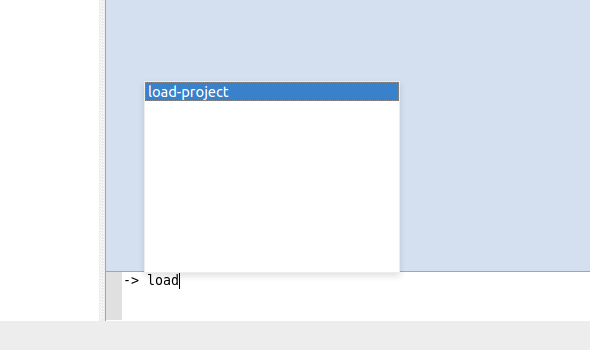
autocomplete

Use Enter to select the item in the list.

How about a function to hide all the dock panels. Sure why not.

@command.command()
def hide_docks():
    docks = iface.mainWindow().findChildren(QDockWidget)
    for dock in docks:
        dock.setVisible(False)

alias command

You can also alias a function by calling the alias function in the command bar.

The alias command format is alias {name} {function} {args}

Here is an example of predefining the x for point-at as mypoint

-> alias mypoint point-at 100

point-at is a built in function that creates a point at x y however we can alias it so that it will be pre-called with the x argument set. Now when we call mypoint we only have to pass the y each time.

-> mypoint
(point-at) What is the Y?: 200

You can even alias the alias command – because why the heck not :)

-> alias a alias
a mypoint 100

a is now the shortcut hand for alias

WHY U NO USE PYTHON CONSOLE

The Python console is fine and dandy but we are not going for a full programming language here, that isn’t the point. The point is easy to use commands.

You could have a function called point_at in Python that would be

point_at(123,1331)

Handling incomplete functions is a lot harder because of the Python parser. In the end it’s easier and better IMO to just make a simple DSL for this and get all the power of a DSL then try and fit into Python.

It should also be noted that the commands defined in the plugin can still be called like normal Python functions because there is no magic there. The command bar is just a DSL wrapper around them.

Notes

This is still a bit of an experiment for me so things might change or things might not work as full expected just yet.

Check out the projects readme for more info on things that need to be done, open to suggestions and pull requests.

Also see the docs page for more in depth information


Filed under: Open Source, python, qgis Tagged: plugin, pyqgis, qgis

Oh God my plugins! My precious QGIS plugins

tl;dr

The API had to change. We don't like breaking plugins. It makes us sad. We did it now to save pain in the future. You will like the new version better. Trust me.

What happened to my cheese?

When updating to QGIS 2.0 you might have noticed two things. (Apart from all the new awesome stuff!)

  1. All your settings have been set back to defaults
  2. Some of your plugins are gone, or missing in the installer.

Resetting of settings is caused by QGIS now storing its 2.0 settings in a different folder then we used for 1.8. In 1.8, all your plugins, etc, were stored in the ./qgis folder in your home directory, in 2.0 these are now stored in ./qgis2. The reason will become evident later. All user settings, the UI layout, database connections, etc, are now stored in a QGIS location. In windows this in the registry key HKEY_CURRENT_USER\Software\QGIS\QGIS2. So this explains why your settings are missing when you first load QGIS 2.0.

Why did we have to move the settings location?

Good question.

2.0 is very different from 1.8. There has been a lot of work to make this the best version we have ever made, new features, more bug fixes, a bigger dev team, and a even bigger community. Being the next major release we had to make some calls to remove some of the old code and features that were weighing us down. Features such as the old labelling engine, old symbol engine, the old vector API. Carrying old code and old out dated features into the future can sometimes really hurt a project and they have to be cut loose. Because of the massive amount of changes in 2.0 people needed to be able to run 2.0 and 1.8 on the same machine without causing any issues. If they both store settings in the same location this would have had bad results.

Why move the settings. Part 2

Moving the settings was also a result of having non backwards compatible plugins between 1.x and 2.x. If we kept both plugins in the same folder it just wouldn't work. You would install a 1.8 version of a plugin, I would update my plugin to 2.0, you then install the same plugin in 2.0, and now you 1.8 version is broken. Fun!. To avoid this we moved all QGIS 2.0 stuff into ./qgis2.

Why did my plugins break anyway. Why not just leave them be.

In 1.x we were using SIP v1. This meant the framework we used, PyQt, felt more like C++ then it did Python. If you are a Python developer then this isn't a very fun thing to deal with. In SIP v1 you need to tell PyQt, and our QGIS API, what to convert the type to. feature['mycolumn'].toInt() that is pretty gross. In V2 you can just do feature['mycolumn'] and SIP will auto convert the type for you. This makes our API feel more like Python and less like C++. There are other changes when using SIP V2 but you get the idea. Unfortunately SIP v1 and v2 do not work together so we couldn't make the code backwards compatible. This was also a forced change for us. Once we switch to Python 3 at some stage in the future V2 would be the default and we have to change then. The bright side of this change is most of the time you are removing code. Consider it a good time to go though your code, give it a bit of a polish, and remove anything that is no longer needed.

There was another major API change that needed to happen. Vector API update. In order to allow for multithreading in the future, and we all know everyone is looking forward to that, we needed to change how code can ask for features from a layer. The old method would never work in a multithreaded structure and had to go.

What can I do if I need a plugin?

Having a plugin missing from the plugin installer when you really need it can be a bit of a pain. Plugin authors are working hard to update there plugins. I approve about two a day into the plugin repository. While most plugins might be updated at some stage. There are some things that you can do if you need a plugin update to work with 2.0.

  1. Email the author of the plugin to see where they are at with the update

  2. Email the author and offer your help to update the plugin. Remember a lot of plugins are written by volunteers who just need the plugin to get their work done and wanted to share it with everyone.

  3. If the author has no intention of updating the plugin, or can't be contacted. You are free to update you local copy and offer it back to the community as the updated copy. If you are going to upload it back to the plugin repository please try to contact the author and seek permission first. I will be watching for copies of plugins to make sure we don't end up with 10 versions of the same plugin. The GPL allows for you to modify and share your updated version but it's nice to keep the original author in the loop. If the author no longer wants to maintain the plugin and you are able to then contact me and I will make you the owner of the plugin. Overall be nice not evil, we are all friends here.

  4. If you don't have, or know someone with, the skills to update the plugin. You can contact a developer to help update the plugin for you. Companies like mine, or Faunalia, or a whole range of other open source devs, can normally be contracted to update a plugin if needed.

Moving forward

We like the new API. It makes the Python side of QGIS much cleaner. There is still more work to do, it's never ending, but this is a good step. We don't like breaking plugins, but breaking a few now is better then breaking heaps as the popularity of QGIS continues to grow.

Installing Python setuptools into OSGeo4W Python

The easiest way install Python libraries is to use easy_install and pip.  easy_install and pip are package managers for Python. From the easy_install page:

Easy Install is a python module (easy_install) bundled with setuptools that lets you automatically download, build, install, and manage Python packages.

and from the pip page:

pip is a tool for installing and managing Python packages, such as those found in the Python Package Index. It’s a replacement for easy_install.

To get easy_install you need to install Python setuptools and you are good to go. Sounds easy!  However the setuptools installer assumes that you have the normal standalone Python installed which writes it’s install location to the registry, and when you run the installer it will say that it can’t find Python on the system.  What the!?

If you have installed QGIS, or any other tool from the OSGeo4W install, you will see that OSGeo4W bundles its own version of Python in: C:\OSGeo4W\apps\python27. This is the Python that is used when calling python in the OSGeo4W shell.  It seems someone on the OSGeo wiki has made a bootstrapped installer for setuptools that will install setuptools and easy_install into the  C:\OSGeo4W\apps\python27 folder for you.

Steps to take

  • Download ez_setup.py
  • Run python ez_setup.py in your OSGeo4W shell
  • Done!

To install a package with easy_install just use:

easy_install {packagename}

I wanted to have bottle and flask installed:

easy_install bottle

which gives you something like:

Searching for bottle
Reading http://pypi.python.org/simple/bottle/
Reading http://bottle.paws.de/
Reading http://github.com/defnull/bottle
Reading http://bottlepy.org/
Best match: bottle 0.11.4
Downloading http://pypi.python.org/packages/source/b/bottle/bottle-0.11.4.tar.gz#md5=f767c340de0b7c9581917c48e609479b
Processing bottle-0.11.4.tar.gz
Running bottle-0.11.4\setup.py -q bdist_egg –dist-dir c:\users\woo\appdata\local\temp\easy_install-5b4qq6\bottle-0.11.4\egg-dist-tmp-q2yd68
zip_safe flag not set; analyzing archive contents…
bottle: module references __file__
bottle: module references __path__
Adding bottle 0.11.4 to easy-install.pth file
Installing bottle.py script to C:\OSGeo4W\apps\Python27\Scripts
Installed c:\osgeo4w\apps\python27\lib\site-packages\bottle-0.11.4-py2.7.egg
Processing dependencies for bottle
Finished processing dependencies for bottle

Install pip

Note

Most of the time any Python packages that are needed by your OSGeo4W tools are bundled in the installer and can be downloaded using the OSGeo4W installer, however there have been cases when I wanted to install a non OSGeo4W package into my setup by using easy_install or pip. Like bottle and flask in the example above.


Filed under: Open Source Tagged: FOSSGIS, osgeo, python, qgis, Quantum GIS

Don’t forget to migrate your QGIS plugins!

From QGIS 1.8 and onwards the Plugin Installer plugin will no longer include the option to add the 3rd party repositories.  This was by design and intended to move people over to using the official plugin repository at http://plugins.qgis.org/ so we can provide a richer experience and keep everything in one place.

If you have plugins that are still not on the official repository then I would strongly recommend that you migrate them as a lot of new 1.8 users will be missing out on your great work.


Filed under: Open Source, qgis Tagged: FOSSGIS, gis, Open Source, python, qgis, Quantum GIS

Generating chainage (distance) nodes in QGIS

Something that I need to do now and then is generate points along a line at supplied distance.  I had never really looked into doing it in QGIS until this question poped up on gis.stackexchange.com.  This is a quick blog post because I thought it was a pretty handy little thing to do.

In the development version there is a new method on QgsGeometry called interpolate. This method takes a distance and returns a point along a line at that distance. Perfect! We can then just wrap this in a loop and generate a point increasing the distance as we move along

from qgis.core import (QgsFeature, QgsGeometry,
                       QgsVectorLayer, QgsMapLayerRegistry,
                       QgsField)
from PyQt4.QtCore import QVariant
from qgis.utils import iface

def createPointsAt(distance, geom):
    length = geom.length()
    currentdistance = distance
    feats = []

    while currentdistance < length:
        # Get a point along the line at the current distance
        point = geom.interpolate(currentdistance)
        # Create a new QgsFeature and assign it the new geometry
        fet = QgsFeature()
        fet.setAttributeMap( { 0 : currentdistance } )
        fet.setGeometry(point)
        feats.append(fet)
        # Increase the distance
        currentdistance = currentdistance + distance

    return feats

def pointsAlongLine(distance):
    # Create a new memory layer and add a distance attribute
    vl = QgsVectorLayer("Point", "distance nodes", "memory")
    pr = vl.dataProvider()
    pr.addAttributes( [ QgsField("distance", QVariant.Int) ] )
    layer = iface.mapCanvas().currentLayer()
    # Loop though all the selected features
    for feature in layer.selectedFeatures():
        geom = feature.geometry()
        features = createPointsAt(distance, geom)
        pr.addFeatures(features)
        vl.updateExtents()

    QgsMapLayerRegistry.instance().addMapLayer(vl)

The above code might look a bit scary at first if you have never done any Python/pyqgis but hopefully the comments will ease the pain a little. The main bit is the createPointsAt function.

Cool! If we want to use this we can just stick it in a file in the .qgis/python folder (lets call it pointtools.py) and then run import pointtools in the python console.

So lets have a go. First select some objects then run the following in the Python Console

import pointtools
pointtools.pointsAlongLine(40)

That will generate a point every 40 meters along then selected lines

Distance nodes along line in qgis-dev

To generate nodes along different lines, select the new features, then call pointtools.pointsAlongLine(40) in the Python console.

Simple as that!

(Who knows, someone (maybe me) might even add this as a core object function in QGIS in the future)


Filed under: Open Source, qgis Tagged: language python, Open Source, osgeo, pyqgis, python, qgis, qgis-tips, Quantum GIS, tips

A new QGIS plugin: Python Script Runner

Gary Sherman has just published a new Python plugin for QGIS that I think people will find very handy, I know I will.  The plugin allows you to run Python scripts inside QGIS for tasks that don’t really require, or warrant, a whole plugin.

Go check out Gray’s post about the new plugin at http://spatialgalaxy.net/2012/01/29/script-runner-a-plugin-to-run-python-scripts-in-qgis/

The new plugin can be installed via the Plugin Installer using the “runner” or “script”.  The Plugin Installer is another one of my favorite plugins for QGIS, being able to push out a new plugin and know that everyone can get it is a good feeling :)


Filed under: Open Source, qgis Tagged: FOSSGIS, gis, Open Source, osgeo, plugin, python, qgis, Quantum GIS

Using Python and MapInfo with Callbacks

The other day I posted an entry about using MapInfo with Python and Qt (see http://woostuff.wordpress.com/2011/03/05/mapinfo-map-control-into-qt-python-form/), one big thing that I missed was support for callbacks, which if you want to do anything related to integrated mapping is a must for map tool support.

Turns out it is pretty easy, and today I worked out how.

You will need to create a class in python that looks something like this:

class Callback():
    _public_methods_ = ['SetStatusText']
    _reg_progid_ = "MapInfo.PythonCallback"
    _reg_clsid_ = "{14EF8D30-8B00-4B14-8891-36B8EF6D51FD}"
    def SetStatusText(self,status):
        print status

This will be our callback object that we will need to create for MapInfo.

First I will explain what some of the funny stuff is:

  • _public_methods_ is a Python array of all the methods that you would like to expose to COM eg MapInfo in this case. This attribute is a must for creating a COM object.
  • _reg_progid_ is the name of your COM application or object.  This can be anything you would like.
  • _reg_clsid_ is the GUID, or unique id, for the object or app.  Do not use the one I have, call the following in a Python shell to create your own.
             import pythoncom
             pythoncom.CreateGuid()
             
  • SetStatusText is the MapInfo callback method that is called when the status bar changes in MapInfo.

In order to use the class as a COM object we have two more steps to complete, one is registering the COM object and the other is creating it.

First, in oder to register the object we call the following code from our main Python method:

if __name__ == "__main__":
    print "Registering COM server..."
    import win32com.server.register
    win32com.server.register.UseCommandLine(Callback)
    main()

This will register the COM object which will mean it can then be creating for use by MapInfo.

In order to create our callback in Python we call:

callback = win32com.client.Dispatch("MapInfo.PythonCallback")

and set it as our callback object for MapInfo:

mapinfo.SetCallback(callback)

So after all that the final code looks like this:

def main():
    from PyQt4.QtCore import *
    from PyQt4.QtGui import *
    from win32com.client import Dispatch
    import sys

    app = QApplication(sys.argv)
    app.setAttribute(Qt.AA_NativeWindows,True)
    wnd = QMainWindow()
    wnd.resize(400, 400)
    widget = QWidget()
    wnd.setCentralWidget(widget)
    wnd.show()

    handle = int(widget.winId())
    mapinfo = Dispatch("MapInfo.Application")
    callback = win32com.client.Dispatch("MapInfo.PythonCallback")
    mapinfo.SetCallback(callback)
    mapinfo.do('Set Next Document Parent %s Style 1' % handle)
    mapinfo.do('Open Table "D:\GIS\MAPS\Property.TAB"')
    mapinfo.do('Map from Property')

    app.exec_()

class Callback():
    """ Callback class for MapInfo """
    _public_methods_ = ['SetStatusText']
    _reg_progid_ = "MapInfo.PythonCallback"
    _reg_clsid_ = "{14EF8D30-8B00-4B14-8891-36B8EF6D51FD}"
    def SetStatusText(self,status):
        print status

if __name__ == "__main__":
    print "Registering COM server..."
    import win32com.server.register
    win32com.server.register.UseCommandLine(Callback)
    main()

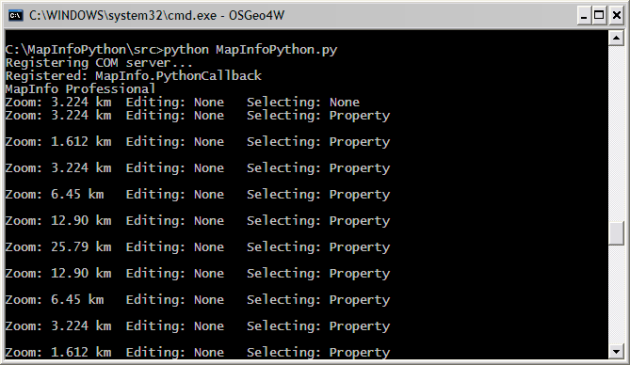
and the result is a map window and information printed to the console.

Information from MapInfo callback

I think Python could be a good language to prototype MapInfo based app, or even build a whole app itself. If you do end up making something of it let me know I am quite interested with what people could come up with.


Filed under: MapInfo, Mapinfo Programming, Open Source Tagged: gis, Mapbasic, mapinfo, mapinfo interop, mapinfo ole, MapInfo Professional, mapping, Open Source, python

Opening MS SQL Server 2008 Spatial tables in QGIS

EDIT:  If you are having trouble opening MS SQL 2008 in QGIS I will have a blog post coming explaining how to correct it. Or you can read the comments between TheGeoist and I below which will have the answer.

Just a quick tip.

Thanks to GDAL/OGR 1.8 QGIS can now open MS SQL Server 2008 spatial tables via the OGR MSSQLSpatial driver.

First you must be running a version of QGIS that is using GDAL/OGR 1.8.  Opening the QGIS about page will tell you if it is supported.

Need version 1.8 or higher

As I am writing this on my Ubuntu install I only have version 1.6.3 but the latest dev version of QGIS (upcoming 1.7 release) for Windows in the OSGeo4W installer is complied with version 1.8.

Now open the python console in QGIS and type the following:

uri = "MSSQL:server={serverName};database={databaseName};tables={tableName};trusted_connection=yes"
qgis.utils.iface.addVectorLayer(uri,'{yourLayerNameHere}','ogr')

Replacing {serverName} with your server name, if installed on your local machine you can use localhost; {databaseName} with the name of the database with the tables;{tableName} with the table to open; {yourLayerNameHere} with the name you would like the layer to have in the map legend.

After that you should see your MS SQL Spatial table displayed in QGIS, with editing support.

At the moment there is no nice interface in QGIS to open MS SQL tables like there is for PostGIS, although that might be a good plugin project for someone to work on.


Filed under: Open Source, qgis Tagged: gis, mapping, MS SQL Server 2008, MS SQL Spatial, Open Source, OSS, python, qgis, Quantum GIS

MapInfo map control into Qt Python form

Tonight for a bit of fun, or shits and jiggles as we say here, I thought I would try and embed a MapInfo map control into a Qt python widget (although I should be studying, but it’s Saturday night) .

Turns out it is pretty easy!

pls send me teh codez? OK here you go.

from PyQt4.QtCore import *
from PyQt4.QtGui import *
from win32com.client import Dispatch
import sys

app = QApplication(sys.argv)
app.setAttribute(Qt.AA_NativeWindows,True)
wnd = QMainWindow()
wnd.resize(400, 400)
widget = QWidget()
wnd.setCentralWidget(widget)
wnd.show()

handle = int(widget.winId())
mapinfo = Dispatch("MapInfo.Application")
mapinfo.do('Set Next Document Parent %s Style 1' % handle)
mapinfo.do('Open Table "D:\GIS\MAPS\Property.TAB"')
mapinfo.do('Map from Property')

app.exec_()

The above code will load MapInfo and open the property layer into the Qt Widget control, with the result below.

MapInfo map in python Qt based form

So this means you don’t “always” have to write your MapInfo based apps in C# or C++; of course I already knew this as anything that can use OLE and provide a native window handle to MapInfo will work, I just never tried it.


Filed under: MapInfo, Mapinfo Programming, Open Source Tagged: gis, mapinfo, mapinfo interop, mapinfo ole, MapInfo Professional, mapping, Open Source, python

Generating contour lines in QGIS

One of the cool things I love about QGIS is finding stuff that you didn’t know it could do, well not just itself but plugins that you didn’t know about.

Today my discovery was in how to generate contour lines from a point layer.

  1. First install the contour plugin for qgis via the plugin installer.  Just search for “contour”
  2. Once installed open a vector point layer in QGIS.  Make sure the point layer has a field that you can use for elevation.

    One I prepared earlier

  3. Then select from the menu: Plugins->Contour->Contour
  4. Fill in the information

    Details form (The above setting will generate 0.5m contours)

  5. Press OK
  6. Results

    Results from plugin

  7. Profit??

The resulting contours will have a field that contains the label and z value for each contour line, you can then just label or color them how you wish.

Note:  There is a bug with QGIS memory layers where the fields don’t  show up in dropdown or attribute browsers, a simple fix is just to make the layer editable and then non editable then the fields will be there.

The contour layer is a QGIS memory layer so remember to save it to disk eg a shapefile before you close you will loose your new fancy contour layer.

Happy mapping :)


Filed under: MapInfo, Open Source, qgis Tagged: gis, mapping, Open Source, python, qgis, shapely

Getting total length of selected lines in QGIS via python

The other day I was trying to get the total length of the some selected lines in QGIS. In MapInfo I would just do

Select Sum(ObjectLen(obj,”m”)) from Selection

however QGIS doesn’t have the ability (yet..) to run SQL queries like this, but you can do it via python.

The following is a little python snippet that will get the total length of the selected objects. (You will need to have shapely installed to use)

from shapely.wkb import loads
def getLength():
    layer = qgis.utils.iface.mapCanvas().currentLayer()
    total = 0
    for feature in layer.selectedFeatures():
        geom = feature.geometry()
        wkb = geom.asWkb()
        line = loads(wkb)
        total = total + line.length
    return total

print getLength()

EDIT:Or as Peter asked in the comments, yes you can just call length on the geometry:

def getLength():
    layer = qgis.utils.iface.mapCanvas().currentLayer()
    total = 0
    for feature in layer.selectedFeatures():
        geom = feature.geometry()
        total = total + geom.length()
    return total

print getLength()

Just copy and past that into your QGIS python console and call getLength() when ever you need the total length.

Note: I have found the QgsGeometry .legnth() function to be unstable in the past and it has crashed my QGIS instance. Just test it first, if not you can always use the shapely method.


Filed under: Open Source, qgis Tagged: gis, mapping, Open Source, python, qgis, Quantum GIS, shapely

Back to Top

Sustaining Members