Related Plugins and Tags

QGIS Planet

QGIS Instant Print Plugin

As a side product of a customer project, we’re publishing a QGIS plugin for printing maps to a file with just two mouse clicks.

To use the instant print tool, a composer needs to be created first. The only requirement is that it contains exactly one map item.

The instant print tool can then be activated from the plugin toolbar by clicking on the plugin icon icon.

In the dialog window which appears, one can pick the composer to use as page layout. A selection rectangle is displayed in the map canvas, sized according to the size of the map item in the composer and the scale chosen in the instant print dialog. The selection rectangle can be freely dragged around to choose the region one wishes to print. When dragging the selection rectangle, the previous rectangle is shown shaded and can be used as a snap reference when setting the new region. While the instant print tool is active, the canvas can be panned with the middle mouse button.
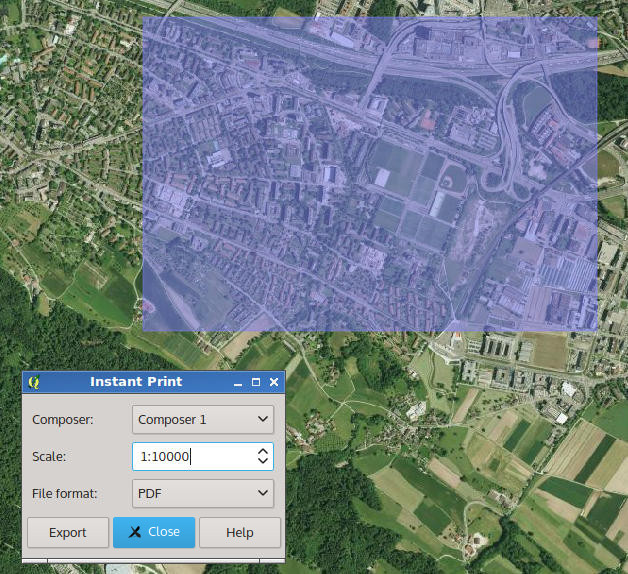
screenshot

To instant print tool can be installed with the QGIS plugin manager and the sources are available on Github.

QGIS Cloud - Speed up the loading time of the web client

QGIS Cloud is your personal geo-data infrastructure in the internet. Publish maps and data. Share geo-information with others. And all of this very easily, without server, infrastructure and expert knowledge. If you know QGIS Desktop, then you know QGIS cloud just as well. Just install the QGIS cloud plugin from the official QGIS plugin repository and you’re good to go. You can publish as many maps as you want.

But the default settings of QGIS projects you like to publish via QGIS Cloud are not the best with respect to the performance of the QGIS Webclient / WMS. This point is noticeable when the published project contains many layers. Than the default settings are leading to bad performance. The size of the WMS GetCapabilities request is not negligible. Have a look at the first request:

QGIS Cloud slow response

The second request has a much faster response time than the first one:

QGIS Cloud fast response

What’s the difference between this two requests? First of all the slow request has to download and parse 3.1MB of XML data. The fast request has to download and parse 22KB only. However that work’s much faster. What makes the difference? If you have a look at the first request result, you can see, that tons of coordinate reference systems (CRS) are defined for every layer. These are all CRS supported by QGIS. In fact most of them will never be used. As the result the solution is to reduce the number of CRS in the QGIS Cloud WMS and WFS services. To achieve that you have to restrict the CRS in the QGIS project settings. Open the OWS Server tab and activate the CRS restrictions option and add all CRS of interest.

QGIS Cloud Webclient slow initialisation with none restricted CRS

QGIS Cloud Webclient fast initialisation with restricted CRS

QGIS Cloud - Speed up the loading time of the web client

QGIS Cloud is your personal geo-data infrastructure in the internet. Publish maps and data. Share geo-information with others. And all of this very easily, without server, infrastructure and expert knowledge. If you know QGIS Desktop, then you know QGIS cloud just as well. Just install the QGIS cloud plugin from the official QGIS plugin repository and you’re good to go. You can publish as many maps as you want.

But the default settings of QGIS projects you like to publish via QGIS Cloud are not the best with respect to the performance of the QGIS Webclient / WMS. This point is noticeable when the published project contains many layers. Than the default settings are leading to bad performance. The size of the WMS GetCapabilities request is not negligible. Have a look at the first request:

QGIS Cloud slow response

The second request has a much faster response time than the first one:

QGIS Cloud fast response

What’s the difference between this two requests? First of all the slow request has to download and parse 3.1MB of XML data. The fast request has to download and parse 22KB only. However that work’s much faster. What makes the difference? If you have a look at the first request result, you can see, that tons of coordinate reference systems (CRS) are defined for every layer. These are all CRS supported by QGIS. In fact most of them will never be used. As the result the solution is to reduce the number of CRS in the QGIS Cloud WMS and WFS services. To achieve that you have to restrict the CRS in the QGIS project settings. Open the OWS Server tab and activate the CRS restrictions option and add all CRS of interest.

OWS_server

QGIS Cloud Webclient slow initialisation with none restricted CRS

QGIS Cloud Webclient fast initialisation with restricted CRS

Slides FOSS4G 2014

Slides from our presentations at FOSS4G 2014 in Portland/Oregon:

@PirminKalberer

Slides FOSS4G 2014

Slides from our presentations at FOSS4G 2014 in Portland/Oregon:

@PirminKalberer

Share and manage your Data with QGIS Cloud and WFS-T

A lot of people are using QGIS Cloud as a service with ready to use QGIS webclient. It’s very easy to publish data and share maps in this way. But QGIS Cloud has more power under the hood. A not so obvious feature of QGIS Cloud is the option to share your data via Web Feature Service (WFS) and manage them via Web Feature Service Transactional (WFS-T). “The basic Web Feature Service allows querying and retrieval of features. A transactional Web Feature Service (WFS-T) allows creation, deletion, and updating of features” (Wikipedia). With WFS-T you have full access to your vector data for editing over the web. Since QGIS Server includes WFS-T functionality, you can manage and edit your data served by QGIS Cloud from every client supporting WFS-T. In addition, with QGIS Cloud Pro you have the option to control access to your published WFS.

How to setup a QGIS Cloud WFS-T in few steps:

  1. Setup a QGIS Project containing the data you like to pubish as WFS-T

  2. Load local vector data of your choice to your project.

  3. Define vector layers you wish to publish and set the appropriate settings for them in the following way:
    • open the Project Properties -> OWS Server tab.
    • scroll to the WFS-Capabilities section and setup the appropriate settings. Tick Published, Update, Insert and Delete for every layer you want to publish.

  • additionally you can set the published fields of every layer in the Layer Properties -> Fields tab.

  • Publish the project on QGIS Cloud.
    • save the project. (If you don’t have installed the QGIS Cloud plugin, than install it from the official QGIS Plugin Repository)
    • open the QGIS Cloud plugin and log in your QGIS Cloud account. (If you don’t have a QGIS Cloud account, sign up a new account).
    • upload the local data to your QGIS Cloud database (if you don’t have a QGIS Cloud database, create one from the QGIS Cloud plugin).
    • publish the project via QGIS Cloud plugin.
    • that’s it!

Have a look at the Services tab of the QGIS Cloud Plugin. There you will find the URL for Public WMS. Your just created WFS has the same URL. Now you can start working with WFS and WFS-T.

Working with WFS-T in QGIS Desktop

You can access your WFS-T with QGIS or any other client which supports WFS and WFS-T. As an example here we show how to access WFS with QGIS Desktop:

  1. Open the QGIS WFS Server connections dialog (Layer -> Add WFS Layer … ).
  2. Add a new connection
  3. Give the connection a name of your choice and add the above created URL
  4. Click connect and you will see the just published WFS layers
  5. Add one or more of them to your project

Thus you have set the Update, Insert and Delete options for the WFS, these layers can be edited in QGIS like any other editable layer.

All the services published under QGIS Cloud Free are public and accessible by everyone. If you need resctricted access , you can order the QGIS Cloud Pro plan.

Follow @QGISCloud on Twitter for QGISCloud related news and infos.

Share and manage your Data with QGIS Cloud and WFS-T

A lot of people are using QGIS Cloud as a service with ready to use QGIS webclient. It’s very easy to publish data and share maps in this way. But QGIS Cloud has more power under the hood. A not so obvious feature of QGIS Cloud is the option to share your data via Web Feature Service (WFS) and manage them via Web Feature Service Transactional (WFS-T). “The basic Web Feature Service allows querying and retrieval of features. A transactional Web Feature Service (WFS-T) allows creation, deletion, and updating of features” (Wikipedia). With WFS-T you have full access to your vector data for editing over the web. Since QGIS Server includes WFS-T functionality, you can manage and edit your data served by QGIS Cloud from every client supporting WFS-T. In addition, with QGIS Cloud Pro you have the option to control access to your published WFS.

How to setup a QGIS Cloud WFS-T in few steps:

  1. Setup a QGIS Project containing the data you like to pubish as WFS-T
  • Load local vector data of your choice to your project.
  • Define vector layers you wish to publish and set the appropriate settings for them in the following way:
  • open the Project Properties -> OWS Server tab.
  • scroll to the WFS-Capabilities section and setup the appropriate settings. Tick Published, Update, Insert and Delete for every layer you want to publish.

  • additionally you can set the published fields of every layer in the Layer Properties -> Fields tab.

  • Publish the project on QGIS Cloud.
  • save the project. (If you don’t have installed the QGIS Cloud plugin, than install it from the official QGIS Plugin Repository)
  • open the QGIS Cloud plugin and log in your QGIS Cloud account. (If you don’t have a QGIS Cloud account, sign up a new account).
  • upload the local data to your QGIS Cloud database (if you don’t have a QGIS Cloud database, create one from the QGIS Cloud plugin).
  • publish the project via QGIS Cloud plugin.
  • that’s it!

Have a look at the Services tab of the QGIS Cloud Plugin. There you will find the URL for Public WMS. Your just created WFS has the same URL. Now you can start working with WFS and WFS-T.

Working with WFS-T in QGIS Desktop

You can access your WFS-T with QGIS or any other client which supports WFS and WFS-T. As an example here we show how to access WFS with QGIS Desktop:

  1. Open the QGIS WFS Server connections dialog (Layer -> Add WFS Layer … ).
  • Add a new connection
  • Give the connection a name of your choice and add the above created URL
  • Click connect and you will see the just published WFS layers
  • Add one or more of them to your project

Thus you have set the Update, Insert and Delete options for the WFS, these layers can be edited in QGIS like any other editable layer.

All the services published under QGIS Cloud Free are public and accessible by everyone. If you need resctricted access , you can order the QGIS Cloud Pro plan.

Follow @QGISCloud on Twitter for QGISCloud related news and infos.

Sourcepole at FOSS4G 2014 in Portland

In one week, the 2014 FOSS4G Conference will start in Portland/Oregon. Sourcepole supports this major event as a bronze sponsor.

Our conference contributions:

Workshop presented by Horst Düster (@moazagotl)

  • Tuesday afternoon: QGIS Plugin Development with PyQt4 and PyQGIS

Presentations by Pirmin Kalberer (@PirminKalberer)

  • Thursday, Session 2, Track 7, 13:00 - 13:25: State of QGIS Server
  • Thursday, Session 2, Track 7, 13:30 - 13:55: From Nottingham to PDX: QGIS 2014 roundup
  • Thursday, Session 3, Track 6, 16:25 - 13:25: Easy ETL with OGR

Meet Pirmin and Horst at Sourcepole’s exhibition booth and have a look at our latest products.

We’re looking forward to meet you in Portland next week!

Follow @Sourcepole for selected QGIS news and other Open Source Geospatial related infos.

Sourcepole Kursprogramm Herbst 2014

Im November 2014 bietet Sourcepole wieder sein kompetentes Kursprogramm rund um alle GDI Komponenten an. Zu allen Kursen gehört umfangreiches Kursmaterial, Mittagessen und Kaffepausen. Bei Buchung eines Grundkurses und dem darauf folgenden Aufbaukurs erhalten die Teilnehmer Rabatt auf den Kurspreis.

Geo-Datenbank:

  • PostgreSQL / PostGIS Einführung (3. - 4. November 2014)
  • PostgreSQL / PostGIS für Fortgeschrittene (5. November 2014)

Desktop GIS

  • QGIS 2.4 / Enterprise Desktop Grundkurs (10. - 11. November 2014)
  • QGIS 2.4 / Enterprise Desktop für Power User (12. November 2014)

GDI

  • Verteilte GDI mit der QGIS Suite und PostgreSQL (20. November 2014)

QGIS Programmierung

  • QGIS 2.4 / Enterprise Plugin Entwicklung mit PyQt4 und PyQGIS (17. - 18. November 2014)

Informationen zu den Kursen und die Online Anmeldung finden Sie im Kursprogramm

Wir freuen uns darauf Sie in Zürich begrüssen zu können.

Multiple map grids in the QGIS print composer

In printed maps, having several coordinate grids over one map is a very usefull feature. For instance using a meter system as output CRS, it is nice to display a latitude / longitude grid as well. Until now, the QGIS print composer allowed only one coordinate grid per composer map and it was restricted to the map output CRS.

Having that multigrid / multiCRS feature in QGIS Enterprise since 13.04 already, I’ve recently found the time to port it into the QGIS developer version. Therefore it will be part of the upcoming version 2.6 in October. The screenshot below shows how it can be used to add a wgs84 grid onto a meter map. In the composermap widget, grids can be added / removed and reordered. Additionally there is now a CRS selection button to select the coordinate system for the grid. The development of this feature has been kindly funded by Canton of Solothurn (Switzerland).

Composer_grid

Packaging PostGIS dev releases with Docker

Packaging PostGIS dev releases with Docker

We recently added support for GML curves to PostGIS, which enables TinyOWS to deliver WFS requests with curve geometries. More on this in a later post. This enhancement is in the current PostGIS developement version (SVN master) and not released yet. To enable our customer testing this functionality, we had to build packages for their server environment which is Ubuntu Precise with UbuntuGIS repositories. After working with Linux LXC containers and it's predecessor VServer for years, Docker was a logical choice for a clean reproducible build environment.

Rebuilding a Debian package is usually quite easy:

apt-get build-dep <package>
apt-get source <package>
cd <packagedir>
#Make your changes
dch -i
dpkg-buildpackage

But getting build dependencies for PostGIS currently fails with libssl-dev conflicts, maybe because the dev packages got out of sync after the recent Heartblead updates. So the Dockerfile uses equivs to build a dummy package which satisfies the dependencies.

The command

docker run -v /tmp:/pkg sourcepole/postgis-svn-build-env sh -c 'cp /root/*postgis*.deb /pkg'

loads the Docker image with packages built from the latest SVN version of PostGIS in /root and copies the deb files from the containter into /tmp.

Now we're ready to install these packages on the Ubuntu server:

sudo dpkg -i /tmp/*postgis*.deb

Thats it. Feedback welcome!

@PirminKalberer

P.S.

If you happen to be a developer, then you may prefer running a cutting-edge version of PostGIS in a Docker container instead of building packages. Our colleagues from Oslandia just published how to do this.

„Geo For All“ - neue Technologien für eine Welt im Wandel

GEOSummit 2014, Bern

„Geo for all“ ist nicht nur das Motto der weltumspannenden ICA-OSGeo Lab Initiative zur Förderung der GIS-Ausbildung an Hochschulen, sondern steht allgemein für den immer breiteren Zugang zu professionellen GIS-Werkzeugen. Im Kartenbereich haben Produkte wie TileMill oder D3.js, sowie Dienste wie CartoDB, GeoCommons, usw. den Anwenderkreis weit über das klassische GIS-Fachbebiet hinaus erweitert. Im Vortrag werden einige herausragende Beispiele vorgestellt und deren Relevanz für die Fachwelt erläutert.

@PirminKalberer

Links:

Packaging PostGIS dev releases with Docker

Packaging PostGIS dev releases with Docker

We recently added support for GML curves to PostGIS, which enables TinyOWS to deliver WFS requests with curve geometries. More on this in a later post. This enhancement is in the current PostGIS developement version (SVN master) and not released yet. To enable our customer testing this functionality, we had to build packages for their server environment which is Ubuntu Precise with UbuntuGIS repositories. After working with Linux LXC containers and it's predecessor VServer for years, Docker was a logical choice for a clean reproducible build environment.

Rebuilding a Debian package is usually quite easy:

apt-get build-dep <package>
cd <packagedir>
#Make your changes
dch -i
dpkg-buildpackage

But getting build dependencies for PostGIS currently fails with libssl-dev conflicts, maybe because the dev packages got out of sync after the recent Heartblead updates. So the Dockerfile uses equivs to build a dummy package which satisfies the dependencies.

The command

docker run -v /tmp:/pkg sourcepole/postgis-svn-build-env sh -c 'cp /root/*postgis*.deb /pkg'

loads the Docker image with packages built from the latest SVN version of PostGIS in /root and copies the deb files from the containter into /tmp.

Now we're ready to install these packages on the Ubuntu server:

sudo dpkg -i /tmp/*postgis*.deb

Thats it. Feedback welcome!

@PirminKalberer

P.S.

If you happen to be a developer, then you may prefer running a cutting-edge version of PostGIS in a Docker container instead of building packages. Our colleagues from Oslandia just published how to do this.

FOSSGIS 2014 slides

Neues in QGIS 2.2

Nach dem lange erwarteten Release von QGIS 2.0 im September 2013, sind ab diesem Jahr neue Versionen im Viermonatszyklus geplant. Es werden die neuen Funktionen in QGIS 2.2, wie z.B. DB-Relationen mit verschachtelten Formularen, die erweiterten Methoden zur Transformierung geographischer Koordinatensysteme, zahlreiche Verbesserungen im Print Composer und ein komplett überarbeiteter DXF Export vorgestellt. Zusätzlich wird eine Vorschau auf das multithreaded Rendering gegeben und die neuen Mitglieder im Project Steering Committee vorgestellt

Links:

Mobile Kartenviewer mit Openlayers 3

Mit OpenLayers 3 steht eine komplette Neuentwicklung der funktionsreichen OpenLayers-Bibliothek zur Verfügung. Die verbesserte Unterstützung mobiler Geräte war ein primäres Ziel der neuen Version. Dieser Vortrag stellt den JQuery Mobile basierten OL3 Mobile Viewer vor, der erweiterte Funktionen wie automatische Kartenausrichtung oder Positionsnachführung bietet. Es wird auch ein Vergleich mit anderen Viewern, wie der auf Bootstrap und AngularJS aufbauenden Neuentwicklung von Swisstopo angestellt.

Links:

AGIT 2013: QGIS Cloud - Karten einfach ins Netz

Noch nie war es so einfach individuelle Web Map Services mit ansprechenden Karten, Geodatenbank und Web Client zu erstellen, wie mit QGIS Cloud. Der am 5. Juli an der AGIT 2013 in Salzburg präsentierte Vortrag kann hier herunter geladen werden.

Präsentation

Multithreaded rendering with QGIS

Nowadays, most computers have several processor cores. However, most computer programs are still designed to only use one processing unit. As a convenient and portable way of writing software using all the available processing power, Qt provides the excellent QtConcurrent framework.

In 2010, a Google Summer of Code project examined the suitabilty of using Qt concurrent for rendering the map image in QGIS using several processor cores. Following that approach, each layer renders its image in a separate thread. Once all layer threads are finished, the layer images are composited into one map image and the labels are drawn on top of it. Despite providing good results, that code was unfortunately never merged into the main development branch.

QGIS Enterprise 13.05 will provide the capability of multithreaded rendering. A screencast of the new functionality shows that not only the render time is shorter using multiple cores. More important is to have the possibility to cancel the render progress and the labeling any time, thus achieving a much more responsive user interface when navigating maps.

Back to Top

Sustaining Members