QGIS Planet

Configure editing form widgets using PyQGIS

PT | EN

As I was preparing a QGIS Project to read a database structured according to the new rules and technical specifications for the Portuguese Cartography, I started to configure the editing forms for several layers, so that:

  1. Make some fields read-only, like for example an identifier field.
  2. Configure widgets better suited for each field, to help the user and avoid errors. For example, date-time files with a pop-up calendar, and value lists with dropdown selectors.

Basically, I wanted something like this:

Peek 2019-09-30 15-04_2

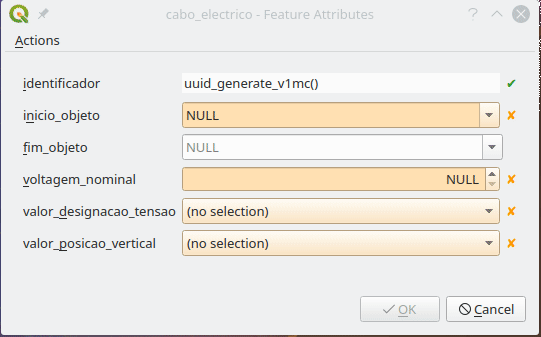
Let me say that, in PostGIS layers, QGIS does a great job in figuring out the best widget to use for each field, as well as the constraints to apply. Which is a great help. Nevertheless, some need some extra configuration.

If I had only a few layers and fields, I would have done them all by hand, but after the 5th layer my personal mantra started to chime in:

“If you are using a computer to perform a repetitive manual task, you are doing it wrong!”

So, I began to think how could I configure the layers and fields more systematically. After some research and trial and error, I came up with the following PyQGIS functions.

Make a field Read-only

The identifier field (“identificador”) is automatically generated by the database. Therefore, the user shouldn’t edit it. So I had better make it read only

Layer Properties - cabo_electrico | Attributes Form_103

To make all the identifier fields read-only, I used the following code.

def field_readonly(layer, fieldname, option = True):
    fields = layer.fields()
    field_idx = fields.indexOf(fieldname)
    if field_idx >= 0:
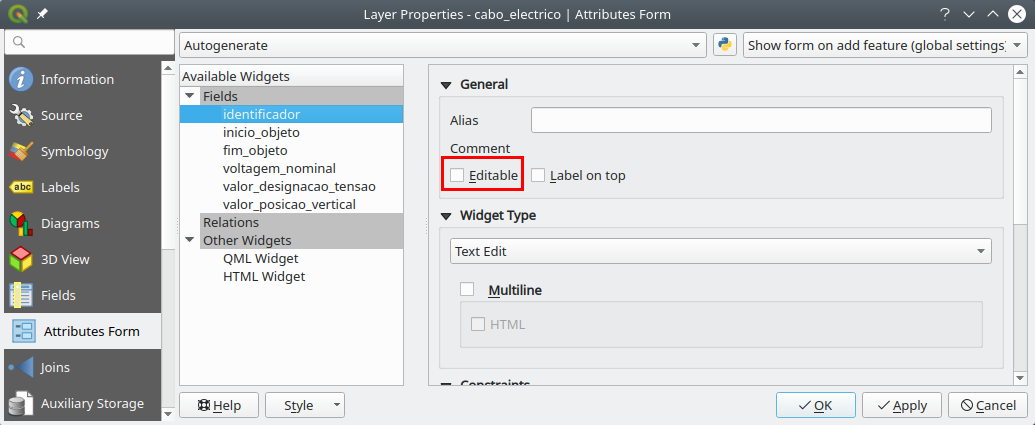
        form_config = layer.editFormConfig()
        form_config.setReadOnly(field_idx, option)
        layer.setEditFormConfig(form_config)

# Example for the field "identificador"

project = QgsProject.instance()
layers = project.mapLayers() 

for layer in layers.values():
    field_readonly(layer,'identificador')

Set fields with DateTime widget

The date fields are configured automatically, but the default widget setting only outputs the date, and not date-time, as the rules required.

I started by setting a field in a layer exactly how I wanted, then I tried to figure out how those setting were saved in PyQGIS using the Python console:

>>>layer = iface.mapCanvas().currentLayer()
>>>layer.fields().indexOf('inicio_objeto')
1
>>>field = layer.fields()[1]
>>>field.editorWidgetSetup().type()
'DateTime'
>>>field.editorWidgetSetup().config()
{'allow_null': True, 'calendar_popup': True, 'display_format': 'yyyy-MM-dd HH:mm:ss', 'field_format': 'yyyy-MM-dd HH:mm:ss', 'field_iso_format': False}

Knowing this, I was able to create a function that allows configuring a field in a layer using the exact same settings, and apply it to all layers.

def field_to_datetime(layer, fieldname):
    config = {'allow_null': True,
              'calendar_popup': True,
              'display_format': 'yyyy-MM-dd HH:mm:ss',
              'field_format': 'yyyy-MM-dd HH:mm:ss',
              'field_iso_format': False}
    type = 'Datetime'
    fields = layer.fields()
    field_idx = fields.indexOf(fieldname)
    if field_idx >= 0:
        widget_setup = QgsEditorWidgetSetup(type,config)
        layer.setEditorWidgetSetup(field_idx, widget_setup)

# Example applied to "inicio_objeto" e "fim_objeto"

for layer in layers.values():
    field_to_datetime(layer,'inicio_objeto')
    field_to_datetime(layer,'fim_objeto')

Setting a field with the Value Relation widget

In the data model, many tables have fields that only allow a limited number of values. Those values are referenced to other tables, the Foreign keys.

In these cases, it’s quite helpful to use a Value Relation widget. To configure fields with it in a programmatic way, it’s quite similar to the earlier example, where we first neet to set an example and see how it’s stored, but in this case, each field has a slightly different settings

Luckily, whoever designed the data model, did a favor to us all by giving the same name to the fields and the related tables, making it possible to automatically adapt the settings for each case.

The function stars by gathering all fields in which the name starts with ‘valor_’ (value). Then, iterating over those fields, adapts the configuration to use the reference layer that as the same name as the field.

def field_to_value_relation(layer):
    fields = layer.fields()
    pattern = re.compile(r'^valor_')
    fields_valor = [field for field in fields if pattern.match(field.name())]
    if len(fields_valor) > 0:
        config = {'AllowMulti': False,
                  'AllowNull': True,
                  'FilterExpression': '',
                  'Key': 'identificador',
                  'Layer': '',
                  'NofColumns': 1,
                  'OrderByValue': False,
                  'UseCompleter': False,
                   'Value': 'descricao'}
        for field in fields_valor:
            field_idx = fields.indexOf(field.name())
            if field_idx >= 0:
                print(field)
                try:
                    target_layer = QgsProject.instance().mapLayersByName(field.name())[0]
                    config['Layer'] = target_layer.id()
                    widget_setup = QgsEditorWidgetSetup('ValueRelation',config)
                    layer.setEditorWidgetSetup(field_idx, widget_setup)
                except:
                    pass
            else:
                return False
    else:
        return False
    return True
    
# Correr função em todas as camadas
for layer in layers.values():
    field_to_value_relation(layer)

Conclusion

In a relatively quick way, I was able to set all the project’s layers with the widgets I needed.Peek 2019-09-30 16-06

This seems to me like the tip of the iceberg. If one has the need, with some search and patience, other configurations can be changed using PyQGIS. Therefore, think twice before embarking in configuring a big project, layer by layer, field by fields.

Map corner coordinates in QGIS

EN | PT

Some time ago in the qgis-pt mailing list, someone asked how to show the coordinates of a map corners using QGIS. Since this features wasn’t available (yet), I have tried to reach a automatic solution, but without success,  After some thought about it and after reading a blog post by Nathan Woodrow, it came to me that the solution could be creating a user defined function for the expression builder to be used in labels in the map.

Closely following the blog post instructions, I have created a file called userfunctions.py in the  .qgis2/python folder and, with a help from Nyall Dawson I wrote the following code.

from qgis.utils import qgsfunction, iface
from qgis.core import QGis

@qgsfunction(2,"python")
def map_x_min(values, feature, parent):
 """
 Returns the minimum x coordinate of a map from
 a specific composer.
 """
 composer_title = values[0]
 map_id = values[1]
 composers = iface.activeComposers()
 for composer_view in composers():
  composer_window = composer_view.composerWindow()
  window_title = composer_window.windowTitle()
  if window_title == composer_title:
   composition = composer_view.composition()
   map = composition.getComposerMapById(map_id)
   if map:
    extent = map.currentMapExtent()
    break
 result = extent.xMinimum()
 return result

After running the command import userfunctions in the python console  (Plugins > Python Console), it was already possible to use the  map_x_min() function (from the python category) in an expression to get the minimum X value of the map.

Screenshot from 2014-09-09 16^%29^%29

All I needed now was to create the other three functions,  map_x_max(), map_y_min() and map_y_max().  Since part of the code would be repeated, I have decided to put it in a function called map_bound(), that would use the print composer title and map id as arguments, and return the map extent (in the form of a QgsRectangle).

from qgis.utils import qgsfunction, iface
from qgis.core import QGis

def map_bounds(composer_title, map_id):
 """
 Returns a rectangle with the bounds of a map
 from a specific composer
 """
 composers = iface.activeComposers()
 for composer_view in composers:
  composer_window = composer_view.composerWindow()
  window_title = composer_window.windowTitle()
  if window_title == composer_title:
   composition = composer_view.composition()
   map = composition.getComposerMapById(map_id)
   if map:
    extent = map.currentMapExtent()
    break
 else:
  extent = None

 return extent

With this function available, I could now use it in the other functions to obtain the map X and Y minimum and maximum values, making the code more clear and easy to maintain. I also add some mechanisms to the original code to prevent errors.

@qgsfunction(2,"python")
def map_x_min(values, feature, parent):
 """
 Returns the minimum x coordinate of a map from a specific composer.
 Calculations are in the Spatial Reference System of the project.
<h2>Syntax</h2>
map_x_min(composer_title, map_id)
<h2>Arguments</h2>
composer_title - is string. The title of the composer where the map is.
 map_id - integer. The id of the map.
<h2>Example</h2>
map_x_min('my pretty map', 0) -> -12345.679

 """
 composer_title = values[0]
 map_id = values[1]
 map_extent = map_bounds(composer_title, map_id)
 if map_extent:
  result = map_extent.xMinimum()
 else:
  result = None

 return result

@qgsfunction(2,"python")
def map_x_max(values, feature, parent):
 """
 Returns the maximum x coordinate of a map from a specific composer.
 Calculations are in the Spatial Reference System of the project.
<h2>Syntax</h2>
map_x_max(composer_title, map_id)
<h2>Arguments</h2>
composer_title - is string. The title of the composer where the map is.
 map_id - integer. The id of the map.
<h2>Example</h2>
map_x_max('my pretty map', 0) -> 12345.679

 """
 composer_title = values[0]
 map_id = values[1]
 map_extent = map_bounds(composer_title, map_id)
 if map_extent:
  result = map_extent.xMaximum()
 else:
  result = None

 return result

@qgsfunction(2,"python")
def map_y_min(values, feature, parent):
 """
 Returns the minimum y coordinate of a map from a specific composer.
 Calculations are in the Spatial Reference System of the project.
<h2>Syntax</h2>
map_y_min(composer_title, map_id)
<h2>Arguments</h2>
composer_title - is string. The title of the composer where the map is.
 map_id - integer. The id of the map.
<h2>Example</h2>
map_y_min('my pretty map', 0) -> -12345.679

 """
 composer_title = values[0]
 map_id = values[1]
 map_extent = map_bounds(composer_title, map_id)
 if map_extent:
  result = map_extent.yMinimum()
 else:
  result = None

 return result

@qgsfunction(2,"python")
def map_y_max(values, feature, parent):
 """
 Returns the maximum y coordinate of a map from a specific composer.
 Calculations are in the Spatial Reference System of the project.
<h2>Syntax</h2>
map_y_max(composer_title, map_id)
<h2>Arguments</h2>
composer_title - is string. The title of the composer where the map is.
 map_id - integer. The id of the map.
<h2>Example</h2>
map_y_max('my pretty map', 0) -> 12345.679

 """
 composer_title = values[0]
 map_id = values[1]
 map_extent = map_bounds(composer_title, map_id)
 if map_extent:
  result = map_extent.yMaximum()
 else:
  result = None

 return result

The functions became available to the expression builder in the “Python” category (could have been any other name) and the functions descriptions are formatted as help texts to provide the user all the information needed to use them.

Screenshot from 2014-09-09 15^%39^%19

Using the created functions, it was now easy to put the corner coordinates in labels near the map corners. Any change to the map extents is reflected in the label, therefore quite useful to use with the atlas mode.

Screenshot from 2014-09-09 15^%40^%27

The functions result can be used with other functions. In the following image, there is an expression to show the coordinates in a more compact way.

Screenshot from 2014-09-09 15^%43^%55

There was a setback… For the functions to become available, it was necessary to manually import them in each QGIS session. Not very practical. Again with Nathan’s help, I found out that it’s possible to import python modules at QGIS startup by putting a startup.py file with the import statements in the .qgis2/python folder. In my case, this was enough.

import userfunctions

I was pretty satisfied with the end result. The ability to create your own functions in expressions demonstrates once more how easy it is to customize QGIS and create your own tools. I’m already thinking in more applications for this amazing functionality.

UT 9 - Qta da Peninha - Vegetação potencial

You can download the Python files with the functions HERE. Just unzip both files to the .qgis2/python folder, and restart QGIS, and the functions should become available.

Disclaimer: I’m not an English native speaker, therefore I apologize for any errors, and I will thank any advice on how to improve the text.

Back to Top

Sustaining Members