I’m more then likly way behind the 8 ball here, aren’t all the cool kids doing tiles these days, but regardless I thought it was pretty cool to share. The other day I found TileStache a neat little Python app that can generate, cache, and serve tiles from a list of providers. The normal way is via Mapnik (and others) to render a image, there is also a vector provider which can render vector tiles. Nifty.
A while ago I wrote qgis2img which can generate an image for project, or layers, and export it for you. It serves two roles, one is to benchmark a project and layer render times, the other as a simple export tool. I thought it would be pretty cool to be able to export tiles from it but was I never really up for working on the math and all the logic so I left it. Then I found TileStache.
The best part about TileStache, apart from that it’s Python, is that you can make your own providers for it, and the API is dead easy
class Provider:
    def __init__(self, layer):
        self.layer = layer

    def renderArea(self, width, height, srs, xmin, ymin, xmax, ymax, zoom):
        pass
How easy is that! Just implement one method and you are good to go. So that’s what I did. I created a custom provider that will load a QGIS project and render out images. Thanks to the work done by Martin from Lutra Consulting for the multithreaded rendering in QGIS 2.4 this is a hell of a lot easier then it used to be.
Ignoring some of the setup code to create and load the session the whole export logic is in these few lines
   extents = QgsRectangle(xmin, ymin, xmax, ymax)
   settings.setExtent(extents)
   settings.setOutputSize(QSize(width, height))
   layers = [layer.id() for layer in project.visiblelayers()]
   image, rendertime = qgis2img.render.render_layers(settings, layers, RenderType=QgsMapRendererSequentialJob)
with render_layers defined as
def render_layers(settings, layers, RenderType):
    settings.setLayers(layers)
    job = RenderType(settings)
    job.start()
    job.waitForFinished()
    image = job.renderedImage()
    return image, job.renderingTime()
As this is build on top of my qgis2img tool you can see the full code here
Running it is as simple as installing TileStache, cloneing qgis2img, updating tilestache.cfg, and running the server.
$ pip install TileStache
$ git clone https://github.com/DMS-Aus/qgis2img.git
$ cd qgis2img
In tilestache.cfg you can just change the path to the project to render:
{
  "cache": {
    "name": "Test",
    "path": "/tmp/stache"
    },
  "layers": {
    "qgis":
    {
      "provider": {"class": "qgis2img.tilestache:Provider",
                   "kwargs": {"projectfile": "data/test.qgs"}
                  }
    }
  }
}
Then run the server
$ tilestache-server /path/to/tilestache.cfg
Note: The path to the .cfg file seems to have to be the full path. I had issues with relative paths working.
To view the tiles you can load the preview URL that TileStache provides or you can use it in something like LeafLet
<!DOCTYPE html>
<html>
<head>
    <title>QGIS Tiles WOOT!</title>
    <meta charset="utf-8" />
    <meta name="viewport" content="width=device-width, initial-scale=1.0">
    <link rel="stylesheet" href="http://cdn.leafletjs.com/leaflet-0.7.3/leaflet.css" />
</head>
<body>
    <div id="map" style="position: absolute; top: 0; right: 0; bottom: 0; left: 0;"></div>
    <script src="http://cdn.leafletjs.com/leaflet-0.7.3/leaflet.js"></script>
    <script>

        var map = L.map('map').setView([51.505, -0.09], 5);

        L.tileLayer('http://10.0.0.11:8080/{id}/{z}/{x}/{y}.png', {
            maxZoom: 18,
            id: 'qgis'
        }).addTo(map);

    </script>
</body>
</html>
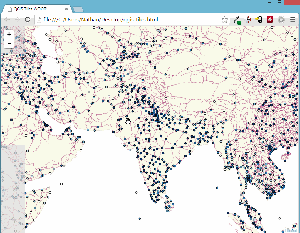
And the result is live tiles from a QGIS project.
Winning!
Some Caveats
-
The provider currently doesn’t use metatiles so labels and points will get chopped at tile edge. I have working code for this but haven’t pushed it yet.
-
I don’t kill the QGIS session that I create. Creating a session for each request was really expensive so I just keep it around.
-
I only load the project once so any changes mean starting and stopping the server. Wouldn’t be hard to add a file watcher for this.
-
It’s just me using this at home for fun, I have no idea on how it would scale, or even if it would, but I would be keen to hear feedback on that theory.
Filed under:
qgis 


