QGIS Planet

A new QGIS plugin allows dynamic filtering of values in forms


This plugin has been partially funded (50%) by ARPA Piemonte.

Description

This is a core-enhancement QGIS plugin that makes the implementation of complex dynamic filters in QGIS attribute forms an easy task. For example, this widget can be used to implement drill-down forms, where the values available in one field depend on the values of other fields.

Download

The plugin is available on the official QGIS Python Plugin Repository and the source code is on GitHub QGIS Form Value Relation plugin repository

Implementation

The new “Form Value Relation” widget is essentially a clone of the core “Value Relation” widget with some important differences: When the widget is created:
  • the whole unfiltered features of the related layer are loaded and cached
  • the form values of all the attributes are added to the context (see below)
  • the filtering against the expression happens every time the widget is refreshed
  • a signal is bound to the form changes and if the changed field is present in the filter expression, the features are filtered against the expression and the widget is refreshed

Using form values in the expression

A new expression function is available (in the “Custom” section):
CurrentFormValue('FIELD_NAME')
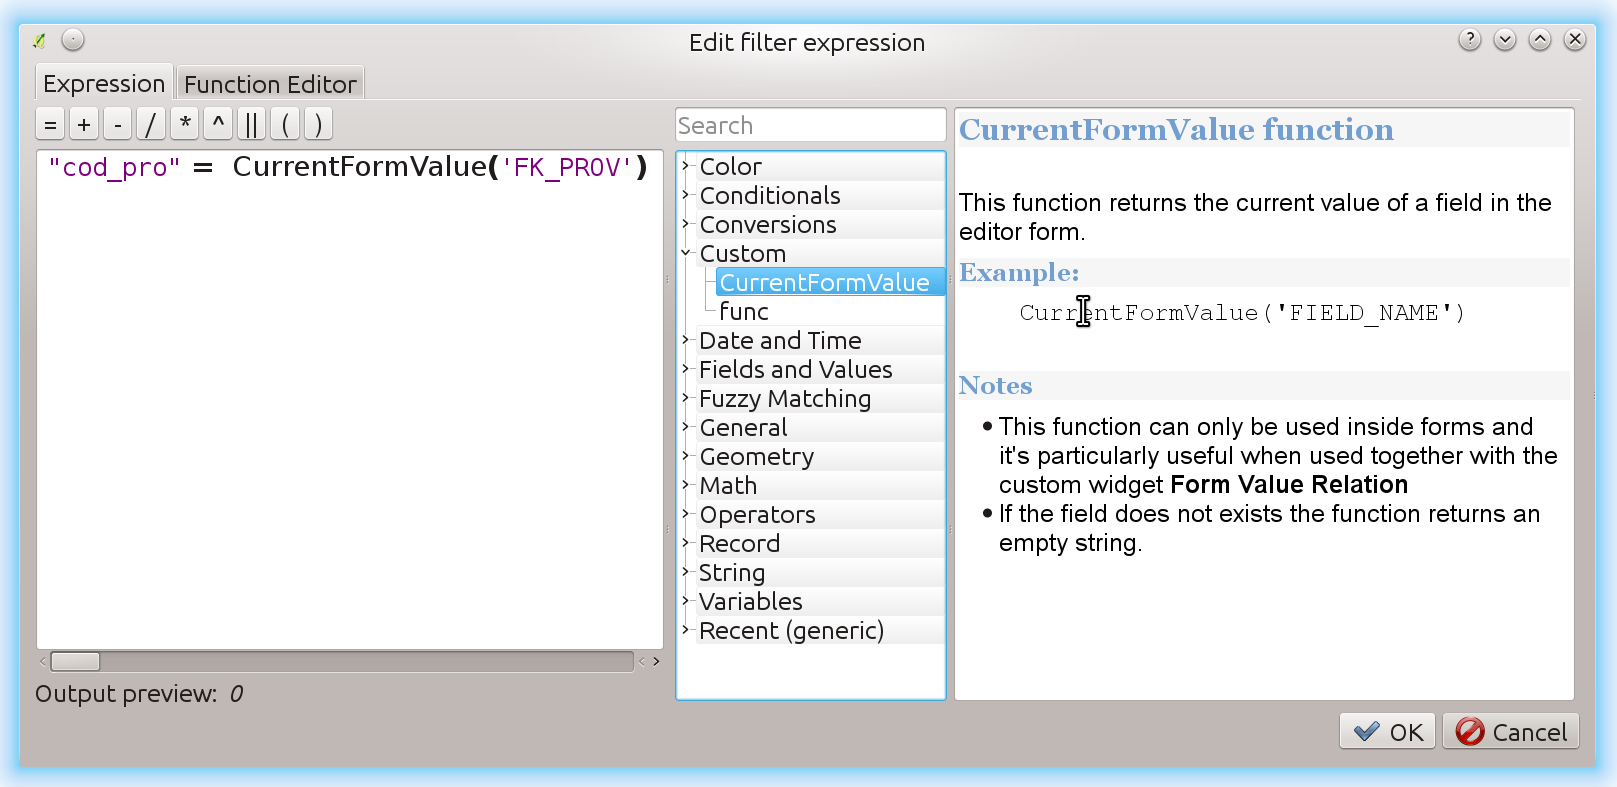
This function returns the current value of a field in the editor form.

Note

  1. This function can only be used inside forms and it’s particularly useful when used together with the custom widget `Form Value Relation`
  2. If the field does not exists the function returns an empty string.

Visual guide

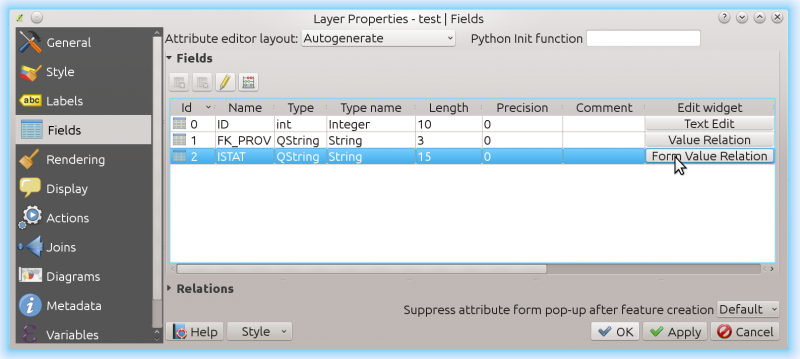
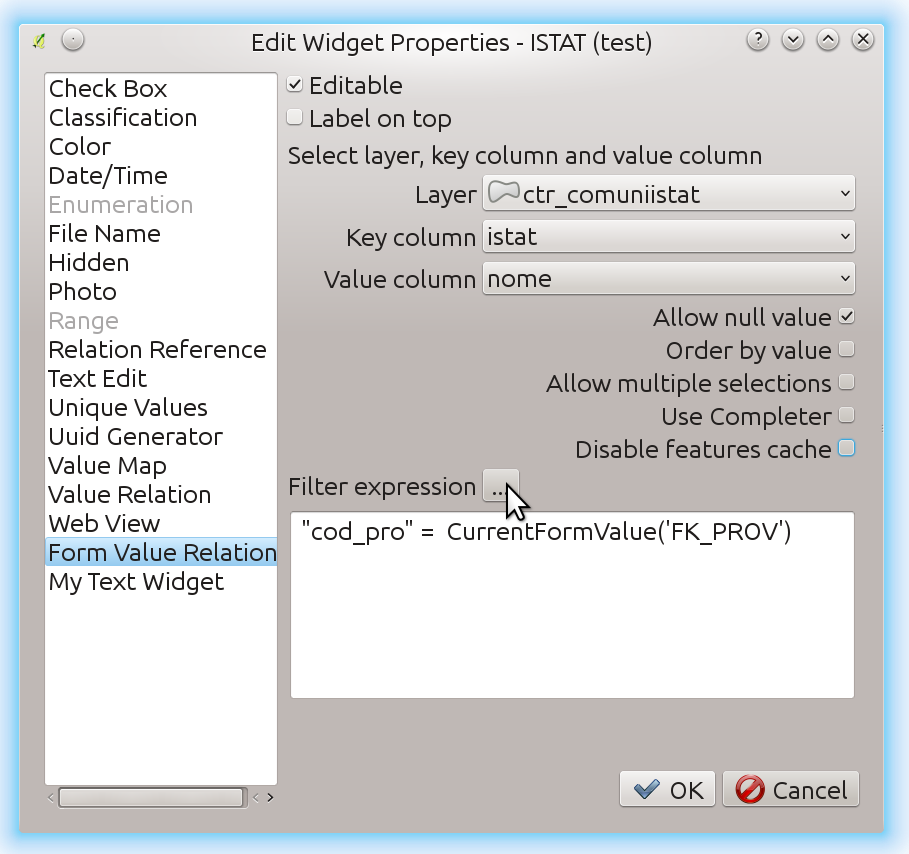
  Download the example project.   This is the new widget in action: changing the field FK_PROV, the ISTAT values are filtered according to the filter expression.
The new widget in action

The new widget drill-down in action

layer_config_fields

Choosing the new widget

Configuring the widget

Configuring the widget

Configuring the expression

Configuring the expression to read FK_PROV value from the form

QGIS developer meeting in Nødebo

During the hackfest I’ve been working on the refactoring of the server component, aimed to wrap the server into a class and create python bindings for the new classes. This work is now in the PR queue and brings a first working python test for the server itself.

The server can now be invoked directly from python, like in the example below:


#!/usr/bin/env python
"""
Super simple QgsServer.
"""

from qgis.server import *
from BaseHTTPServer import *

class handler (BaseHTTPRequestHandler):

    server = QgsServer()

    def _doHeaders(self, response):
        l = response.pop(0)
        while l:
            h = l.split(':')
            self.send_header(h[0], ':'.join(h[1:]))
            self.log_message( "send_header %s - %s" % (h[0], ':'.join(h[1:])))
            l = response.pop(0)
        self.end_headers()

    def do_HEAD(self):
        self.send_response(200)
        response = str(handler.server.handleRequestGetHeaders(self.path[2:])).split('\n')
        self._doHeaders(response)

    def do_GET(self):
        response = str(handler.server.handleRequest(self.path[2:])).split('\n')
        i = 0
        self.send_response(200)
        self._doHeaders(response)
        self.wfile.write(('\n'.join(response[i:])).strip())

    def do_OPTIONS(s):
        handler.do_GET(s)

httpd = HTTPServer( ('', 8000), handler)

while True:
    httpd.handle_request()

The python bindings capture the server output instead of printing it on FCGI stdout and allow to pass the request parameters QUERY_STRING directly to the request handler as a string, this makes writing python tests very easy.

How to read a raster cell with Python QGIS and GDAL

QGIS and GDAL both have Python bindings, you can use both libraries to read a value from a raster cell, since QGIS uses GDAL libraries under the hood, we can expect to read the exact same value with both systems.


Here is a short example about how to do it with the two different approaches, we assume that you are working inside the QGIS python console and the project has a raster file loaded, but with just a few modifications, the example can also be run from a standard python console.

The example raster layer is a DTM with 1000 cells width and 2000 cells height, we want to read the value at the cell with coordinates x = 500 and y = 1000.

# First layer in QGIS project is a DTM 2 bands raster
from osgeo import gdal
# You need this to convert raw values readings from GDAL
import struct

# Read the cell with this raster coordinates
x = 500
y = 1000

# Get the map layer registry
reg = QgsMapLayerRegistry.instance()

# Get the first layer (the DTM raster)
qgis_layer = reg.mapLayers().values()[0]

# Open the raster with GDAL
gdal_layer = gdal.Open(rlayer.source())

"""
Fetches the coefficients for transforming between pixel/line (P,L) raster space, 
and projection coordinates (Xp,Yp) space.
    Xp = padfTransform[0] + P*padfTransform[1] + L*padfTransform[2];
    Yp = padfTransform[3] + P*padfTransform[4] + L*padfTransform[5];
In a north up image, padfTransform[1] is the pixel width, and padfTransform[5] 
is the pixel height. The upper left corner of the upper left pixel is 
at position (padfTransform[0],padfTransform[3]).
"""
gt = gldal_layer.GetGeoTransform()

# o:origin, r:rotation, s:size
xo, xs, xr, yo, yr, ys = gt

# Read band 1 at the middle of the raster ( x = 500, y = 1000)
band = gdal_layer.GetRasterBand(1)
gdal_value = struct.unpack('f', band.ReadRaster(x, y, 1, 1, buf_type=band.DataType))[0]

xcoo = xo + xs * x + xr * y
ycoo = yo + yr * x + ys * y

# Read the value with QGIS, we must pass the map coordinates
# and the exact extent = 1 cell size
qgis_value = qgis_layer.dataProvider().identify(QgsPoint(xcoo, ycoo), \
    QgsRaster.IdentifyFormatValue, \
    theExtent=QgsRectangle( xcoo , ycoo, xcoo + xs, ycoo + ys) )\
    .results()[1]

assert(gdal_value == qgis_value)

QGIS and IPython: the definitive interactive console

Whatever is your level of Python knowledge, when you’ll discover the advantages and super-powers of IPython you will never run the default python console again, really: never!

If you’ve never heard about IPython, discover it on IPython official website, don’t get confused by its notebook, graphics and parallel computing capabilities, it also worth if only used as a substitute for the standard Python shell.

I discovered IPython more than 5 years ago and it literally changed my life: I use it also for debugging instead ofpdb, you can embed an IPython console in your code with:

from IPython import embed; embed()

TAB completion with full introspection

What I like the most in IPython is its TAB completion features, it’s not just like normal text matching while you type but it has full realtime introspection, you only see what you have access to, being it a method of an instance or a class or a property, a module, a submodule or whatever you might think of: it even works when you’re importing something or you are typing a path like in open('/home/.....

Its TAB completion is so powerful that you can even use shell commands from within the IPython interpreter!

Full documentation is just a question mark away

Just type “?” after a method of function to print its docstring or its signature in case of SIP bindings.

Lot of special functions

IPython special functions are available for history, paste, run, include and many more topics, they are prefixed with “%” and self-documented in the shell.

All that sounds great! But what has to do with QGIS?

I personally find the QGIS python console lacks some important features, expecially with the autocompletion (autosuggest). What’s the purpose of having autocompletion when most of the times you just get a traceback because the method the autocompleter proposed you is that of another class? My brain is too small and too old to keep the whole API docs in my mind, autocompletion is useful when it’s intelligent enough to tell between methods and properties of the instance/class on which you’re operating.

Another problem is that the API is very far from being “pythonic” (this isn’t anyone’s fault, it’s just how SIP works), here’s an example (suppose we want the SRID of the first layer):

core.QgsMapLayerRegistry.instance().mapLayers().value()[0].crs().authid()
# TAB completion stops working here^

TAB completion stop working at the first parenthesis :(

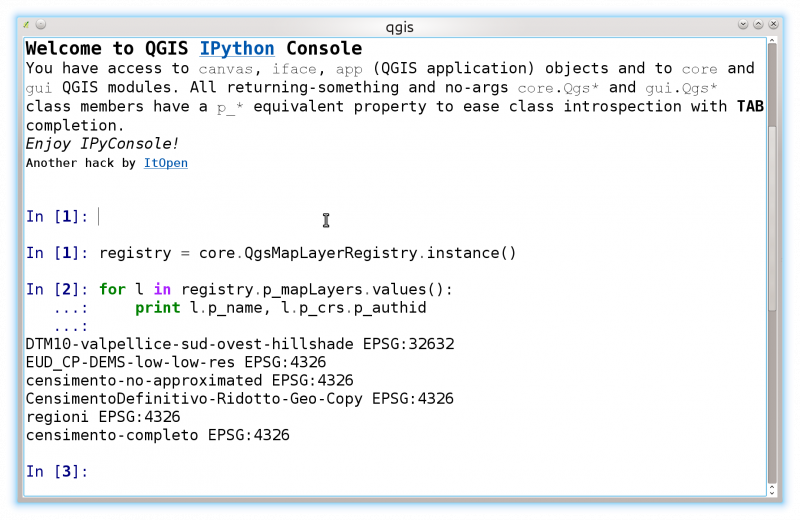
What if all those getter would be properties?

registry = core.QgsMapLayerRegistry.instance()
# With a couple of TABs without having to remember any method or function name!
registry.p_mapLayers.values()
[<qgis._core.QgsRasterLayer at 0x7f07dff8e2b0>,
 <qgis._core.QgsRasterLayer at 0x7f07dff8ef28>,
 <qgis._core.QgsVectorLayer at 0x7f07dff48c30>,
 <qgis._core.QgsVectorLayer at 0x7f07dff8e478>,
 <qgis._core.QgsVectorLayer at 0x7f07dff489d0>,
 <qgis._core.QgsVectorLayer at 0x7f07dff48770>]

layer = registry.p_mapLayers.values()[0]

layer.p_c ---> TAB!
layer.p_cacheImage            layer.p_children       layer.p_connect       
layer.p_capabilitiesString    layer.p_commitChanges  layer.p_crs           
layer.p_changeAttributeValue  layer.p_commitErrors   layer.p_customProperty

layer.p_crs.p_ ---> TAB!
layer.p_crs.p_authid               layer.p_crs.p_postgisSrid      
layer.p_crs.p_axisInverted         layer.p_crs.p_projectionAcronym
layer.p_crs.p_description          layer.p_crs.p_recentProjections
layer.p_crs.p_ellipsoidAcronym     layer.p_crs.p_srsid            
layer.p_crs.p_findMatchingProj     layer.p_crs.p_syncDb           
layer.p_crs.p_geographicCRSAuthId  layer.p_crs.p_toProj4          
layer.p_crs.p_geographicFlag       layer.p_crs.p_toWkt            
layer.p_crs.p_isValid              layer.p_crs.p_validationHint   
layer.p_crs.p_mapUnits    

layer.p_crs.p_authid
Out[]: u'EPSG:4326'

This works with a quick and dirty hack: propertize that adds a p_... property to all methods in a module or in a class that

  1. do return something
  2. do not take any argument (except self)

this leaves the original methods untouched (in case they were overloaded!) still allowing full introspection and TAB completion with a pythonic interface.

A few methods are still not working with propertize, so far singleton methods like instance() are not passing unit tests.

IPyConsole: a QGIS IPython plugin

If you’ve been reading up to this point you probably can’t wait to start using IPython inside your beloved QGIS (if that’s not the case, please keep reading the previous paragraphs carefully until your appetite is grown!).

An experimental plugin that brings the magic of IPython to QGIS is now available:
Download IPyConsole


Please start exploring QGIS objects and classes and give me some feedback!


IPyConsole QGIS plugin

Installation notes

You basically need only a working IPython installation, IPython is available for all major platforms and distributions, please refer to the official documentation.


QGIS server python plugins tutorial

This is the second article about python plugins for QGIS server, see also the introductory article posted a few days ago.

In this post I will introduce the helloServer example plugin that shows some common implementation patterns exploiting the new QGIS Server Python Bindings API.

Server plugins and desktop interfaces

Server plugins can optionally have a desktop interface exactly like all standard QGIS plugins.

A typical use case for a server plugin that also has a desktop interface is to allow the users to configure the server-side of the plugin from QGIS desktop, this is the same principle of configuring WMS/WFS services of QGIS server from the project properties.

The only important difference it that while the WMS/WFS services configuration is stored in the project file itself, the plugins can store and access project data but not to the user’s settings (because the server process normally runs with a different user). For this reason, if you want to share configuration settings between the server and the desktop, provided that you normally run the server with a different user, paths and permissions have to be carefully configured to grant both users access to the shared data.


Server configuration

This is an example configuration for Apache, it covers both FCGI and CGI:

  ServerAdmin webmaster@localhost
  # Add an entry to your /etc/hosts file for xxx localhost e.g.
  # 127.0.0.1 xxx
  ServerName xxx
    # Longer timeout for WPS... default = 40
    FcgidIOTimeout 120 
    FcgidInitialEnv LC_ALL "en_US.UTF-8"
    FcgidInitialEnv PYTHONIOENCODING UTF-8
    FcgidInitialEnv LANG "en_US.UTF-8"
    FcgidInitialEnv QGIS_DEBUG 1
    FcgidInitialEnv QGIS_CUSTOM_CONFIG_PATH "/home/xxx/.qgis2/"
    FcgidInitialEnv QGIS_SERVER_LOG_FILE /tmp/qgis.log
    FcgidInitialEnv QGIS_SERVER_LOG_LEVEL 0
    FcgidInitialEnv QGIS_OPTIONS_PATH "/home/xxx/public_html/cgi-bin/"
    FcgidInitialEnv QGIS_PLUGINPATH "/home/xxx/.qgis2/python/plugins"
    FcgidInitialEnv LD_LIBRARY_PATH "/home/xxx/apps/lib"

    # For simple CGI: ignored by fcgid
    SetEnv QGIS_DEBUG 1
    SetEnv QGIS_CUSTOM_CONFIG_PATH "/home/xxx/.qgis2/"
    SetEnv QGIS_SERVER_LOG_FILE /tmp/qgis.log 
    SetEnv QGIS_SERVER_LOG_LEVEL 0
    SetEnv QGIS_OPTIONS_PATH "/home/xxx/public_html/cgi-bin/"
    SetEnv QGIS_PLUGINPATH "/home/xxx/.qgis2/python/plugins"
    SetEnv LD_LIBRARY_PATH "/home/xxx/apps/lib"

    RewriteEngine On
    
        RewriteCond %{HTTP:Authorization} .
        RewriteRule .* - [E=HTTP_AUTHORIZATION:%{HTTP:Authorization}]
    

  ScriptAlias /cgi-bin/ /home/xxx/apps/bin/
  <Directory "/home/xxx/apps/bin/">
    AllowOverride All
    Options +ExecCGI -MultiViews +FollowSymLinks
    Require all granted  

  ErrorLog ${APACHE_LOG_DIR}/xxx-error.log
  CustomLog ${APACHE_LOG_DIR}/xxx-access.log combined


In this particular example, I’m using a QGIS server built from sources and installed in /home/xxx/apps/bin the libraries are in /home/xxx/apps/lib and LD_LIBRARY_PATH poins to this location.
QGIS_CUSTOM_CONFIG_PATH tells the server where to search for QGIS configuration (for example qgis.db).
QGIS_PLUGINPATH is searched for plugins as start, your server plugins must sit in this directory, while developing you can choose to use the same directory of your QGIS desktop installation.
QGIS_DEBUG set to 1 to enable debug and logging.

Anatomy of a server plugin

For a plugin to be seen as a server plugin, it must provide correct metadata informations and a factory method:

Plugin metadata

A server enabled plugins must advertise itself as a server plugin by adding the line

server=True

in its metadata.txt file.

The serverClassFactory method

A server enabled plugins is basically just a standard QGIS Python plugins that provides a serverClassFactory(serverIface) function in its __init__.py. This function is invoked once when the server starts to generate the plugin instance (it’s called on each request if running in CGI mode: not recommended) and returns a plugin instance:

def serverClassFactory(serverIface):
    from HelloServer import HelloServerServer
    return HelloServerServer(serverIface)

You’ll notice that this is the same pattern we have in “traditional” QGIS plugins.

Server Filters

A server plugin typically consists in one or more callbacks packed into objects called QgsServerFilter.

Each QgsServerFilter implements one or all of the following callbacks:

The following example implements a minimal filter which prints HelloServer! in case the SERVICE parameter equals to “HELLO”.

from qgis.server import *
from qgis.core import *

class HelloFilter(QgsServerFilter):

    def __init__(self, serverIface):
        super(HelloFilter, self).__init__(serverIface)    

    def responseComplete(self):        
        request = self.serverInterface().requestHandler()
        params = request.parameterMap()
        if params.get('SERVICE', '').upper() == 'HELLO':
            request.clearHeaders()
            request.setHeader('Content-type', 'text/plain')
            request.clearBody()
            request.appendBody('HelloServer!')

The filters must be registered into the serverIface as in the following example:

class HelloServerServer:
    def __init__(self, serverIface):
        # Save reference to the QGIS server interface
        self.serverIface = serverIface
        serverIface.registerFilter( HelloFilter, 100 )          

The second parameter of registerFilter allows to set a priority which defines the order for the callbacks with the same name (the lower priority is invoked first).

Full control over the flow

By using the three callbacks, plugins can manipulate the input and/or the output of the server in many different ways. In every moment, the plugin instance has access to the QgsRequestHandler through the QgsServerInterface, the QgsRequestHandler has plenty of methods that can be used to alter the input parameters before entering the core processing of the server (by using requestReady) or after the request has been processed by the core services (by using sendResponse).

The following examples cover some common use cases:

Modifying the input

The example plugin contains a test example that changes input parameters coming from the query string, in this example a new parameter is injected into the (already parsed) parameterMap, this parameter is then visible by core services (WMS etc.), at the end of core services processing we check that the parameter is still there.

from qgis.server import *
from qgis.core import *

class ParamsFilter(QgsServerFilter):

    def __init__(self, serverIface):
        super(ParamsFilter, self).__init__(serverIface)

    def requestReady(self):
        request = self.serverInterface().requestHandler()
        params = request.parameterMap( )
        request.setParameter('TEST_NEW_PARAM', 'ParamsFilter')

    def responseComplete(self):
        request = self.serverInterface().requestHandler()
        params = request.parameterMap( )
        if params.get('TEST_NEW_PARAM') == 'ParamsFilter':
            QgsMessageLog.logMessage("SUCCESS - ParamsFilter.responseComplete", 'plugin', QgsMessageLog.INFO)
        else:
            QgsMessageLog.logMessage("FAIL    - ParamsFilter.responseComplete", 'plugin', QgsMessageLog.CRITICAL)

This is an extract of what you see in the log file:

src/core/qgsmessagelog.cpp: 45: (logMessage) [0ms] 2014-12-12T12:39:29 plugin[0] HelloServerServer - loading filter ParamsFilter
src/core/qgsmessagelog.cpp: 45: (logMessage) [1ms] 2014-12-12T12:39:29 Server[0] Server plugin HelloServer loaded!
src/core/qgsmessagelog.cpp: 45: (logMessage) [0ms] 2014-12-12T12:39:29 Server[0] Server python plugins loaded
src/mapserver/qgsgetrequesthandler.cpp: 35: (parseInput) [0ms] query string is: SERVICE=HELLO&request=GetOutput
src/mapserver/qgshttprequesthandler.cpp: 547: (requestStringToParameterMap) [1ms] inserting pair SERVICE // HELLO into the parameter map
src/mapserver/qgshttprequesthandler.cpp: 547: (requestStringToParameterMap) [0ms] inserting pair REQUEST // GetOutput into the parameter map
src/mapserver/qgsserverfilter.cpp: 42: (requestReady) [0ms] QgsServerFilter plugin default requestReady called
src/core/qgsmessagelog.cpp: 45: (logMessage) [0ms] 2014-12-12T12:39:29 plugin[0] HelloFilter.requestReady
src/mapserver/qgis_map_serv.cpp: 235: (configPath) [0ms] Using default configuration file path: /home/xxx/apps/bin/admin.sld
src/mapserver/qgshttprequesthandler.cpp: 49: (setHttpResponse) [0ms] Checking byte array is ok to set...
src/mapserver/qgshttprequesthandler.cpp: 59: (setHttpResponse) [0ms] Byte array looks good, setting response...
src/core/qgsmessagelog.cpp: 45: (logMessage) [0ms] 2014-12-12T12:39:29 plugin[0] HelloFilter.responseComplete
src/core/qgsmessagelog.cpp: 45: (logMessage) [0ms] 2014-12-12T12:39:29 plugin[0] SUCCESS - ParamsFilter.responseComplete
src/core/qgsmessagelog.cpp: 45: (logMessage) [0ms] 2014-12-12T12:39:29 plugin[0] RemoteConsoleFilter.responseComplete
src/mapserver/qgshttprequesthandler.cpp: 158: (sendResponse) [0ms] Sending HTTP response
src/core/qgsmessagelog.cpp: 45: (logMessage) [0ms] 2014-12-12T12:39:29 plugin[0] HelloFilter.sendResponse

On line 13 the “SUCCESS” string indicates that the plugin passed the test.

The same technique can be exploited to use a custom service instead of a core one: you could for example skip a WFS SERVICE request or any other core request just by changing the SERVICE parameter to something different and the core service will be skipped, then you can inject your custom results into the output and send them to the client (this is explained here below).

Changing or replacing the output

The watermark filter example shows how to replace the WMS output with a new image obtained by adding a watermark image on the top of the WMS image generated by the WMS core service:

import os

from qgis.server import *
from qgis.core import *
from PyQt4.QtCore import *
from PyQt4.QtGui import *


class WatermarkFilter(QgsServerFilter):

    def __init__(self, serverIface):
        super(WatermarkFilter, self).__init__(serverIface)

    def responseComplete(self):
        request = self.serverInterface().requestHandler()
        params = request.parameterMap( )
        # Do some checks
        if (request.parameter('SERVICE').upper() == 'WMS' \
                and request.parameter('REQUEST').upper() == 'GETMAP' \
                and not request.exceptionRaised() ):
            QgsMessageLog.logMessage("WatermarkFilter.responseComplete: image ready %s" % request.infoFormat(), 'plugin', QgsMessageLog.INFO)
            # Get the image
            img = QImage()
            img.loadFromData(request.body())
            # Adds the watermark
            watermark = QImage(os.path.join(os.path.dirname(__file__), 'media/watermark.png'))
            p = QPainter(img)
            p.drawImage(QRect( 20, 20, 40, 40), watermark)
            p.end()
            ba = QByteArray()
            buffer = QBuffer(ba)
            buffer.open(QIODevice.WriteOnly)
            img.save(buffer, "PNG")
            # Set the body
            request.clearBody()
            request.appendBody(ba)

In this example the SERVICE parameter value is checked and if the incoming request is a WMS GETMAP and no exceptions have been set by a previously executed plugin or by the core service (WMS in this case), the WMS generated image is retrieved from the output buffer and the watermark image is added. The final step is to clear the output buffer and replace it with the newly generated image. Please note that in a real-world situation we should also check for the requested image type instead of returning PNG in any case.

The power of python

The examples above are just meant to explain how to interact with QGIS server python bindings but server plugins have full access to all QGIS python bindings and to thousands of python libraries, what you can do with python server plugins is just limited by your imagination!


See all QGIS Server related posts

Python SIP C++ bindings tutorial

Since QGIS uses QT libraries, SIP is the natural choice for creating the bindings.

Here are some random notes about this journey into SIP and Python bindings, I hope you’ll find them useful!
We will create a sample C++ library, a simple C++ program to test it and finally, the SIP configuration file and the python module plus a short program to test it.

Create the example library

FIrst we need a C++ library, following  the tutorial on the official SIP website  I created a simple library named hellosip:


$ mkdir hellosip
$ cd hellosip
$ touch hellosip.h hellosip.cpp Makefile.lib

This is the content of the header file hellosip.h:

#include <string>

using namespace std;

class HelloSip {
    const string the_word;
public:
    // ctor
    HelloSip(const string w);
    string reverse() const;
};

This is the implementation in file hellosip.cpp , the library just reverse a string, nothing really useful.

#include "hellosip.h"
#include <string>

HelloSip::HelloSip(const string w): the_word(w)
{
}

string HelloSip::reverse() const
{
    string tmp;
    for (string::const_reverse_iterator rit=the_word.rbegin(); rit!=the_word.rend(); ++rit)
        tmp += *rit;
    return tmp;
}


Compiling and linking the shared library

Now, its time to compile the library, g++ must be invoked with -fPIC option in order to generate Position Independent Code, -g tells the compiler to generate debug symbols and it is not strictly necessary if you don’t need to debug the library:

g++ -c -g -fPIC hellosip.cpp -o hellosip.o

The linker needs a few options to create a dynamically linked Shared Object (.so) library, first -shared which tells gcc to create a shared library, then the -soname which is the library version name, last -export_dynamic that is also not strictly necessary but can be useful for debugging in case the library is dynamically opened (with dlopen) :

g++ -shared -Wl,-soname,libhellosip.so.1  -g -export-dynamic -o libhellosip.so.1  hellosip.o

At the end of this process, we should have a brand new libhellosip.so.1 sitting in the current directory.

For more informations on shared libraries under linux you can read TLDP chapter on this topic.


Using the library with C++

Before starting the binding creation with SIP, we want to test the new library with a simple C++ program stored in a new cpp file: hellosiptest.cpp:

#include "hellosip.h"
#include <string>
using namespace std;
// Prints True if the string is correctly reversed
int main(int argc, char* argv[]) {
  HelloSip hs("ciao");
  cout << ("oaic" == hs.reverse() ? "True" : "False") << endl;
  return 0;
}

To compile the program we use the simple command:

g++ hellosiptest.cpp -g -L.  -lhellosip -o hellosiptest

which fails with the following error:

/usr/bin/ld: cannot find -lhellosip
collect2: error: ld returned 1 exit status

For this tutorial, we are skipping the installation part, that would have created proper links from the base soname, we are doing it now with:

ln -s libhellosip.so.1 libhellosip.so

The compiler should now be happy and produce an hellosiptest executable, that can be tested with:

$ ./hellosiptest
True

If we launch the program we might see a new error:

./hellosiptest: error while loading shared libraries: libhellosip.so.1: cannot open shared object file: No such file or directory

This is due to the fact that we have not installed our test library system-wide and the operating system is not able to locate and dynamically load the library, we can fix it in the current shell by adding the current path to the LD_LIBRARY_PATH environment variable which tells the operating system which directories have to be searched for shared libraries. The following commands will do just that:

export LD_LIBRARY_PATH=`pwd`

Note that this environment variable setting is “temporary” and will be lost when you exit the current shell.


SIP bindings

Now that we know that the library works we can start with the bindings, SIP needs an interface header file with the instructions to create the bindings, its syntax resembles that of a standard C header file with the addition of a few directives, it contains (among other bits) the name of the module and the classes and methods to export.

The SIP header file hellosip.sip contains two blocks of instructions: the class definition that ends around line 15 and an additional %MappedType block that specifies how the std::string type can be translated from/to Python objects, this block is not normally necessary until you stick standard C types. You will notice that the class definition part is quite similar to the C++ header file hellosip.h:

// Define the SIP wrapper to the hellosip library.

%Module hellosip

class HelloSip {

%TypeHeaderCode
#include <hellosip.h>
%End

public:
    HelloSip(const std::string w);
    std::string reverse() const;
};

// Creates the mapping for std::string
// From: http://www.riverbankcomputing.com/pipermail/pyqt/2009-July/023533.html

%MappedType std::string
{
%TypeHeaderCode
#include 
%End

%ConvertFromTypeCode
    // convert an std::string to a Python (unicode) string
    PyObject* newstring;
    newstring = PyUnicode_DecodeUTF8(sipCpp->c_str(), sipCpp->length(), NULL);
    if(newstring == NULL) {
        PyErr_Clear();
        newstring = PyString_FromString(sipCpp->c_str());
    }
    return newstring;
%End

%ConvertToTypeCode
    // Allow a Python string (or a unicode string) whenever a string is
    // expected.
    // If argument is a Unicode string, just decode it to UTF-8
    // If argument is a Python string, assume it's UTF-8
    if (sipIsErr == NULL)
        return (PyString_Check(sipPy) || PyUnicode_Check(sipPy));
    if (sipPy == Py_None) {
        *sipCppPtr = new std::string;
        return 1;
    }
    if (PyUnicode_Check(sipPy)) {
        PyObject* s = PyUnicode_AsEncodedString(sipPy, "UTF-8", "");
        *sipCppPtr = new std::string(PyString_AS_STRING(s));
        Py_DECREF(s);
        return 1;
    }
    if (PyString_Check(sipPy)) {
        *sipCppPtr = new std::string(PyString_AS_STRING(sipPy));
        return 1;
    }
    return 0;
%End
};

At this point we could have run the sip command by hand but the documentation suggests to use the python module sipconfig that, given a few of configuration variables, automatically creates the Makefile for us, the file is by convention named configure.py:

import os
import sipconfig

basename = "hellosip"

# The name of the SIP build file generated by SIP and used by the build
# system.
build_file = basename + ".sbf"

# Get the SIP configuration information.
config = sipconfig.Configuration()

# Run SIP to generate the code.
os.system(" ".join([config.sip_bin, "-c", ".", "-b", build_file, basename + ".sip"]))

# Create the Makefile.
makefile = sipconfig.SIPModuleMakefile(config, build_file)

# Add the library we are wrapping.  The name doesn't include any platform
# specific prefixes or extensions (e.g. the "lib" prefix on UNIX, or the
# ".dll" extension on Windows).
makefile.extra_libs = [basename]

# Search libraries in current directory
makefile.extra_lflags= ['-L.']

# Generate the Makefile itself.
makefile.generate()

We now have a Makefile ready to build the bindings, just run make to build the library. If everything goes right you will find a new hellosip.so library which is the python module. To test it, we can use the following simple program (always make sure that LD_LIBRARY_PATH contains the directory where libhellosip.so is found).

import hellosip
print hellosip.HelloSip('ciao').reverse() == 'oaic'

Download

The full source code of this tutorial can be downloaded from this link.

  • Page 1 of 1 ( 6 posts )
  • ItOpen
  • python

Back to Top

Sustaining Members